Fleetrun
Hecterra
NimBus
Other apps
Wialon for Android/iOS
Logistics
Wialon Local
Wialon Hosting
WiaTag
Configurator
LeaseControl
en
Contents
Command Does Not Work
  • technical_consulting
  • commands
  • sms

Wialon not only receives data from trackers, but can also send commands to them. In this article, you will find conditions for executing commands, the description of peculiar properties of different channels for sending commands, as well as possible issues and their solutions.

Conditions for executing commands

To execute commands, you should consider several conditions at once related to the service, account, user, and unit. Let's look at these conditions one by one.

  1. The Commands service is enabled in the account.


  2. The user has the Send commands special right regarding the unit.


  3. The command is created in the same-name Commands tab in the unit properties.


    To create commands, the user must have the Create, edit, and delete commands special right regarding the unit.

  4. There are several additional conditions for executing commands over the SMS channel:
    • The SMS messages service is enabled in the account.

    • SMS must be available in the service, i.e., the counter on the top panel must be greater than zero.

      This counter is not displayed if the service uses a personal modem for sending SMS.

    • In the General tab in the unit properties, you must specify the Phone number in international format, to which the tracker will receive SMS.

Peculiarities of channels for sending commands

The channel (connection type) for sending the command is selected in its properties. Depending on the selected channel, you should consider the unit with the server connection state when executing the command.

The unit keeps an Internet connection with the server if messages with data or keep alive/heart beat packets come from it. To check the current connection status, you can use the Connection state column on the Monitoring panel.

Channel

Peculiarities

GPRS (TCP/UDP)

The unit must keep an Internet connection with the server.

Virtual

This channel is similar to TCP/UDP judging by the principle of sending, but the virtual command can be executed even when the unit is not connected to the server. At the moment of execution, the command is queued, and its actual sending will be done at the moment the unit goes online.

For each type of device, Wialon imposes a limit on the number of virtual commands in the queue, and when the queue is full, a new virtual command will push the oldest command out of the queue (it will not be sent).
SMSThe unit may not keep an Internet connection with the server.
AutoWhen sending, the program will choose the channel that is currently available. If more than one type is available, the channel that is higher in this table will be used.
If the communication channel selected for commands is currently available, the button for command execution opposite the unit on the Monitoring panel will become active.

Checking the command sending on the Wialon side

The fact of command execution is recorded in the unit Log. This information is also available for viewing:

  • in the Messages tab when requesting Sent commands;
  • in the Messages tab when requesting SMS messages;
  • in the report with the Sent commands table.

An entry about command execution in the log means that the command was executed on the Wialon side. Then it is sent over a TCP/UDP channel or transferred to the modem/SMPP gateway for sending.

If the command was not executed when pressing the corresponding button, you should check the compliance with the above-mentioned requirements. If all the requirements were met and the unit did not lose connection at the moment of command execution, you can send a detailed description of the problem (username, unit, command name and execution time) to support@wialon.com for analysis by Wialon technical support specialists.

Possible issues and their solutions

If according to the Wialon log the command is executed, but there is no response from the tracker, the issue is most likely related to the operation of third-party systems. It’s possible that the tracker did not receive the command, the tracker did not perform the programmed actions on the command, or it did not send a response/file to the command to Wialon. The most common issues of this kind and possible actions to solve them are listed below.

IssuePossible causesOptions for action
SMS command is not delivered to the unit

Problems with the delivery of SMS messages and TCP/UDP commands are usually associated with problems at the level of telecom operator/Internet provider networks. Together with your provider, you should check the message delivery route, troubleshoot the network, or search for other delivery routes.

If you use the 500 SMS package, write to Wialon technical support at support@wialon.com.
If you use your own SMPP gateway or modem, please contact your SMPP provider or GSM operator to analyze the situation.

The command is delivered but with incorrect text

Typically, this problem is related to the telecom operator encoding and is relevant mainly for SMS messages. Wialon uses the standard A5 (CCITT T.50)/ASCII (ANSI X3.4) encoding. The recipient's operator may use a different protocol and, as a result, decode the message incorrectly.

The user should contact the recipient's operator to correct the situation.

An alternative is to use your own SMPP gateway with the required encoding.
The command is delivered with the correct text, but the tracker did not execute/rejected the command

An incorrect command format is specified in SMS. You should double-check the syntax according to the device manual or contact the hardware manufacturer.

If standard Wialon commands are used (except Custom message), make sure that the correct parameters are specified in the command (for example, the number of the tracker input for activation). You can also contact Wialon technical support at support@wialon.com, providing the detailed problem description.

An SMS command is received from a sender's number that is not added to the allowed list.

Add the allowed number in the tracker settings.

The command is received from an IP not allowed to the tracker.

Add the allowed IP in the tracker settings. IP in Wialon Hosting depends on the service data center, and you can see it in the General tab in the properties of any unit.

The Password for executing commands is not entered in the unit settings (or it does not match the password in the tracker).

Double-check the password for executing commands. It is recommended to use the Latin alphabet for the password, because the tracker may decode other languages incorrectly.

The tracker is defective.

A hardware or software failure at the tracker level should be analyzed with the engineer maintaining this tracker.

The command is delivered, executed by the tracker, but the Wialon system receives no response

For some types of devices, there is an additional hardware protocol setting, where you should activate the corresponding flag or configure settings for receiving and displaying messages from the tracker.

When configuring the device, find and activate the corresponding option in the General tab. The configuration button is located to the right of the device type entry field and is active if the device itself provides the configuration option.

The command came from a virtual number that cannot act as an SMS recipient.

Wialon Hosting uses a virtual number 79037676122. You can contact Wialon technical support at support@wialon.com and clarify whether it’s possible to switch your service to another available sender phone number in order to receive SMS responses from trackers to this number.
If, due to the peculiarities of SMS delivery routes to a certain country, you cannot set a different sender’s number for sending SMS, the most convenient solution would be to connect your own SMPP gateway for your Hosting service with the ability to receive SMS from trackers. To connect your SMPP gateway to the Hosting service, contact your manager (or Wialon technical support for technical advice).


Sergey Novikov,Customer Service Engineer

Telegram notifications
  • technical_consulting
  • notifications_to_telegram

The ability to send information to different channels is a big advantage. Standard options have their inconveniences: an email can get lost in spam, and an SMS is not free of charge and does not always reach the recipient. In such conditions, the Telegram messenger can become a convenient alternative.

Telegram is a third-party service for Wialon. You can freely find guidance for the necessary settings on the internet. However, to simplify the work of our partners, in one article, we have collected the key steps that will be required to send notifications to Telegram from Wialon for public and private groups or channels, individual and bulk messages.

Part of the information (tokens and IDs) in the instructions are hidden, since this is private data. It does not affect the understanding of the guidance.

Preliminary requirements

Create a bot following the instructions. Hereinafter we will assume that the Telegram app is installed on your computer or phone. You can configure it in both versions, but we recommend doing it on a computer as it is easier since you will have to copy the information to the notification settings in Wialon.

Categories of notifications

Notifications can be roughly divided into two categories:

  • individual — notifications for one dedicated user (for example, a client with one personal car);
  • bulk — sending messages for several users at once (for example, one group, team, department, or company).

There is only one setting for Telegram notifications in Wialon — you need to set the Bot token and Channel ID:

Usually questions arise with the Channel ID. The way you fill in this field determines whether the notifications will be individual or bulk.

Individual notifications

On a computer or on the phone with Telegram installed, open this link: https://telegram.me/userinfobot

Send a command to start. In response, you get your own ID:

Then, use this own ID in the notification settings:

When such a notification is triggered, the message will be sent to the chatbot and only you will see it:

What is even more remarkable about this method is the ability to use one token for different user IDs. Thus, we use one bot for many individual notifications but each client receives only their own notification.

To find out the ID of another user, simply forward this user's message to them (for example, if you already have a chat with them, you may forward this message from there):

Bulk notifications

Public channel

Setting up the bulk sending to several users at once seems easier. It is enough to create a public Telegram channel, add a bot there, and allow it to manage notifications.

Put the channel ID in the Channel ID field for configuring notifications in Wialon:

Take only the “pach_test” part (without the symbols “t.me/”), put the “@” prefix, and add it to the notification in Wialon like this:

Then, add all the relevant contacts to this channel (all of them will receive notifications on a centralized basis). Wait for the triggered processing with the result similar to the one below:

Private channel

First, create a public channel and add a bot there with the administrator role. Send a request on behalf of the bot to this channel by pasting the following link into the address bar of the browser and pressing Enter:

https://api.telegram.org/bot/sendMessage?chat_id=@yourchannelname&text=ping

Then replace the existing token with the token of your bot:

Enter your Channel ID:

Paste the following link into the address bar of the browser and press Enter:

https://api.telegram.org/bot775ххххххх:AAH5Kp_cххххххххххххххххх/sendMessage?chat_id=@gurtamstudy&text=ping

In response you will get:

{"ok":true,"result":{"message_id":17,"chat":{"id":-1001xxxxxxxxx,"title":"Study","username":"gurtamstudy","type":"channel"},"date":1593066856,"text":"ping"}}

Delete the message and make the channel private. Use the value "id": -1001xxxxxxxxx instead of @yourchannelname in the notification settings.

Private group

Sending notifications to a group can be useful as it gives an opportunity to its members to discuss the messages straight away. The setup process is similar to the settings for notifications to a private channel.

Create a public group and add a bot there (with or without administrator rights). Send a request on behalf of the bot to this group by pasting the following link into the address bar of the browser and pressing Enter:

https://api.telegram.org/bot/sendMessage?chat_id=@yourgroupname&text=ping

Replace the token with the token of your bot:


Enter the ID of your group:

Paste the following link into the address bar of the browser and press Enter:

https://api.telegram.org/bot775ххххххх:AAH5Kp_cххххххххххххххххх/sendMessage?chat_id=@gurtam_study&text=ping

In response you will get:

{"ok":true,"result":{"message_id":2,"from":{"id":775ххххххх,"is_bot":true,"first_name":"pach_test","username":"pach_bot"},"chat":{"id":-1001xxxxxxxxx,"title":"Study group","username":"gurtam_study","type":"supergroup"},"date":1593070025,"text":"ping"}}

Delete the message and make the group private. Use the value "id": -1001xxxxxxxxx instead of @yourgroupname in the notification settings.

Pavel Chebotarev,Customer Service Engineer

Tachographs and Wialon
  • technical_consulting

A tachograph is a device that monitors compliance with the drivers' working hours (DWH), as well as the speed of the vehicle, the distance it has traveled and the country of location. The use of such a device allows minimizing the risk of accidents due to driver fatigue and optimizing the fleet operation. The need to install a tachograph is determined by law.

This article will cover general issues related to tachography, as well as the options for calculating and displaying DWH that are implemented in Wialon.

Legal aspect

Generally speaking, the tachograph is a mandatory device for vehicles engaged in cargo-and-passenger transportation. However, different countries have different rules about the need to install tachographs and the DWH control.

Wialon only supports the European Agreement Concerning the Work of Crews of Vehicles Engaged in International Road Transportation, or AETR for short (from the French Accord Européen sur les Transports Routiers). This is a single agreement on the work of vehicle crews on the territory of European countries.

 Rules of other countries

The rules listed below are not supported in Wialon, but it may be useful to know about them:

  • In the United States, the function of tachographs is performed by electronic logging devices (ELD), and the rules that determine the work-rest schedule of drivers are called Hours of Service (HOS). For HOS accounting, the Apollo ELD solution was created on the Wialon basis. You can find it on the following website: eld.wialon.com
  • In Australia, the tachograph law is called the Heavy Vehicle National Law and Regulations (NHVL).
  • In the Russian Federation, the rules of use of tachographs are determined by orders of the Ministry of Transport of the Russian Federation (in particular, Order No. 36 of February 13, 2013, Moscow).

Each tachograph is configured to control the rules of a specific country/region. The readings of a digital tachograph are legally recognized data in court proceedings or traffic control on the roads, and a document issued by a digital tachograph is the basis for imposing penalties by law enforcement agencies, because this document is generated automatically, protected from falsification and recognized as being objective.

The tachograph information displayed in Wialon has no legal force, despite the fact that it may be based on data received from the tachograph.

Operation modes

Instead of text notation, tachographs use standard symbols (pictograms) so that anyone, even without knowing the language, can understand the tachograph readings. The basic pictograms indicate the modes, i.e., the different driver activity:

PictogramNameAlternative namesDescription

Driving

Steering wheel

Used to register the duration of the actual vehicle driving.

Turns on automatically when the driver card is inserted into the first slot, the engine is on, and the vehicle speed is not zero.

Work

Other work,
hammers

Used to register work that is not driving (paperwork, loading and unloading, etc.).

Turns on manually or automatically when the driver card is inserted into the first slot, the engine is on, and the vehicle speed is zero.

Rest

Break,
bed,
chair

Used to register rest time.

Turns on manually or automatically when the ignition is off.

Availability

Valid interruption,
square

Used if there is a second driver in the vehicle crew.

Turns on automatically when a driver card is inserted in the second slot, and for the first driver the Driving or Work mode is displayed.

The use of the modes may differ from the above description (for example, depending on the requirements for loading or the recommendations of the transport company). And the logic of automatic/manual mode switching may depend on the tachograph model.

Other pictograms are not used in Wialon, so they are not mentioned in this article. However, the driver must know them in order to properly interact with the device.

Examples of DWH rules

To get an idea of what criteria the tachograph uses when controlling DWH, you can look at some AETR rules:

  • You can drive a maximum of 4.5 hours without stopping for a break. After that, a break of 45 minutes should be taken.

     Examples

    Example 1. The driver drove for 4.5 hours and then took a break for 45 minutes. In this case, there are no violations.

    Example 2. The driver drove for 4.5 hours and then took a break for 30 minutes. This is a violation, as the duration of the break is not enough.

  • If within 4.5 hours of driving you take a break of more than 15 minutes but less than 45 minutes, then at the end of the 4.5-hour driving period, you can take a break of such duration that in total with the previous break will be equal to 45 minutes. If the break lasts less than 15 minutes, it will not be counted.

     Examples

    Example 1. The driver drove for 2 hours, took a break for 20 minutes, then drove for another 2.5 hours and took a break for 25 minutes. In this case, there are no violations, since in total there were 45 minutes of rest for the 4.5-hour driving period.

    Example 2. The driver drove for 2 hours, took a break for 10 minutes, then drove for another 2.5 hours and took a break for 35 minutes. This is a violation, since the first break lasted less than 15 minutes, and therefore was not counted. As a result, for the 4.5-hour driving period, there were no 45 minutes of rest.

  • The maximum driving time within one working week is 56 hours, and within two consecutive weeks — 90 hours.

     Examples

    Example 1. The driving time in the first week was 50 hours, in the second — 40 hours, and in the third — again 50 hours. In this case, there are no violations, since in each individual week the limit of 56 hours was not exceeded, and in total for each two consecutive weeks the limit of 90 hours was met.

    Example 2. The driving time in the first week was 50 hours, in the second — 50 hours, and in the third — 40 hours. In this case, there is a violation: despite the fact that in each individual week the limit of 56 hours was not exceeded, in total, the limit of 90 hours for the first and second weeks was exceeded.

DWH control uses a lot of such rules with confusing conditions, and almost all of them focus on the duration of continuous driving, periodic breaks and daily/weekly rest, or their combinations. The tachograph automatically controls the rules, however, the driver must know them in order to correctly plan their route and not violate DWH.

The structure of tachographs

Usually, tachographs are divided into analog and digital.

Analog tachographs are of round shape and installed in the speedometer socket. There is a paper disk inside, on which information is recorded. Today, analog tachographs are considered obsolete.

Digital tachographs are of rectangular shape and installed in the socket of the car radio (head unit). The technical implementation of a digital tachograph is an encrypted system of permanent energy-independent data storage with limited access to data and a thermal printer for reporting. Further, in the article, we will talk only about this type of tachographs.

The main practical difference between analog and digital tachographs is the degree of data protection from hacking. This necessity arises because some drivers try to manipulate tachograph data to complete routes faster while neglecting rest and safety, or to artificially increase their mileage and steal fuel. Any mechanical interference or incorrect data entry will be registered in the digital tachograph's memory, which will be discovered during the official check. Identified manipulations with the tachograph entail a fine, which will depend on the seriousness of the violation and on the country where it’s discovered.

Access to the tachograph memory is provided by 4 types of plastic key cards:

  1. Driver card — allows the driver to save data on operating modes for 28 days.
  2. Company card — allows the transport company to read the trip data of its vehicles.
  3. Workshop card — allows technical specialists to set up the tachograph.
  4. Control card — allows law enforcement agencies to read driver violations and hardware failures.

The data in the tachograph memory is stored in files that may have different formats (extensions) depending on the tachograph model.

Wialon can display only data from the driver card. It’s possible to work with the DDD format and other formats with similar structure (for example, TGD, V1B, C1B).

DWH control in Wialon

The previous paragraphs are a kind of introduction to the tachography and DWH control. Now, let's move on to the direct work within Wialon.

Tachographs are not connected to Wialon directly — they always work via the tracker. Note that some models of trackers have a built-in tachograph, i.e., one body contains two devices at once.

Since the tachograph-tracker-Wialon combination is involved in obtaining information, it is not always possible to solve potential issues on the Wialon side.

In Wialon, not only the tachograph can be the source of information on DWH. The following diagram will help you understand presented in the system sources and options for displaying DWH information.

Sources of DWH information

The information on DWH displayed in Wialon can be obtained from several sources.

Driver card file

Files with different data are stored in the tachograph memory. The information on DWH of a particular driver is stored on their card. There are different ways to upload a file from a driver card to Wialon, depending on the tracker model:

  • Using commands — in the FAQ section, you can find instructions on how to do this. Such a method is available for trackers that are displayed in the list of supported devices by the Tachograph file download filter.
  • Using third-party software, for example, by connecting the tracker to a computer. Next, you should upload the file to Wialon via the TachoManager web application, and when uploading, select to which driver it belongs.

As a result of each of the actions described above, Wialon will have a file from the driver card, which will be associated with the Driver element.

A file from the driver card is the only reliable source for displaying tachograph information in Wialon. The controller sees data from the same source when checking the tachograph readings on the road.

Assignments and trips

The tachograph determines the work mode by the speed of the vehicle, the ignition status and the presence of a card in the slot. Wialon contains this data without the tachograph as well: trips detector that can be calculated based on the ignition sensor and speed, and assigning/separating drivers. Therefore, driver activity can be determined by messages from the tracker, even if the tachograph is not installed on the unit.

Assignments and trips can only be used as a rough estimate of the DWH compliance. Unlike the tachograph, which determines the current work mode in real time, drivers' assignments/separations and trips in Wialon are determined by messages from the tracker recorded at a certain frequency, which is less than that of the tachograph.

Online data

The procedure of uploading files from the driver card to Wialon takes time, which is not always convenient. However, users may need real-time DWH information. To satisfy this demand, Wialon created an algorithm, the data source for which is selected on the Advanced tab:

  • Parameters from tachograph, which the tracker determines according to the current tachograph mode. At the moment of this writing, such a capability is only implemented in trackers manufactured by Sensata INSIGHTS (ex-BCE), RuptelaTeltonika, and Navtelecom.
  • Assignments and trips from Wialon.

The online data calculated from any of the sources is associated with the Driver element.

Online data can only be used as a rough estimate of the DWH compliance. Unlike the tachograph, which has an algorithm for recalculating previous intervals, Wialon saves online data without further recalculation.

Displaying DWH information

There are several ways to display DWH information in Wialon.

Tacho View

The Tacho View web application visualizes DWH information in the form of color charts and reports on driver activity or labor routine violations.

The information source for displaying is selected in the application settings, and it can be a file from the driver card or online data.

Reports on drivers

The Driver activity table shows DWH information.

The Infringements table shows the information on the DWH violations.

In the settings of both tables, a file from the driver card, online data or assignments and trips can be selected as the source of information.

If assignments and trips are selected as the source, the result of the repeated report execution will change after changing the unit's trip detector settings or when editing the assignment history and registering driver shifts.

Additional information on the unit and the driver

To use this method, you should first enable the Driver activity by online data option in the general user settings.

When hovering over a driver, the information on DWH and violations will be displayed in a tooltip.

The same information will be displayed in the unit tooltip and extended unit information, if the display of drivers in the mentioned places is selected in the user settings and the driver is assigned to this unit.

The source of information for this way of displaying is always online data.

Oleg Zharkovsky,Customer Service Engineer

Working with the Routes Module
  • technical_consulting
  • routes

Based on the title, it may seem that the Routes module should be suitable for any request related to vehicle route control. However, this module has specific features that make it ideal for solving certain tasks and completely unsuitable for others. Different options for route control were mentioned in the meetup 4 ways of routes control in Wialon and how to choose the right one. This article will discuss the key settings of the Routes module and examples of its application.

Overall Concept

The word route is often used in everyday speech, but in Wialon it is a term. To avoid confusion, let's agree that within the framework of this article, the word route will be used only as a term.

Routes from the module of the same name are macro-objects and are not part of the resource, unlike report templates, notifications, etc. The thing is, a route itself is a multi-layered object that requires an understanding of check points, schedules, and rides for proper configuration.

The key feature of routes is their focus on the time of visiting check points rather than how the vehicle moves between these points.

The main questions that need to be answered when using the Routes module are as follows:

  • How will check points be added?
  • What type of schedule will be used?
  • What order of passing check points will be chosen?
  • How will a ride be created?
  • How will the result be tracked?

Each of these questions has 3 possible answers. Let's consider each of them.

Adding Check Points

The first layer of routes consists of check points that are included in it. Check points are areas on the map that a unit must visit. They can be added using three methods:

  1. Adding points from the map is similar to using the Address tool: you can double-click on the desired location on the map or enter the address in the corresponding field. The found point will be the center of the check point. By default, the radius is 100 meters, but it can be manually changed if necessary.

    Similarly, route check points can be added through the Routing tool and then saved as a route.

  2. Adding points from geofences involves selecting the desired one from the list of available geofences. In this case, there is no need to specify a radius since the geofence already has a defined area.
  3. Adding points from units is similar to the previous method: you simply need to select a unit from the list. Since a unit corresponds to a point, a radius must be set for it (by default, it is 100 meters).

    Using a unit as a check point may seem like a strange method, but there can be practical applications for this approach. For example, the unit that follows the route could be a truck, and the moving check points could be harvesters collecting crops. On the other hand, a unit point can also be stationary, such as a fuel station with a tracker installed on it, registered as a unit in Wialon.

An important step in creating check points is optimizing the order of visiting them. During optimization, the map displays the estimated shortest route between check points, but after saving the route, the check points will simply be connected by dashed lines since the Routes module does not track the unit's location between check points.

If schedules have not been created for the route yet, you can make changes to the list of check points. If schedules have been created, the route cannot be edited, but it can be copied for future modifications.

Please, keep in mind that routes cannot be transferred from one account to another.


Types of Schedules

The second layer of routes consists of schedules, which represent the expected arrival time at check points and, optionally, the departure time from them. Multiple schedules can be added for a set of check points.

There are three types of schedules:

  1. Absolute — this type of schedule can only be used once, after that it should be changed, copied, or deleted.
    This type of schedule takes into account not only the time but also the specific date.

  2. Relative to day — this type of schedule can be used once a day.

  3. Relative to activation — this type of schedule can be used multiple times a day.
    The activation time is the time specified when creating a ride, at which the movement of the unit to the check points begins to be tracked.
    Most often, when working with this schedule, the activation time coincides with the time of visiting the first point, so the schedule lists 00:00 as the time for it, and then the time is calculated based on the time it takes to travel from the first point to the second, from the first point to the third, and so on.

    However, there can be a different situation when the ride is activated before the unit enters the first point. In this case, the schedule adjusts the time based on how long it will take for the unit to move from the activation time to the first point, from the activation time to the second point, and so on.

The examples above show how to fill in the Arrival field for different types of schedules. In addition to that, the Departure field can be filled in for each check point, allowing you to record the time that the unit should spend at that point. Additionally, for each time, an acceptable Variation can be specified, which represents the allowed time corridor for a delay or being ahead of schedule that is not a violation.

Also, any type of schedule can have a Time limitation, which allows the schedule to be applied only during certain months, days of the month, week days, or hours.

Check Points Order

Initially, the check points order can be specified in the schedule, but later it can be changed to another when creating a ride. The available options are listed below:

  1. Strict — all the check points must be passed in the established order without skipping.
  2. Skipping possible — the check points are expected to be visited in the established order but can be skipped, at the same time it is mandatory to visit the last check point.
  3. Arbitrary — the check points can be passed in any order.

None of the schedule types prohibit entering overlapping ranges of arrival and departure times with variation taken into account. The use of this approach depends on the order of passing the check points.

For example, if the Strict or Skipping possible orders of passing points are chosen, the unit must visit them in a fixed sequence but in case of applying significant variation the visiting time can be almost any. As a result, there is control over the sequence, but not over the visiting time.

If the Arbitrary check points order is chosen, then with significant variation there is control only over the fact of visiting but not over the time and sequence.

Creating rides

Rides are the implementation of routes and they combine check points, schedules, and units. It is rides that allow tracking the movement of a unit through the check points according to the specified time.

A ride can be created in three ways:

  1. Manually — this method can be used when there is a dispatcher who can create a ride at the right time. It is unlikely that this approach will be suitable when there are a large number of rides.
  2. Automatically for schedules with the Relative to day type. This type of schedule clearly determines the time of creating a ride on any day, so it is enough to select units in the schedule and enable the option Create rides for this schedule automatically.
  3. Automatically using notifications with the Create a ride action. This method logically combines with schedules of the Relative to activation type.

    For example, a notification can be created that will start a ride when the unit leaves any of the selected geofences.

    With such a setup, any departure of the unit from the Base geofence will lead to creating a ride. Therefore, if the unit leaves the base not only for a ride, additional properties must be used to distinguish these departures from each other. For example, the unit may only leave for a ride at a certain time, or only with an assigned driver, or only when the certain button in the cabin is pressed, etc.

Tracking methods

Different approaches can be used for tracking routes:

  1. Reports allow gathering information about the route for a specific period. The Rides and Check points tables can be used for a unit or a unit group, and the Rides and Log tables can be used for route reports.
  2. Notifications allow real-time tracking of rides. The only type of notification, Route progress, includes the following:
    • Ride status: started, finished, and aborted.
    • Activity at check points: arrival, departure, and skip.
    • Schedule control: delay, outrunning, and return to the schedule.

  3. The timeline also allows you to track rides in real-time. It is a special panel available at the bottom of the Routes tab. Its main feature is that units are not visible on it but the schedule is displayed in the form of ranges from Arrival to Departure (when clicking on the icon , the range will be expanded considering the allowed Variation), and the vertical line corresponds to the current time.

    Since units are not displayed on the timeline, it is not possible to determine how far they are from a check point while using the timeline. This can only be done using a map.

    If the vertical line of the current time reaches a check point, it does not mean that the unit has visited the point. The visit can only be recorded by a change in the color of the check point: before the visit, it is indicated by an empty rectangle, and after the visit, the rectangle is filled with the color of the route (in this case, blue), and if the point is missed, the rectangle is filled and outlined in red.

Configuration examples

When using the Routes module, a number of settings need to be made, which were mentioned above. For convenience, they are collected in a cheat sheet table, where one option needs to be selected in each column.

The cell color in the table indicates the frequency of use based on our experience of working with partners: green means often, yellow means sometimes, and red means rarely.

Check points

Schedule*

Check points order

Creating a ride

Tracking

Addresses

Absolute

Strict

Manually

Reports

Geofences

Relative to day

Skipping possible

Automatically (Relative to day)

Notifications

Units

Relative to activation

Arbitrary

Automatically (Notifications)

Timeline

* The Arrival field in the schedule must be always filled in, as it is the essence of schedules, and the Departure and Variation fields are optional. Time limitations can also be specified.

Below are examples of using the Routes module and suitable settings for them.

Bakery Delivery to Grocery Stores

Every morning, a truck must deliver fresh baked goods from the bakery to the same stores. Unloading and filling out invoices at each point takes a total of 10 minutes with an allowed delay time of 5 minutes.

Proposed settings:

  • Check points can be added through the addresses or geofences.
  • The ride is done once in the morning, so a relative to day schedule would be suitable.
    For each point, the Departure field will contain a time 10 minutes later than the Arrival field. The Variation field should be set to 5 minutes.
    No need to set time limitations.
  • Since the optimal order of visiting can be calculated in advance and check points can not be skipped (usually, batches of baked goods are not large and are always sold within a day), the order of visiting points will be strict.
  • The departure time is the same every day, so rides can be created automatically (relative to day).
  • Let's assume that during the delivery process, there are no expected real-time problems that need to be solved, so a report on a unit with a Rides table will be suitable for tracking.


Schedule settings

Water Cooler Delivery

A van delivers 5-gallon water bottles for office coolers. The customers are regular and their information is stored in the system. However, not all customers finish their water by Wednesday (which is a standard delivery day), that’s why an additional delivery day is available — Thursday. The exact visiting time is not significant, we have only an approximate range: from 10:00 to 14:00. Due to the flexibility of the schedule, unloading and filling out invoices can be not taken into consideration.

Proposed settings:

  • Check points can be added through the addresses or geofences. The warehouse can be specified as the last point, where the delivery starts and ends.
  • The ride is done once in the middle of the day, so a relative to day schedule would be suitable.
    For all check points, the Arrival field can be set to 12:00. The Departure field can be left empty. The Variation field can be set to 2 hours.
    Time limitations: only Wednesday and Thursday.
  • Since not all points need to be visited on the same day, the Skipping possible option should be selected as the order of visiting.
  • The departure time is approximately the same every day, so rides can be created automatically (relative to day).
    An additional ride on Thursday can be launched manually if necessary, but in that case, the time limitations in the schedule should only include Wednesday, so that automatic ride creation happens only on that day.
  • Customers occasionally contact the administrator to check the real-time delivery status, so notifications and a timeline can be used for tracking.


Schedule settings


Time limitations settings

Shuttle bus

On weekends, a shuttle bus waits at the station until there is a certain number of passengers inside. After that, it starts the ride and visits each check point. The same route is performed multiple times a day.

Proposed settings:

  • Check points can be added through the addresses or geofences. The passenger waiting point at the beginning of the route is enclosed by a geofence. The first check point of the route is placed immediately after this geofence.
  • The ride can be done multiple times a day, so a relative to activation schedule would be suitable.
    The Arrival field for the first point is set to 00:00, and for the other points, it is filled out relative to the first point. Since the shuttle bus spends little time at each stop, the Departure field can be left empty. The Variation field can be set to any value based on the usual situation on this route (e.g. 10 minutes).
    Time limitations: Saturday and Sunday.
  • This case describes a specific public transportation route, so the order of visiting points will be strict.
  • Since the unit starts moving only after enough people get inside, the exact start time of the ride is unknown. Rides must be created using a notification, and the criterion for starting will be leaving the geofence at the beginning of the route where the empty shuttle bus is waiting for passengers.
  • Let's assume that during the delivery process, there are no expected real-time problems that need to be solved, so a report on a unit with a Rides table will be suitable for tracking.


Creating geofences for check points


Schedule settings


Time limitations settings


Choosing the type of notification to start a ride


Choosing the action in the notification

Oleg Zharkovsky,Customer Service Engineer

How to Choose a Way to Control Routes
  • technical_consulting
  • routes
  • geofences

Wialon allows you to meet customer needs in various ways. For example, the system offers at least four route control options, each of which has its advantages and disadvantages. This article will help you to compare them to choose the option that best suits your customer's needs.

Considered options

During our comparison, we will focus on the following four options for route control:

  • Routes module — despite its name, this module is suitable only for cases where there is a specific time for visiting check points and there is no need to track the path between them.

  • Combination of geofences, reports, and notifications (this option will be referred to as Geofences) is the most flexible option suitable for most situations but requires configuring several separate elements.

  • Logistics web application is a niche solution for organizing operations of courier services, which can also be used for other business tasks.

  • NimBus web application is a niche solution for public transport operations, which can also be used for other business tasks.

The terminology used in these options differs from each other:


RoutesGeofencesLogisticsNimBus
Point to visitcheck pointgeofenceorderstop
Group of points within one triproute

planned route or templateroute
Time for visiting check pointsscheduletime limitationtime of the estimated arrivalschedule
Movement of a unit through the group of check points

ride

active routeride

It is important to take this difference into account when comparing the considered options.

Comparison by criteria

Now, let’s summarize the considered options in the table, which will indicate how well they meet different criteria, meaning, the customer's requirements. We have tried to make these criteria as practical as possible, based on our experience of communicating with our partners.

Criteria

RoutesGeofencesLogisticsNimBus

Basic
1The same check points every dayyesyesyesyes
2

New check points every day

nopartiallyyesno
3Tracking the path between check pointsnoyesyesyes
4Optimizing the sequence of check pointsyespartiallyyesno
5Optimizing the path between check pointsnopartiallyyesyes
6

Automatic start of tracking the ride

yesyesnoyes

Specific
7Additional conditions for visiting check pointsnopartiallyyesno
8Schedule relative to departure
yesnopartiallyyes
9Transport replacement during the ride executionnopartiallyyesyes
10Long route (more than 2 days)yesyesyesno
11Moving check pointsyesyesnono
12Sending routes to the driverpartiallypartiallyyesno

Displaying information
13Online controlyesyesyesyes
14Reports for the previous periodyesyesyesyes
15Displaying in the monitoring interfaceyesyespartiallyno
16Mobile applicationnoyesyespartially

Now let's consider each of the criteria separately.

1. The same check points every day

Routesyes

Routes allow you to start rides with the same check points every day if the schedules Relative to day or Relative to activation are used.

Geofencesyes

Geofences are not deleted immediately after visiting them, so they can easily be used on other days.

Logisticsyes

Orders correspond to check points. They can be permanent, meaning they are not deleted immediately after visiting.
You can also turn the route into a template to quickly repeat it on other days.

NimBusyes

Public transport stops rarely change their location, so the application is initially designed to work with the same check points every day.

2. New check points every day

Routesno

New checkpoints cannot be added to an already saved route. To add new check points, you need to create a brand-new route, reconfigure schedules, and create rides. It is pretty time-consuming.

Geofencespartially

Creating a new geofence, as well as adding it to reports and notifications, is not a problem. Setting up may take a relatively long time only if there is a need to control the time for visiting check points (via Time limitation in reports and notifications).

Logisticsyes

A new route with new orders can be created very quickly. Adding check points to an already created route is also available.

NimBusno

Since the application is designed to control public transport, and the public transport stops change quite rarely, adding new check points will require changing several settings at once (creating a stop, adding it to the route, changing the schedule), which is time-consuming.

3. Tracking the path between check points

Routesno

The module doesn't track movement between check points. It is assumed that it’s the driver who should choose the route from one address to another in order to stay on schedule.

Geofencesyes

To track the path between check points, you can create a line geofence on the roads that the unit should follow. Notifications with the Geofence type can be used to control leaving or entering to the geofence line.

Logisticsyes

The application has a notification type called Deviation from a route. This notification triggers if the unit moves away from the route line exceeding the distance indicated in the notification.
You can also display the planned and actual route of the unit on the map when completing the route.

NimBusyes

The application has a notification type called Unit left the route path. It is triggered after receiving a message from the unit that is geographically remote from the route path by more than 50 meters.

4. Optimizing the sequence of check points

Routesyes

There is an option to optimize the order of check points when creating a route.
Also, in the monitoring interface, you will find the Routing tool. Among other things, this tool allows you to optimize the sequence of check points and save the result as a route.

Geofencespartially

In the monitoring interface, you will find the Routing tool. Among other things, this tool allows you to optimize the sequence of check points and save the result as a geofence.

Logisticsyes

When creating a route, the application automatically optimizes the order of check points considering multiple criteria and also allows changing the order of check points manually.

NimBusno

The order of check points in the application is to be fixed manually when creating a route.

5. Optimizing the path between check points

Routesno

The module doesn't track the path between check points. The path is only displayed during the optimization of the order of check points.

Geofencespartially

In the monitoring interface, you will find the Routing tool. Among other things, this tool allows you to optimize the path between the check points and save the result as a geofence.

Logisticsyes

When creating a route, the application automatically optimizes the path between the check points considering multiple criteria.

NimBusyes

When creating a route, the path between check points is automatically optimized, after which it can be edited manually.

6. Automatic start of tracking the ride

Routesyes

Automatic creation of rides is available when using a schedule with the Relative to day type or when using notifications with the Create a ride action type.

Geofencesyes

In this option, there is no concept of a ride, so tracking a ride doesn't start at a specific time. You can start tracking the visits to the check points at any time after adding geofences to reports or notifications.

Logisticsno

The application assumes that the route is started manually by the operator. However, the operator can create routes that are meant to start in the future depending on the delivery interval in the properties of orders.

NimBusyes

If schedules are created for the route and it is switched on, then a ride related to this route is created automatically. Two types of ride activation are available in the application:

  • According to schedule, meaning, the ride is created a certain number of minutes before the planned visit to the first stop; the number of minutes is specified in the settings.
  • When visiting a stop — this type of activation is only available for routes where the automatic assignment of units is enabled.

7. Additional conditions for visiting check points

Routesno

There are no additional conditions for visiting check points. Any message with coordinates in the check point area is considered as visiting a check point.

Geofencespartially

Using notification settings or interval filtration, you can hide visited geofences from the results. For example, you can use a filter by speed and sensor value for a notification with the Geofence type. However, this cannot be called total control of visits, as there is no additional confirmation of visits received from the driver's side.

Logisticsyes

With the help of a mobile application, the courier can send confirmation of the order by leaving a comment, taking a photo, or attaching a client’s signature.

NimBusno

There are no additional conditions for visiting a stop. Any message with coordinates in the stop area is considered as visiting a stop.

8. Schedule relative to departure

Routesyes

The schedule can have the activation type called Relative to activation so that one schedule can be used multiple times a day.

Geofencesno

In this option, there is no concept of a schedule. It is substituted by Time limitation in reports and notifications, where only the beginning of the day is specified.

Logisticspartially

When creating a route, the time of the estimated arrival can vary depending on the current time. For example, if orders can be visited from 10:00 to 20:00, and it is currently 12:00, the time of the estimated arrival for the requests will be counted from 12:00. This can only be partly called a schedule relative to departure.

NimBusyes

For such a case, there is a type of schedule called Relative in the application.

9. Transport replacement during the ride execution

Routesno

It is impossible to replace a unit during the execution of a ride. For example, if the first unit breaks down, a new ride (or even route) will have to be created for another unit that is going to replace the first one.

Geofencespartially

In this option, there is no concept of a ride. However, technically, the operator can contact drivers and direct them to the unvisited geofences.

Logisticsyes

The application offers the possibility to change a unit for an active route.

NimBusyes

It is possible to replace the unit that is in the process of executing the ride.

10. Long route (more than 2 days)

Routesyes

There are no restrictions on the duration of the route for the Absolute schedule type. However, each such schedule can only be used once, and then it becomes useless. For the Relative to day and Relative to activation schedule types, a duration of up to 99 hours (which is slightly over 4 days) can be achieved.

Geofencesyes

In this option, there are no concepts of a ride or schedule. Therefore, nothing prevents a unit from moving between geofences for several days, weeks, and even longer.

Logisticsyes

It is possible to set a restriction on the maximum duration in the application, but as long as it is not enabled, the route can take any number of days.

NimBusno

The route schedule can include only one running past midnight, as sometimes transport may execute the last ride after 00:00 (this is done using the Past midnight function).

11. Moving check points

Routesyes

Moving units can be used as check points. This can be useful, for example, for organizing harvesting when a truck needs to approach moving harvesters collecting crops.

Geofencesyes

Units can be used as moving geofences in the Geofences and Trips Between Geofences tables.

Logisticsno

Orders in the application have a fixed location.

NimBusno

Stops in the application have a fixed location.

12. Sending routes to the driver

Routespartially

There is a possibility to send routes to a unit using commands. The tracker must support such a command, also, a navigator must be connected to the tracker. This means that this feature is not available for all the units.

Geofencespartially

There is a possibility to send geofences to a unit using commands, but they won't be combined into a common route. The tracker must support this feature.

Logisticsyes

There is a mobile application created specifically for couriers where they can see their planned routes.

NimBusno

NimBus doesn't have such functionality.

13. Online control

Routesyes

It is possible to track the route's execution on the map in the monitoring interface, using notifications such as Route progress, and on the Timeline with rides. Unfortunately, working with the timeline is not very convenient, as the position of the unit is not displayed on it.

Geofencesyes

It is possible to track the route's execution on the map in the monitoring interface or using notifications with the Geofence type.

Logisticsyes

Currently active routes and order statuses can be displayed as a table. The dispatcher will also find notifications useful. Real-time statistics are displayed on the Dashboard tab.

NimBusyes

The Online tab is suitable for monitoring ride execution online. Notifications will also be useful for the dispatcher. Real-time statistics are displayed on the Dashboard tab.

14. Reports for the previous period

Routesyes

You can use the Rides and Check Points tables for a unit and a group of units, and the Rides and Log tables for the route report.

Geofencesyes

The Geofences and Trips Between Geofences tables are the most convenient and available for a unit and a group of units.

Logisticsyes

There is a special Reports tab in the application.

NimBusyes

There is a special Reports tab in the application.

15. Displaying in the monitoring interface

Routesyes

The module is a part of the monitoring interface.

Geofencesyes

Geofences, reports, and notifications are the parts of the monitoring interface.

Logisticspartially

It is possible to create the Orders table based on the Logistics data, but it only displays part of the information available in the application.

NimBusno

The units’ movement is displayed in the monitoring interface, but the application's data (stops, routes, schedules, rides, etc.) is not displayed.

16. Mobile application

Routesno

Routes are not displayed in the Wialon mobile application.

Geofencesyes

Geofences, notifications, and reports are displayed in the mobile application.
Clients can track location using the Locator link, which can be added to a notification text using the %LOCATOR_LINK% tag. It is convenient to open this link in a browser on a smartphone.

Logisticsyes

A mobile application has been created specifically for couriers. Using it, the courier sees all the routes they must complete.
The client can track the delivery of their order after receiving a notification with the %LOCATOR_LINK% tag. After sending the notification, the tag turns into the Locator link, which is convenient to open in a browser on a smartphone.

NimBuspartially

Passengers can track the movement of transport using the Locator link, which is convenient to open in a browser on a smartphone. However, this mobile application is not suitable for dispatchers or drivers.


Oleg Zharkovsky,Customer Service Engineer

Controlling Non-standard Conditions with Dynamic Groups
  • technical_consulting
  • notifications
  • unit_groups

Wialon provides a wide range of features within its standard functionality, but some tasks can only be solved with non-obvious methods. For example, using dynamic groups, which we are going to discuss in this article. This method allows sorting units into groups, controlling a chain of conditions using notifications, finding units that have not met certain conditions, and so on.

General logic of dynamic groups

The logic of this method is based on the following system features:

  • notifications can monitor not only specific units but also groups of units;
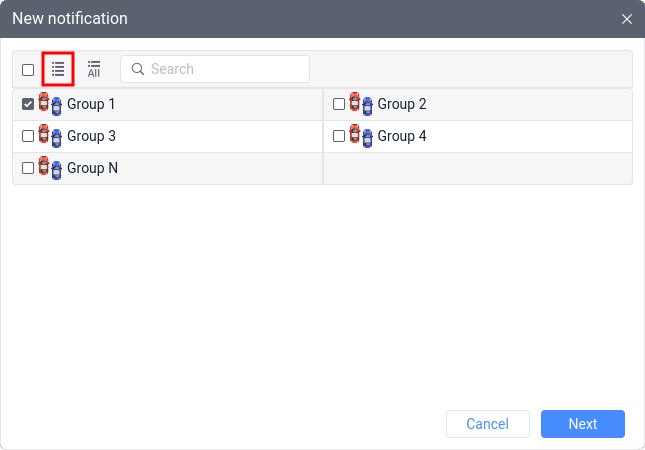


  • notifications allow adding or removing units from groups.
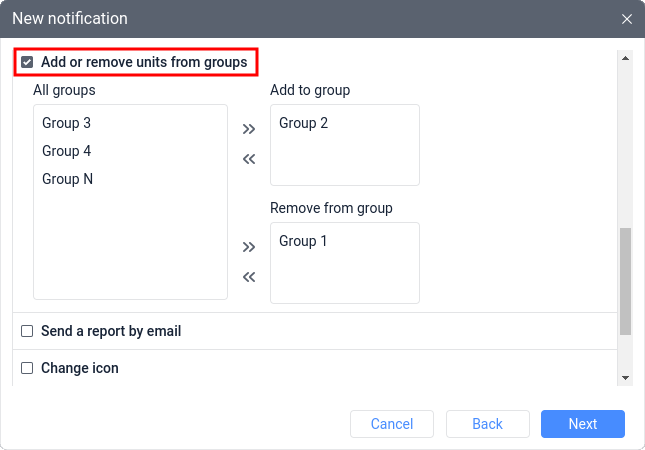

By combining these features, non-obvious behavior can be achieved:

  • If you set up a notification to monitor an empty group, the notification will be enabled, but will not trigger because there are no units in the group.
  • If you add units to this group, even without changing the notification settings, it will automatically start monitoring the added units.
  • If you remove units from the group, the notification will automatically stop monitoring them.

To solve specific tasks, you can use a system of multiple notifications that automatically move units between groups, and then apply other notifications, tasks, and reports to these groups as needed. For brevity, this solution is called the method of dynamic groups (or simply dynamic groups). In this case, the word dynamic means that the units are automatically added and removed from groups in real time.

With dynamic groups, it is possible to create unique logical schemes. Let's take a closer look at some of them.

Sorting by groups

The simplest approach when using dynamic groups is to sort units by groups. For example, all the vehicles in a fleet can be divided into those that are moving and idling, free and busy ones, those that are on the perimeter of the facility and outside of it, and so on. After sorting, the resulting groups can be used in Reports or Jobs, as well as displayed on the Monitoring tab.

To sort by one condition A, the following elements and settings will be required:

  1. The Alpha group that contains units the condition A has not yet been met for.
  2. The Beta group that contains units the condition A has been met for.
  3. Notification 1 which is configured to monitor the Alpha group and control condition A. If this condition is met, the units will be removed from the Alpha group and added to the Beta group.
  4. Notification 2 which is configured to monitor the Beta group and control the condition opposite to condition A. If this condition is met, the units will be removed from the Beta group and added back to the Alpha group.

Schematically, this approach can be represented as follows:

Let's consider a few examples.

Example 1. Report on units outside the country

Let's assume that a client's company has dispatchers who need to divide the vehicles into two groups. One group should include those vehicles that are currently inside the country, and the other one is for those vehicles that are outside the country. Such a division is necessary in order to be able to request a report on each group at any time.

To solve this problem, it is first necessary to create a geofence that corresponds to the borders of the country, as well as 2 unit groups, which can be named Inside the country and Outside the country. Then it is necessary to manually add units to the corresponding groups based on their current location.

If initially all units are placed in one of the groups, then after setting up the dynamic groups, units will be automatically move to the correct groups after some time. The duration of such a sorting will depend on how often the controlled condition changes (in this example, it is entering and leaving the geofence).

Next, it is necessary to set up the first notification called Departure, which will monitor the Inside the country group. It will control the presence of units outside the geofence. As the action, you should select the Add or remove units from groups action, namely to remove units from the Inside the country group and add them to the Outside the country group.

There are no pictures in the gallery


❮ ❯

The second notification will be called Return and monitor the Outside the country group. It will control the presence of units inside the geofence. As the action, you should select the Add or remove units from groups action, namely to remove units from the Outside the country group and add them to the Inside the country group. As can be easily noticed, settings of the second notification are opposite to the first.

There are no pictures in the gallery


❮ ❯

Now the units will dynamically move to the correct groups. Dispatchers will be able to execute a report on either the Inside the country or Outside the country group at any time, depending on their needs.

Such division into groups is only relevant at the current moment. That is, if you generate a report on a group of units for last week, it will display results for those units that are currently in the group, not for those that were in it during the last week.

Example 2. Distribution of access through the groups

Let’s suppose that a client's request is similar to example 1, but additionally, it is necessary to ensure that a specific dispatcher has access only to those units that are currently outside the country. The solution from the previous example will be taken as a basis, and only the missing settings will be considered below.

There are two ways to approach this solution. On the one hand, you can configure the notification so that it not only moves units between the groups but also changes access to these units. On the other hand, you can provide access to the units through the groups. Only the latter method is described below.

First, it is necessary to make sure that the dispatcher does not have access rights regarding the given units. Then it is necessary to provide the dispatcher with access rights only to access a specific group of units (in this example it is the Outside the country group).

There are no pictures in the gallery


❮ ❯

Now, when leaving the geofence and triggering the notification, the units will be added to the Outside the country group, so the dispatcher will be able to see them. When entering the geofence, the opposite situation will occur: the notification will remove those units from the Outside the country group, so the dispatcher will not see them.

Controlling multiple conditions in notifications

In Wialon, there are 20 types of notifications that allow you to automatically perform different actions when a selected condition is met. There can be multiple actions (for example, you can simultaneously display an online notification in a pop-up window and change the icon of the unit), while formally only one condition can be controlled by one notification.

However, in 8 types of notifications, in addition to the main condition, you can include several additional conditions.

Notification type

Additional conditions

Sensor value

Geofence

Speed

Driver absence

Speed


Geofence


Interposition of units


Address


Off time


Connection loss


Fuel filling


Fuel drain


It turns out that not all types of notifications can simultaneously control multiple conditions. If a client needs to combine non-standard conditions, it is necessary to use dynamic groups. With this approach, for example, you can receive a notification fuel drain only while the vehicle is on the move.

To control two conditions — A and B, the following elements and settings will be required:

  1. The Alpha group which contains units for which condition A has not yet been met.
  2. The Beta group which contains units for which condition A has already been met.
  3. Notification 1 which is configured to monitor the Alpha group and control condition A. If this condition is met, the units will be removed from the Alpha group and added to the Beta group.
  4. Notification 2 which is configured to monitor the Beta group and control the condition opposite to condition A. If this condition is met, the units will be removed from the Beta group and added back to the Alpha group.
  5. Key notification 3 which is configured to monitor the Beta group and control condition B. If this condition is met, the notification will perform the final action (for example, notify the client by email).

Schematically, this approach can be represented as follows:
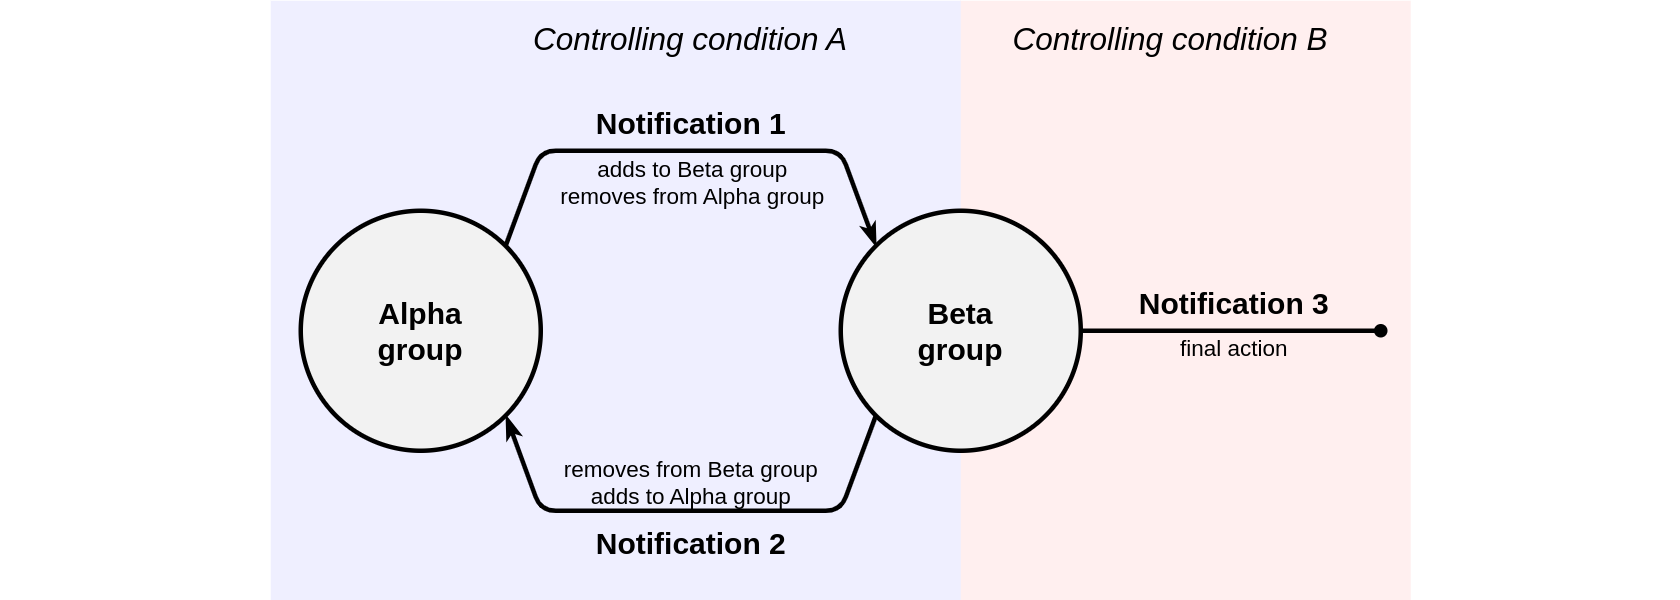
In this scheme, it is possible to manage without the Alpha group, however, based on practice, the presence of this group simplifies configuration and scalability in the future. E.g. if the number of monitored units is increased, you just need to add them to the Alpha group.

If it is necessary to control more conditions, the number of groups and notifications can be increased, for example:
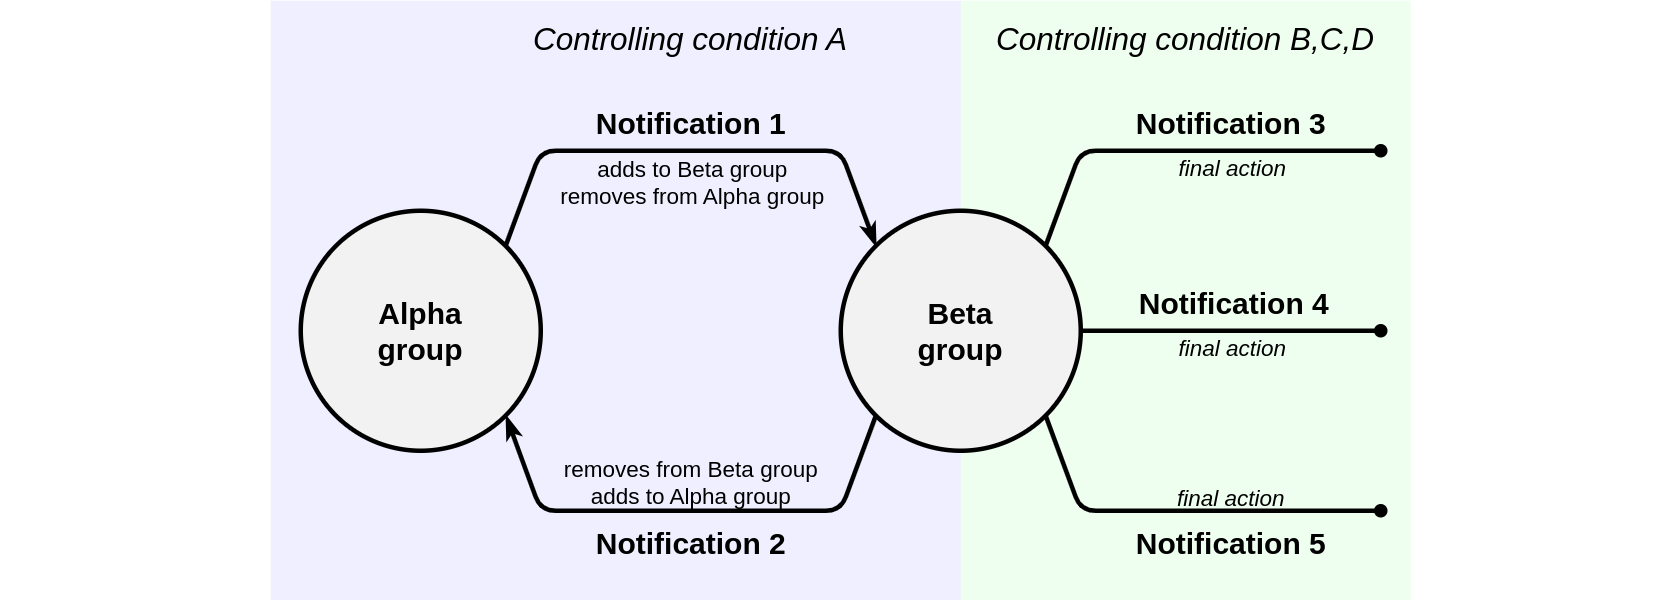
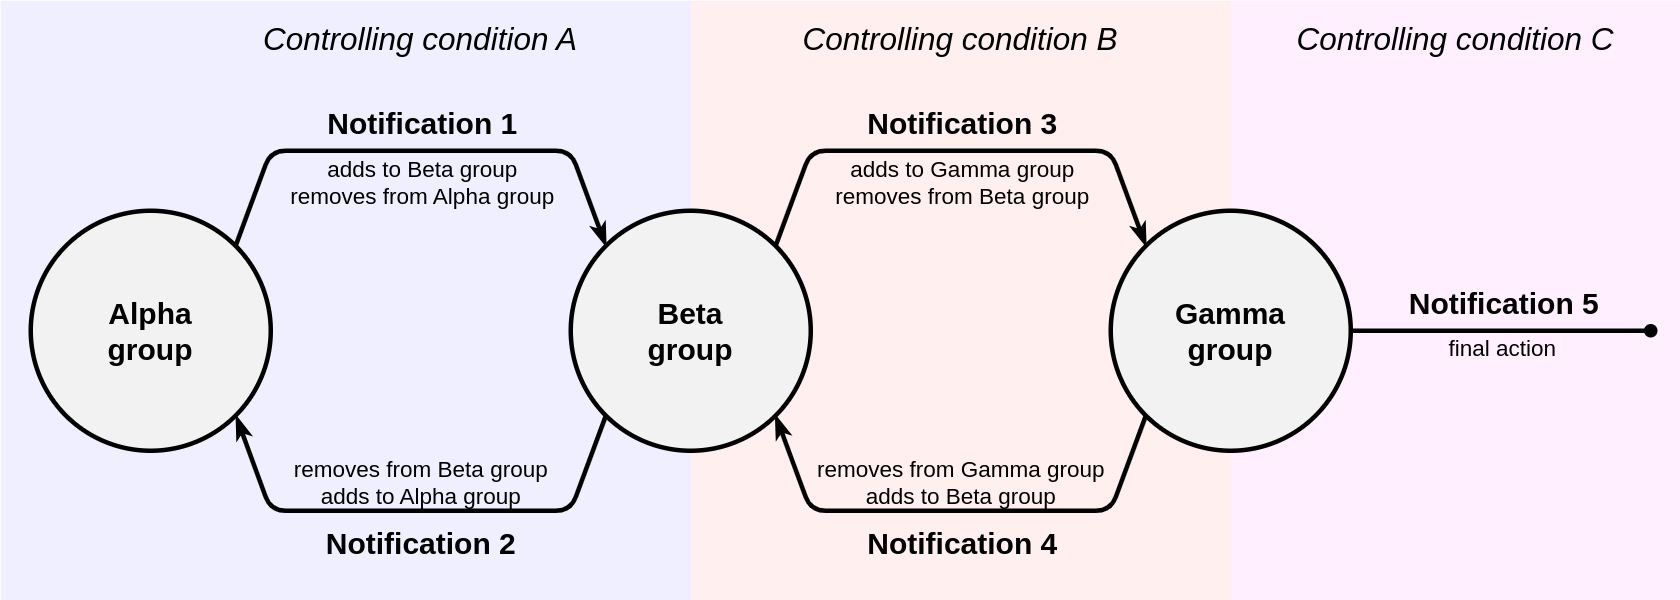
The distinctive feature of this approach is the sequential control of conditions. For example, the Speed type notification with an additional Sensor value filter controls the fulfillment of both conditions simultaneously (one message is required for the notification to trigger). A notification system with dynamic groups configured for these same conditions first controls the speed and only then the sensor value (i.e., two messages is required for it to trigger). At the same time, increasing the number of elements in the scheme will also increase the number of messages required for triggering.

Example 3. Controlling units outside specific area

Let’s suppose a manager wants to receive information about violations of the temperature regime of refrigerator trucks that have left the base.

To solve this problem, it is first necessary to create a geofence that corresponds to the base, as well as two unit groups, which can be named At the base and On departure. Next, it is necessary to create two notifications to sort units by the created groups. You can do it similarly as the solution in the example 1. Below, only the settings for the last notification will be shown.

For temperature control, another notification called Abnormal temperature will be needed, which will monitor the On departure group. As an action, this notification will send emails to the manager.

There are no pictures in the gallery


❮ ❯

As a result, the units will dynamically move into the appropriate groups, and temperature control will only occur outside the base.

Controlling conditions taking time into account

By combining the approaches described above, various logical schemes can be created. Of all the possible use cases, several are highlighted that takes time into account. Let's consider their settings using some examples.

Example 4. Notification triggering once a day

Let’s suppose a client wants to receive an SMS about the first press of the panic button for all vehicles in the fleet during the working day.

To solve this task for one unit, it is necessary to set the value 1 in the Max triggers field, and then specify a time limitation for this parameter from 00:00 to 23:59. If there are not a lot of units, you can create one notification for each of them. However, if there are quite many units, dynamic groups will have to be used, and we will be discussing it further in this example.

Schematically, the solution to this problem can be represented as follows:

Consequently, the following elements and settings will be required:

  1. A group named No alarm (the Alpha group in the above diagram) which contains all units whose drivers have not pressed the panic button today. At midnight, all units should be in this group, so they need to be placed there initially.
  2. A group named Alarm triggered (the Beta group in the diagram) which contains units whose drivers pressed the panic button today. This group should be empty at midnight.
  3. A notification named Alarm! (notification 1 in the diagram) which is set to monitor the No alarm group and control the panic button press. If this condition is met, these units will be removed from the No alarm group and added to the Alarm triggered group, and the notification will send an SMS to the client.

    There are no pictures in the gallery


    ❮ ❯

  4. A notification named Back to initial settings (notification 2 in the diagram) in this case will return all units from the Alarm triggered group to the No alarm group closer to midnight. For this, it must be set to monitor the Alarm triggered group, have a time limitation (for example, from 20:00 to 23:59), and control some conditions that will undoubtedly be met for all the units at the end of the working day. One such condition may be a speed of less than 300 km/h (in this case, the notification should trigger For all messages).

    There are no pictures in the gallery


    ❮ ❯

Now, all the units whose drivers pressed the panic button will move to the Alarm triggered group at the first trigger. The control of triggering the panic button is no longer carried out for this group. Consequently, the client will only receive an SMS about the first alarm for each unit. In the evening, all units will be returned to the initial group.

Example 5. Report on the units that have not started moving by a certain moment

Let’s assume an owner of a fleet wants to receive a daily list of vehicles that have not started moving by 8 am.

Schematically, the solution to this problem can be represented as follows:
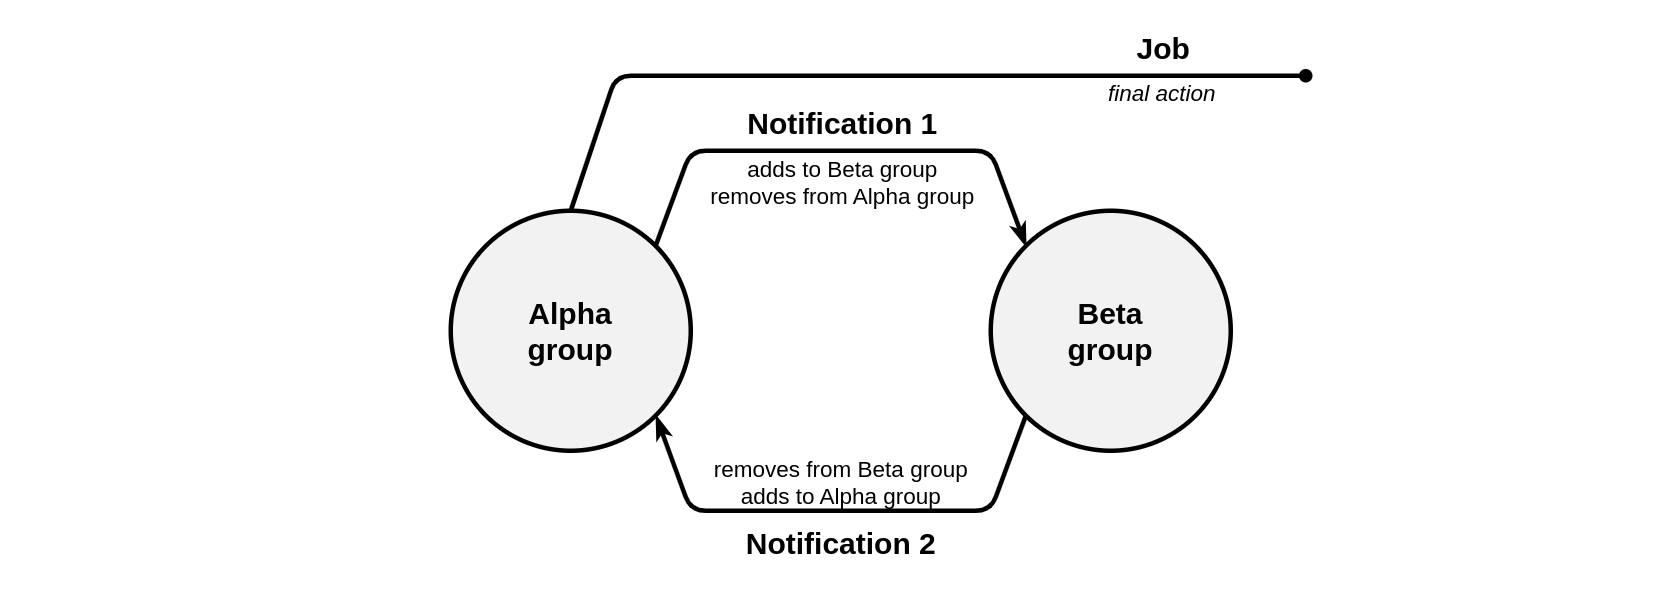
Consequently, the following elements and settings will be required:

  1. A group named Did not start working before 8 am (the Alpha group in the above diagram) which will contain all units that have not yet started moving. It is assumed that at midnight, all units in the fleet should be in this group, so they need to be initially placed there.
  2. A group named Started working before 8 am (the Beta group in the diagram) which contains units that have already started moving. At midnight, this group should be empty.
  3. A notification named Managed to start before 8 am (notification 1 in the diagram) which is set to monitor the Did not start working before 8 am group and control the appearance of speed (meaning, the start of work). If this condition is met, the units will be removed from the Did not start working before 8 am group and added to the Started working before 8 am group. Also, the time limitation of this notification should be set from 00:00 to 07:59.

    There are no pictures in the gallery


    ❮ ❯

  4. A job named Latecomers list, which at 08:00 will send a report to the owner of the fleet about the units from the Did not start working before 8 am group. The group report may contain, for example, the Unit latest data table.

    There are no pictures in the gallery


    ❮ ❯

  5. A notification named Back to initial settings (notification 2 in the diagram) in this case will return all the units from the Started working before 8 am group to the Did not start working before 8 am group closer to midnight. This is done by analogy with the similarly named notification from example 4 above.

Now, all the units that have not started moving by 08:00 will remain in the Did not start working before 8 am group, and then the job will send a report about them to the owner of the fleet. If any unit starts moving before 8 am, it will be moved to the Started working before 8 am group, so it will not be included in the report about violations. In the evening, all the units will be returned to the initial group.

Example 6. Controlling long-term conditions (more than a day)

Let’s suppose a manager needs to receive an email if a unit stays in the factory area for more than 3 days (72 hours).

Usually, the duration of the controlled alarm state (in this case, being in a geofence) is set through the Min duration of alarm state field on the last page of the notification settings. The maximum value for this field is 24 hours (1440 minutes, 86400 seconds). In other words, it is not possible to control an alarm state lasting 72 hours without using dynamic groups.

There are two exceptions: Off time notification has a maximum duration of 30 days, and Connection loss notification has a maximum duration of 999,999 minutes (or approximately 694 days).

Schematically, the solution to this problem can be represented as follows:

Consequently, the following elements and settings will be required:

  1. A geofence that corresponds to the factory area.
  2. A group named Inside <24 hours or outside (the Alpha group in the above diagram), which initially contains all units.
  3. A group named Inside >24 hours (the Beta group in the diagram) which will contain units that are inside the geofence for 24 hours or more.
  4. A group named Inside >48 hours (the Gamma group in the diagram) which will contain units that are inside the geofence for 48 hours or more.
  5. A notification named Entry for 1 day (notification 1 in the diagram), which is configured to monitor the Inside <24 hours or outside group and control a unit being inside the geofence for more than 24 hours. If this condition is met, the units will be removed from the Inside <24 hours or outside group and added to the Inside >24 hours group. The notification should trigger Only when the state changed, and the Min duration of alarm state should be equal to 24 hours (1440 minutes, 86400 seconds).

    There are no pictures in the gallery


    ❮ ❯


  6. A notification named Entry for 2 days (notification 2 in the diagram) which is configured to monitor the Inside >24 hours group and control a unit being inside the geofence for more than 48 hours. If this condition is met, the units will be removed from the Inside >24 hours group and added to the Inside >48 hours group. The notification should trigger For all messages, and the Min duration of alarm state should be equal to 24 hours (1440 minutes, 86400 seconds).

    There are no pictures in the gallery


    ❮ ❯

  7. A notification named Back to initial settings (notification 3 in the diagram) will return all the units from the Inside >24 hours and Inside >48 hours groups to the Inside <24 hours or outside group if a unit leaves the geofence. The notification should trigger Only when the state changed.

    There are no pictures in the gallery


    ❮ ❯

    In this case, all the notifications and groups are used to control one condition (being inside or outside the geofence), so unlike the previous section of this article, one notification is enough to move all the units to the first group.

  8. A notification named Entry for 3 days (notification 4 in the diagram) which is configured to monitor the Inside >48 hours group and control a unit being inside the geofence for more than 72 hours. If this condition is met, the units will be removed from the Inside >48 hours group and added to the Inside <24 hours or outside group and an email will be sent to the manager. The notification should trigger For all messages, and the Min duration of alarm state should be set to 24 hours (1440 minutes, 86400 seconds).

    There are no pictures in the gallery


    ❮ ❯


Now, all the units that have been inside the geofence for one day will move from the Inside <24 hours or outside group to the Inside >24 hours group after one day, they will move to the Inside >48 hours group after another day, and after one more day, the notification will send an email to the manager and move the units back to the initial group. If at any point the units leave the geofence, they will return to the original Inside <24 hours or outside group.

Oleg Zharkovsky,Customer Service Engineer

How to Get an SSL Certificate
  • technical_consulting
  • sites

You may need an SSL certificate if you log into Wialon using a site with an address other than hosting.wialon.com/eu/us/org (i.e., you use an extra-site). SSL certificate allows the use of HTTPS connection to secure the personal user's data. If an SSL certificate is not used, an HTTP connection is used, and your site is marked as not secure in the browser.

SSL certificates are issued by special certification authorities. These certification authorities are trusted parties that authenticate the website owner's identity and issue digital certificates confirming that the connection to the site is secure. You should contact an SSL provider who will work with the certification authorities.

In this article, we list the requirements for adding SSL certificates, and also describe the sequence of steps to obtain certificates.

What Files Need to be Sent to Us

In case you would like to enable HTTPS for your site, please, send an email to support@wialon.com. Your email must contain the following information:

  1. the site name for which the SSL certificate should be applied;
  2. signed (issued) by a third-party SSL certificate (signed by Comodo, GlobalSign, etc.);
  3. private key along with the passphrase if it has been specified.

Before sending the files to us, please ensure that the files contain the corresponding data. You can open files with the help of a text editor to check the content.

  • A file with the certificate usually has one of these extensions: CRT, PEM, or TXT. The files should have the following content:

    -----BEGIN CERTIFICATE-----
    <>
    -----END CERTIFICATE-----


  • The file with the certificate should NOT contain a certificate request that looks as follows:

    -----BEGIN CERTIFICATE REQUEST-----
    <> 
    -----END CERTIFICATE REQUEST-----


    If you see this information in the file, it is not a certificate file but a certificate request. We do not need it when adding the SSL certificate.

  • A file with the private key usually has one of these extensions: CRT, PEM, or TXT. The files should have the following content:

    -----BEGIN RSA PRIVATE KEY-----
    <>
    -----END RSA PRIVATE KEY-----

Requirements

  1. From our side, only commercial certificates valid for a year or more are accepted.
  2. Self-signed and short-term certificates are not accepted.
  3. Let's Encrypt certificates are not accepted.
  4. The SSL certificate and private key must correspond to each other.
  5. We do not host third-party files to confirm ownership of the domain.

    To get the SSL certificate, you need to confirm domain ownership. There are different ways to do it. Please note that we don't host third-party files for this purpose, so please select an alternative method of domain ownership confirmation when selecting the confirmation type. For example, you can use email. With this option, an email containing a unique code and a confirmation link will be sent to the email address of the domain's administrative contact.

    You can get more details about alternative validation methods from your SSL service provider.

SSL Certificate Generation

The easiest way to get an SSL certificate is to ask your SSL provider to generate the SSL certificate for you, and they will create all the required files on their side. In this case, you don't need to use the following instructions.

The following files must be generated to get an SSL certificate: a CSR request and a private key.

If you need to create the mentioned files on your side, please follow the brief instructions below. The steps depend on your operating system (Linux, macOS, or Windows).

Before generating a CSR request and private key, we recommend contacting the SSL service provider to learn some nuances. For example, some companies ask not to enter an email address, challenge password, or an optional company name when generating the CSR.

How to Get an SSL Certificate on Linux/macOS

  1. Make sure that OpenSSL is installed. For that purpose, open the terminal and run 'openssl version'. If OpenSSL is installed, the version will be displayed. If OpenSSL is not installed, please, do it by the corresponding commands that depend on your operating system. You can find out the required command in the documentation available on the Internet.
  2. Use OpenSSL to generate a CSR and match the private key. For that purpose, execute the command below to generate a 2048-bit RSA private key and CSR. When executing the command, it will be necessary to enter data such as a passphrase, country, domain for which the CSR request will be generated, and others.
    To skip a field, press Enter on the keyboard.

    Remember the passphrase because it is used to encrypt the private key. You will need it to access the generated private key.
    openssl req -newkey rsa:2048 -keyout PRIVATE_KEY.key -out CSR_REQUEST.csr
    • The Country Name (optional) — a two-letter country code.
    • State or Province Name (optional) — your state or province name, or use the Locality name if you have none.
    • The Locality Name field (optional) — your city or town.
    • The Organization Name field (optional) — the name of your company or organization. If the company or department has an '&', '@', or any other symbol using the shift key in its name, the symbol must be spelled out or omitted to enroll.
    • The Common Name field (required) — the Fully Qualified Domain Name of the website the certificate will protect. It should be set the same way the client will address it. In most cases, this will be the entire domain name.
    • Email Address (optional) — your email address. The email used for CSR generation will not be used for domain control validation or delivery of the issued certificate.
    • The Challenge Password field (optional) — might be needed for certificate revocation.
  3. You will get 2 files: CSR request and private key. Please save the private key somewhere where the risk of its being deleted will be minimized.
  4. Send two files from the previous step to the certificate provider. The provider will send you a signed certificate and the private key.
  5. Send us a signed certificate, private key, and information on which site they should be added to.
  6. We will recheck, add them, and inform you about the results.

In case you face issues using OpenSSL, you can replace step 2 by using Digicert OpenSSL CSR Wizard. This service helps to create a CSR request. Just fill in the form and press Generate. As a result, the service will create a console command with all required options. Copy this command and execute it in the terminal. Please note that this approach still requires OpenSSL to be installed.

How to Get an SSL Certificate on Windows

OpenSSL

  1. Download and install Win32 OpenSSL or Win64 OpenSSL.
  2. Press Win on the keyboard and type 'cmd'.

  3. Click the right button on the Command prompt and select Run as administrator.
  4. Move to the folder where you've installed OpenSSL. For example, it can be:

    cd C:\Program Files\OpenSSL-Win64\bin
  5. Run the following command:

    set OPENSSL_CONF=*OpenSSL base folder*\bin\openssl.cfg
  6. Restart your computer to apply the changes.
  7. Press Win on the keyboard and type 'cmd' to find the Command prompt.
  8. Click the right button on the Command prompt and select Run as administrator.

  9. Go to the subfolder \bin of your OpenSSL folder. If you've installed by default settings, it might look like:

    cd C:\Program Files\OpenSSL-Win64\bin
  10. Enter the following command to generate a private key file with the name 'PRIVATE_KEY' and a certificate request file with the name 'CSR_REQUEST'.

    openssl req -newkey rsa:2048 -keyout PRIVATE_KEY.key -out CSR_REQUEST.csr
  11. Enter the PEM pass phrase. It is used to output an encrypted private key.

  12. Enter the following information that will be incorporated into your certificate request:
    • Country Name (optional) — a two-letter country code.
    • State or Province Name (optional) — your state or province name, or use the Locality name if you have none.
    • Locality Name field (optional) — your city or town.
    • Organization Name field (optional) — the name of your company or organization. If the company or department has an '&', '@', or any other symbol using the shift key in its name, the symbol must be spelled out or omitted to enroll.
    • Organizational Unit Name (optional) — your unit or department name.
    • Common Name field (required) — the Fully Qualified Domain Name of the website the certificate will protect. It should be set the same way the client will address it. In most cases, this will be the entire domain name.
    • Email Address (optional) — your email address.

      The email used for CSR generation will not be used for domain control validation or delivery of the issued certificate.

  13. Enter the following extra attributes to be sent with your certificate request:
    • A challenge password (optional) — a password by which an entity may request certificate revocation.
    • An optional company name (optional).
  14. The files with the required private key and certificate request will be generated and saved in the folder C:\Program Files\OpenSSL-Win64\bin
  15. Send two files to the certificate provider. The provider will send you a signed certificate and the private key.
  16. Send us a signed certificate, private key, and information on which site they should be added to.
  17. We will recheck, add them, and inform you about the results.

IIS Manager

  1. Press Win on the keyboard and type 'Control Panel'. Then click it in the search results.
  2. Select Programs.
  3. At Programs and Features, click Turn Windows features on or off.

  4. In the new window, click the checkbox next to Internet Information Services and press OK.
  5. When installation is complete, press Close.
  6. Press Win on the keyboard and type 'Internet Information Services (IIS) Manager' in the search bar. Then click it from the search results to launch.
  7. In the new window, in the left column Connections, select the server.

  8. Double-click the Server Certificates icon in the center panel of the window.

  9. Click the Create Certificate Request link in the Actions column on the right side of the window.

  10. Enter the required information and press Next:
    • Common Name field — the Fully Qualified Domain Name of the website the certificate will protect. It should be set the same way the client will address it. In most cases, this will be the entire domain name. You can also set a wildcard, like *.mydomain.com.
    • Organization — the name of your company or organization.
    • Organizational Unit — your unit or department name.
    • City / Locality — city or town where your company is located.
    • State / Province — your state or Province name, or use the Locality name if you have none.
    • Country/ Region Name (optional) — select from the drop-down list.
  11. Set Cryptographic Service Provider Properties. In the drop-down menu, select Microsoft RSA SChannel Cryptographic Provider as the cryptographic service provider, 2048 as the Bit length and press Next.

  12. Click the button with three dots to select where the CSR request should be placed and add its name. Press Finish.


  13. Close Internet Information Services (IIS) Manager.
  14. Press Win on the keyboard and type 'Microsoft Management Console' or 'mmc' in the search bar. Then click it from the search results to launch.
  15. In the new window, press File > Add/Remove Snap-in...

  16. In the new window, in the left column, select Certificates and press Add > button.

  17. This snap-in will always manage certificates for Computer account and press Next.

  18. This snap-in will always manage Local computer (the computer this console is running on) and press Finish.

  19. Press OK to save the changes.
  20. In the left column, select Certificate Enrollment Requests and click Certificates below it.

  21. In the center panel of the window, find the required certificate request and right-click it. Select All Tasks > Export...

  22. Select the answer Yes, export the private key.

  23. Select the format Personal Information Exchange - PKCS #12 (.PFX).

  24. On the next step, mark the Password option. Enter the desired password in the Password and Confirm password fields and press Next.

  25. Click the Browse... button to select where the files should be saved and set the filename. Press Next.


  26. Check the displayed data and press Finish.
  27. Send two files to the certificate provider. The provider will send you a signed certificate and the private key.
  28. Send us a signed certificate, private key, and information on which site they should be added to.
  29. We will recheck, add them, and inform you about the results.

Common questions

Is it possible to set up the site to use only HTTPS?

Yes, it's possible. If you already have an SSL certificate added for your site or request to add your certificate, please let us know if you would like your site to be accessible via HTTPS only.

By default, the website will be available via HTTP and HTTPS. If you want to switch to HTTPS-only mode, just let us know. We will enable force HTTPS redirection, so when you log in to HTTP://your.site.com, you'll be forcibly redirected to HTTPS://your.site.com.

Which type of SSL certificate to choose?

We don't restrict the certificate type, and it's possible to apply different types of certificates.

Depending on the number of websites and domain names you use, you can send us the following types of certificates:

Single Domain CertificateConfigured for a particular domain name and can secure only it.
Multi-Domain TLS/SSL Certificate

Can be configured to allow multi-domain. For example, one certificate can secure the following sites: www.your_domain1.com, www.your_domain2.com, mail.your_domain.com, test.your_domain2.com, etc.

The list of sites for which the certificate can be applied is pre-defined. If another site subsequently appears, you will need to issue an additional certificate for that site.

Wildcard TLS/SSL Certificate

Configured with a wildcard character (*) in the domain name field, so it can secure multiple subdomain names on the same base domain. For example, a certificate generated for '*.your_domain.com', can be used for www.your_domain.com, mail.your_domain.com, monitoring.your_domain.com, etc.

You do not need to add any changes to the certificate or issue additional certificates if you have an additional site on the same base domain. Additional subdomains can be added or removed at any time.

Keep in mind that a wildcard certificate is used only for subdomains at the same level where the asterisk is set. So a certificate generated for *.your.site can be used for monitoring.your.site, but it can't be used for www.monitoring.your.site.

Currently, there are three types of TLS/SSL certificates. They differ in the vetting and verification processes needed to obtain the certificate.
Domain Validation (DV)

It has the lowest level of validation. These certificates only verify the ownership of the domain name.

Organization Validation (OV)

It offers higher assurance than DV. These certificates require validation of the organization's identity in addition to domain ownership.

Extended Validation (EV)

It provides the maximum amount of trust to visitors. EV certificates undergo the most rigorous validation process, including verification of legal identity, physical address, and operational existence of the organization.

For what server should I issue the certificate?

It would be preferable if the certificate was generated for the Nginx server.

What should I do if the private key doesn't match the certificate?

Find the private key to generate the SSL certificate and send both files to us.

If you have issues finding the required file, contact your SSL provider.

How can I know when the certificate expires?

The easiest way is to visit your site by following the instructions:

  1. Open your site in the browser.
  2. Click on the icon near the address bar of the browser.
  3. In the pop-up window, click on the Connection is secure.
  4. Then click on the Certificate is valid.
  5. Check the field Expires On in the new window.

The example is provided for Chrome. The instructions for other browsers should be similar.


Ekaterina Grib,Customer Service Engineer


10
  • 10
  • 25
  • 30
Thank you for your feedback!
Report a mistake
Text with the mistake Comment
Maximum 500 characters