On the Security tab, you can configure authorization and enable two-factor authentication.
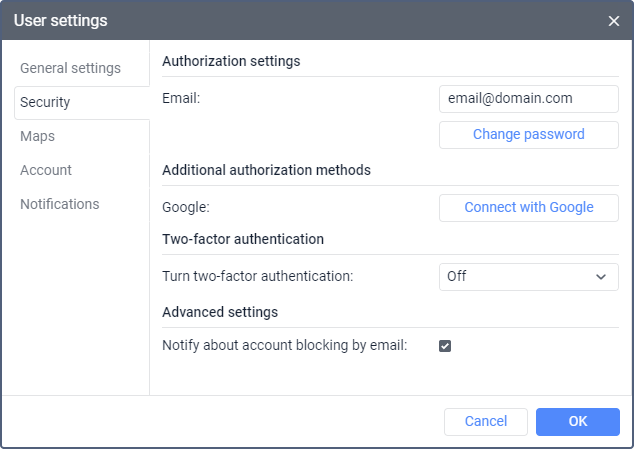
Authorization settings
In this section, you can specify your email and change your password.
An email address is required to recover the password and to receive a verification code when the two-factor authentication is enabled.
Change password
In order for the user to be able to change their password, the Can change password option should be enabled in the user properties.
To change your password, enter the current one and then the new one (twice). The new password should differ from the current one and meet the security requirements (see more). Click OK to save the changes.
When changing the password, you can't make more than 10 incorrect attempts within 5 minutes.
Additional authorization methods
In this section, you can configure authorization via Google and third-party services based on Auth0.
To sign in with Google, you should connect your Wialon account with your Google account. To do this, click on the Connect with Google button and in the window that opens, select the required account (or click on Use another account and indicate the data of another account).
To cancel the connection to Google, click on the Remove connection button and select the connected account in the window that opens.
You can connect only one Google account with your Wialon account.
Third-party services based on Auth0
Upon request, you can configure authorization via third-party services based on Auth0. To get more information and send a request, contact support@wialon.com.
Two-factor authentication
To enable two-factor authentication, in the drop-down menu select the method of receiving the confirmation code: via email or SMS.
Via email
The code is sent to the email address specified in the authorization settings. To confirm the address, do the following:
- Click the Send code button. If you do not receive the code at the address provided, click on the Resend code button. The option is available every 30 seconds.
- Enter the received code in the Verification code field. It is valid for 2 hours.
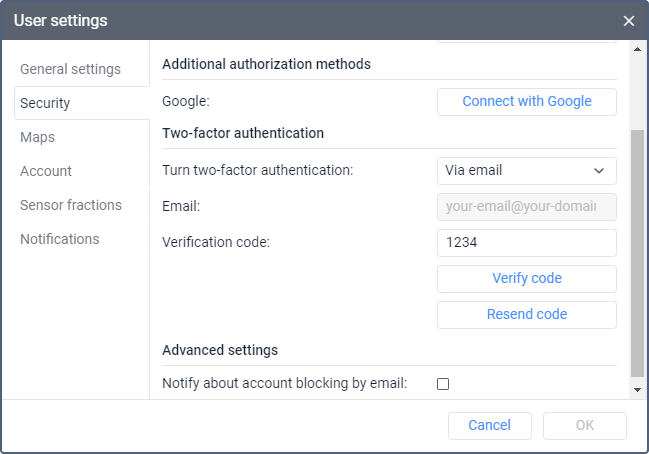
- Click on the Verify code button.
After confirming the e-mail address, you must enter the code sent to this address each time you log in to the monitoring system.
Via SMS
To receive text messages, you should activate the SMS messages service in the account properties and the Can send SMS option in the user properties.
If you cannot send an SMS (for example, the service is disabled or the number of available text messages is exceeded), the confirmation code is sent to the email specified in the authorization settings.
Standard rates apply for SMS messages.
To confirm the phone number, do the following:
- Confirm the email address according to the instructions above.
- Specify the phone number to which you want to receive the code in international format, for example, +12124567890.
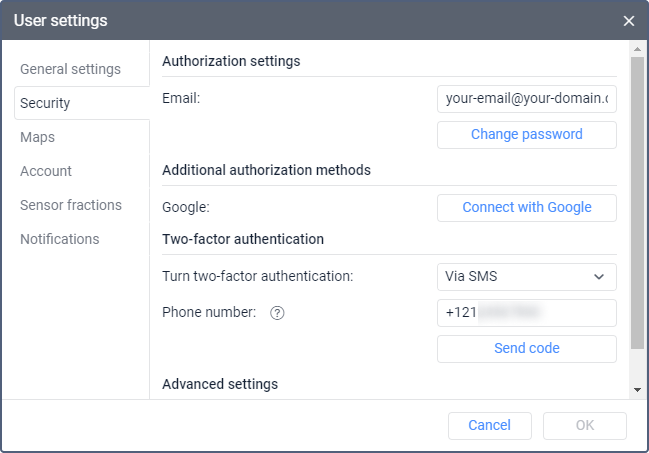
- Click the Send code button. If you do not receive the code at the phone number provided, click on the Resend code button. The option is available every 30 seconds.
- Enter the received code in the Verification code field. It is valid for 2 hours.
- Click on the Verify code button.
After confirming the phone number, you must enter the code sent to this number each time you log in to the monitoring system.
Advanced settings
Here you can configure notification sending in case of account blocking.
Notify about account blocking by email
Enable this option to receive notifications about account blocking to the email address specified in the user properties. Notifications start arriving daily 5 days prior to blocking.
To work with this option, you should activate the Еmail notifications service in the account properties.
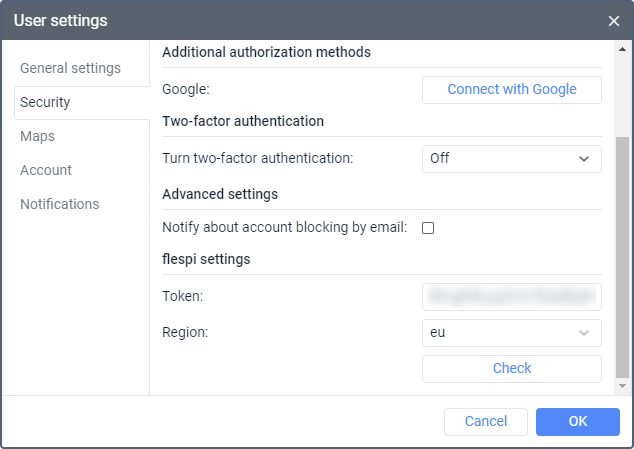
flespi settings
This section is available only to the top users.
Authorization
To obtain a token, click on the Login button and authorize in flespi.
Token
The field with the generated token is displayed after successful authorization in flespi. The token is valid for one year. To see the information about the status (active/expired) and the expiration date of the token, click on the Check button. If necessary, you can edit the token manually.
Region
The data of flespi users is stored in a data centre in the Netherlands (the eu region).