

When creating, editing, or copying a sensor, an additional dialog with its properties is displayed. It consists of several tabs. On the first one, the general properties described below are adjusted.
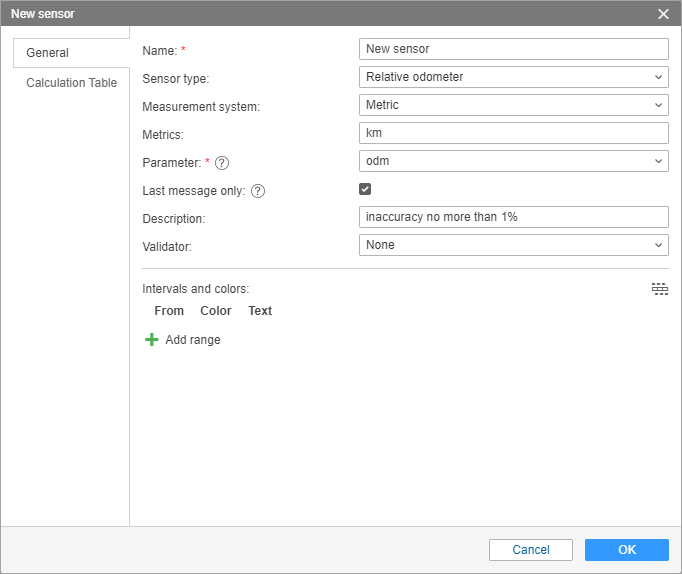
General properties
Name
Type the name of the sensor. It must consist of one or more characters. The name is visible in the unit tooltip, in reports, and in messages.
Sensor type
Select the sensor type from the dropdown list of available types. To quickly find the required one, start entering its name. The type should correspond to the characteristics of the device used in the unit, otherwise, the calculations made on the basis of this sensor can be inaccurate.
Measurement system
In the dropdown list, choose a measurement system in which the sensor values should be received. This property and the corresponding dropdown list are only displayed for those sensors whose units of measurement differ depending on the selected system of measures.
Metrics
You can see metrics in reports (including chart legends), tasks, tooltips, and so on. Most sensors have their own default metrics (units of measurement). For some sensor types, units of measurement cannot be changed, for others, you can do it manually. This is particularly applicable for digital sensors such as engine operation sensor or custom digital sensors. Instead of default On/Off values you can set Activated/Deactivated, Laden/Unladen, Open/Closed, etc.
Parameter
Select or enter the parameter(s) whose data the sensor should interpret.
Last message only
If this option is enabled, the sensor value displayed in the unit tooltip and other places is calculated only from the most recent message. In case there are no required parameters in the last message, Unknown is shown. If the option is disabled, the last known value which is calculated within a minute is displayed (regardless of whether it is recent).
This option does not influence the display of sensor values in Wialon for iOS/Android because the application uses the data processed in real time.
Description
This field is optional. It is displayed only in the list of sensors in the unit properties dialog.
Validator and Validation type
Validation is optional. It determines the interdependence of sensors from each other.
Next, you need to set the calculation table for the sensor. It is especially needed for analog sensors. Not all sensors send ready-made values that can be put into a report and understood by the end user. If the possibility to transform parameters is not provided with a device itself, this transformation is adjusted with the help of the calculation table or the calculation table wizard.
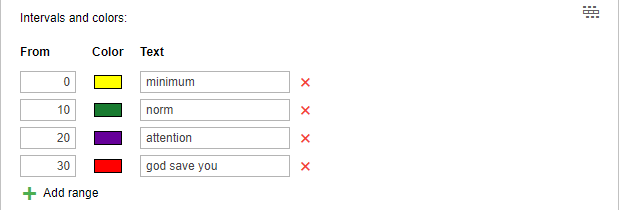
Intervals and colors
Wialon system provides a possibility to differentiate sensor values by color. For this purpose in sensor properties, it is possible to create intervals of values and choose their colors. There is also a possibility to accompany received digital values with text.
By default, any sensor values (from -∞ to +∞) are displayed in black. Click on the button  next to the scale to set the interval, select a color for it, and enter the text. Note that values are set for each interval individually. Here are some peculiarities of setting intervals and choosing their color that could be useful:
- No value in the first field corresponds to -∞, in the second — to +∞;
- If you add an interval that intersects with an existing one and goes beyond its boundaries, the added interval overwrites the existing interval;
- If you add an interval that intersects with an existing one and does not exceed its boundaries, the added interval is inserted inside the existing one. In addition, both the intervals to which the existing one was divided receives its text and color;
- You can select a color from a color picker or indicate its text value (in HEX) in the corresponding field.
Upon completion, all the set intervals of a selected color along with their text info are shown on the scale. Each interval of the scale, its color, and text can be edited. To do so, click the corresponding interval on the scale and set the necessary parameters. To delete all the set intervals from the scale, click on the button  to the right of it.

To enter intervals, select colors and specify text values, an alternative interface is also provided in the form of a table. To switch to the table view, click on the corresponding icon to the right of the scale. To switch back to the scale, click on the icon again. It automatically switches to the table view if you add more than 10 intervals.
If a sensor sends values smaller than the ones indicated in the first interval, such values are considered as a part of the first interval.
Created intervals can be used in several cases:
- to visualize sensor state in the corresponding column of the Monitoring tab;
- to display multicolor tracks of unit movements;
- to show unit on the map according to the sensor state (if it is chosen to replace usual icons with the motion state signs);
- to quickly find the necessary information on sensors either in the unit tooltip or in the extended unit information;
- to visualize sensor state in the Nearest units tool;
- to color the lines of the charts in reports in different colors;
- to describe the values of the Formatted value column of the Sensor tracing table (shown in parenthesis).
In the first three cases, on the Advanced tab in the unit properties, you must also specify a sensor for each case individually.