

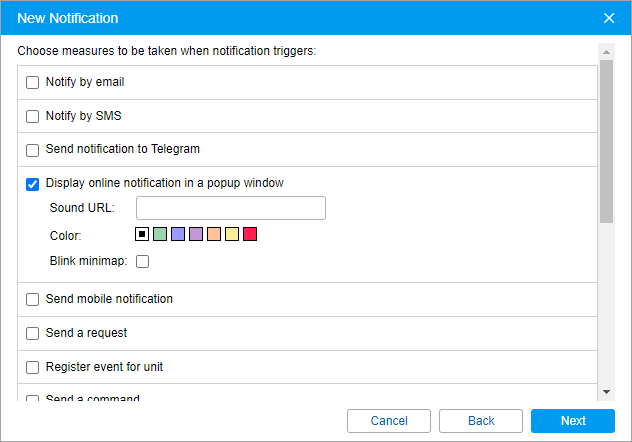
In the notification dialogue box, you can select and configure actions which should be performed when the notification is triggered. All the available actions are described in detail below.
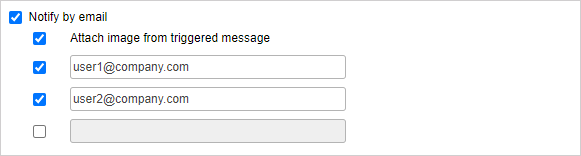
Notify by email
When this action is selected, you can add email addresses to which the notification should be sent. To do this, check the box to the right of the field and specify an address. After specifying the address, a new field is added automatically. To cancel sending the notification to any added address, uncheck the box to the left of it.
To receive notifications by email, on the Email settings tab of the billing plan properties, specify an email address from which system messages should be sent.
The notification name is specified in the header of the received email and the unit name in brackets. The main part of the email contains the notification text.
Some types of devices allow you to attach to the email an image sent by the unit in the message after which the notification was triggered. To do this, enable the Attach image from triggered message option.
Notify by SMS
This action is used to set up SMS notifications. Type in one or more telephone numbers in the international format, for example, +375293293294. When all fields for entering phone numbers are filled in, additional slots appear automatically.

If the Can send SMS option is not activated in the user properties, the corresponding notification delivery method becomes unavailable.
Send notification to Telegram
This action allows sending alerts about triggered notifications to the Telegram messenger.

Configuring notification sending for one user
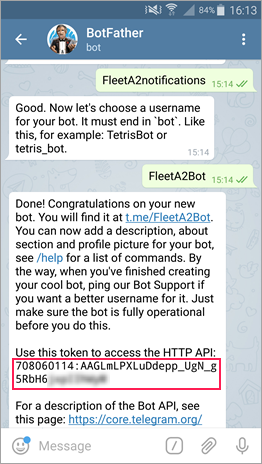
- Create a bot.
- Tap the Search icon.
- Find the bot named BotFather.
- Tap Start and follow the instructions.
- Specify the received token in the Bot token field.
- Tap Start to subscribe to the created bot.
- Indicate the user ID.
- Find the bot named userinfobot.
- Tap Start. If you have found the correct bot, you should receive a message with the user ID. In order to find out the ID of another user, forward any of their messages to the bot.
- Indicate the received ID in the Channel ID field.
Configuring notification sending for a public channel
- Follow steps 1 and 2 from the instruction above.
- Create a public channel in Telegram.
- Add the created bot to the channel as an administrator with a right to post messages.
- In the Channel ID field in Wialon, indicate the link to the channel in the @link format (without t.me/). The link is specified in the Info section of the channel.
- In the channel settings, add subscribers, that is, the users who should receive notifications, or send them the invite link.
In the same way, you can configure notification sending for a public group. In this case, add the created bot as a member.
Configuring notification sending for a private channel
- Follow steps 1 and 2 from the instruction above.
- Create a public channel in Telegram.
- Add the created bot to the channel as an administrator with a right to post messages.
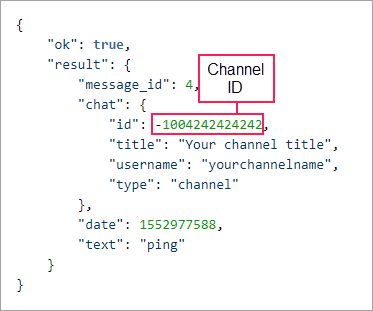
In the address bar of the browser, insert
https://api.telegram.org/bot<YourBotToken>/sendMessage?chat_id=<@YourChannelName>&text=ping
Replace <YourBotToken> with the bot token and <@YourChannelName> with the link to the created channel in the @link format (without t.me/). The link is specified in the Info section of the channel.
Press Enter.
From the resulting code, copy a numerical value after "chat":{"id": and paste it into the Channel ID field in the notification properties in Wialon.
Delete an automatic message in the channel.
In the channel settings, change its type from public to private.
In the channel settings, add subscribers, that is, the users who should receive notifications, or send them the invite link.
Configuring notification sending for a private group
- Follow steps 1 and 2 from the instruction above.
- Create a private group in Telegram.
- Add the created bot to the group as a member.
In the address bar of the browser, insert
https://api.telegram.org/bot<YourBotToken>/getUpdates
- Replace <YourBotToken> with the bot token.
- Press Enter.
- In the resulting code, find the ID of the created group (a negative value between "chat":{"id": and "title":"Group name"). To find this place quickly, use the key combination Ctrl+F, type the name of the group in the search box, and press Enter.
- Insert the ID of the group in the channel ID field of the notification properties in Wialon.
- In the group settings, add members, that is, the users who should receive notifications, or send them the invite link.
Display online notification in a pop-up window
This action is used to set up online notifications that will be displayed in a pop-up window. Such a notification can be silent or accompanied by a specific sound. If no URL is given for the sound, the standard tune will be used. To use a custom tune, enter the URL of the sound. The recommended file size is up to 0.5 MB.
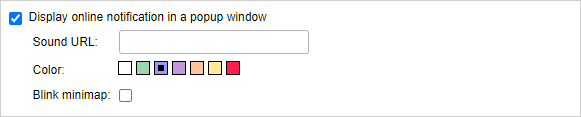
It is possible to receive notifications in the minimap once a notification triggers. To enable this option, check the Blink minimap box in this section.
Different browsers can have restrictions regarding formats of audio files:
| MP3 | WAV | Ogg | AAC | |
|---|---|---|---|---|
| Internet Explorer 9+ | + | + | ||
| Google Chrome 11+ | + | + | + | |
| Mozilla Firefox 12+ | + | + | ||
| Safari 5+ | + | + | + | |
| Opera 10+ | + | + |
To highlight a notification, you can set an individual colour to it. This colour will be applied to the background of the triggered notification so that you could easily notice it.
Send mobile notification
This action allows you to configure sending notifications to a mobile application for selected users. It is available if the Mobile notifications service is enabled in the account properties.
To use this action, the user configuring the notification and the creator of the resource to which it belongs should have the following access rights to recipient users:
- View detailed object properties;
- Act on behalf of this user.
The user configuring the notification should also have these rights to the creator of the resource to which it belongs.
To configure sending a mobile notification, follow these steps:
- Select the mobile application to which the notification should be sent.
- In the list of users, select those who should receive the notification. For a quick search, use the dynamic filter above the list. To select all the users at once, select one of them while holding down the Ctrl key. The list shows only those users to which you have the required access rights.
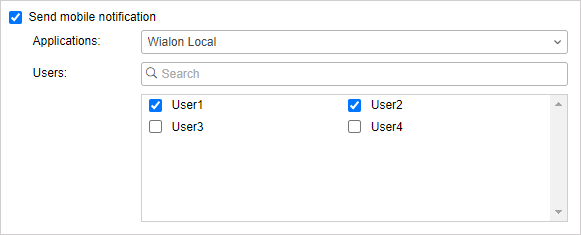
To receive mobile notifications, the recipient users should have the View object and its basic properties access right to the selected unit.
To receive notifications in Wialon for Android and iOS, the users should authorize in the application and enable the Notifications option in the settings.
Send a request
This action allows you to send alerts about the triggered notifications to third-party systems. When choosing this action, indicate the server address as well as the method of the HTTP request (POST or GET).

Register event for unit
This action allows you to register a notification as an event in the unit history. As a result, you can generate a report on these events.
To work with this action, the Manage events access right is required.
Register as violation
This action works together with the Register event for unit action and allows to register a notification not only as an event but also as a violation. As a result, the Violations report becomes available.
Send a command
When you select this action, a command is sent to the unit (units) when a notification is triggered. Select a command from the list of the available ones. The list contains all commands configured in the properties of selected units if a user has the Send commands access rights towards them. Next to the header of the command can be special icons that signify the following:
 : all selected units support this command;
 : not all of the selected units support this command (see details in the tooltip).
If necessary, set the parameters.
If you send commands that require the input of text or a message (for example, Send custom message or Send message to driver), you can use tags (the same as for the notification text). When the command is executed, the entered tags are converted to the values that correspond to them.
Tags are converted to values only if a command is selected as a notification action (not if a command is sent manually from the Monitoring panel).
You can read more about commands here.
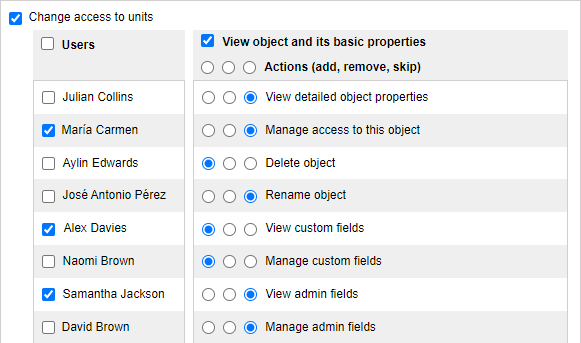
Change access to units
This action allows you to change access rights to units once the notification is triggered. Select users whose access rights should be modified when trigger conditions occur. Specify the access rights that should be applied to these users after the notification triggers. You can use this feature, for instance, in the following situation: suppose you have created a user who monitors the transportation of their cargo, that is, they have access rights to certain units. After the cargo is delivered to the agreed place (that is, after the unit entered a geofence), these units automatically become unavailable to the user.
To work with this action, the Manage access to this object access right is required.
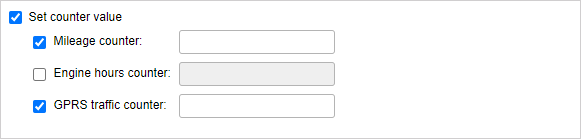
Set counter value
This action is used to change (or reset) counter values when notification triggers. Select one or more counters (mileage counter, engine hours counter, traffic counter) and set new values for them.
To work with this action, the Edit counters access right is required.
Store counter value as a parameter
This action is used to store the current values of mileage or engine hours counters as parameters in unit data messages (odometer or engine_hours correspondingly). These parameters can be used to create sensors on their basis (for example, engine hours sensor) and to get initial/ or final mileage in reports. For more precise calculations, it is recommended to store counters while the unit is parked, for example, once a day at night time.
To work with this action, the Edit counters access right is required.

Register unit status
This action is used to set a new status for a unit when a notification triggers. For instance, when a unit enters a geofence, the private state can automatically switch to business.
To work with this action, the Manage events access right is required.
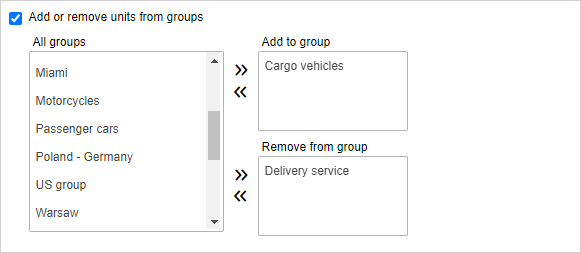
Add or remove units from groups
This action is used to change the contents of unit groups when a notification triggers (units can be added or removed from the group). On the left, there is a list of all available unit groups. Move the required groups to the Add to group or Remove from group sections. As a result, after the notification triggers, the unit will be added or removed from the group.
Send a report by email
This action is used to send a report to the specified email address(es) once the notification is triggered. Indicate the resource to which the required report template belongs (select All available to view the templates of all available resources), report template, object (only the objects that belong to the same resource as the template are displayed), file format(s), time interval and report parameters. Note that when choosing an object, sometimes it is convenient to use the Triggered unit option. In this case, a report is generated for the same unit that the notification triggers for.
Afterwards, for the Content item, specify whether you would like to receive files/archives or the link to the FTP server where the corresponding files/archives are stored. Indicate the report interval: choose particular dates or specify any time interval for the previous X minutes/days/weeks/months/years. Enter an email address(es) to which the report should be sent upon notification triggering. To generate a report, the View messages and reports access right is required. To find out more about file formats or parameters description, see the Export report to files section.
The information about the geodata in such a report is shown in accordance with the settings of the user-creator of the resource in which this notification was created.
If the access right to the object (or the object itself) was removed, the created notification is not executed.
Change icon
This action is used to replace the icon of the current unit by the specified one when the notification triggers. Click on the Library button to open the window with the available icons.
![]()
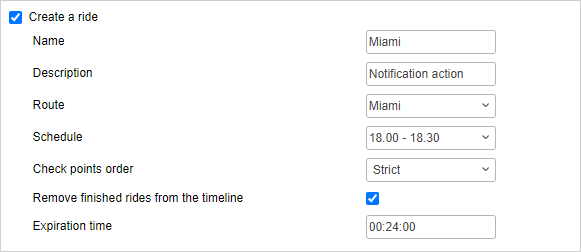
Create a ride
After the notification triggers, a new ride can be created for a unit. For example, when one ride is finished, a new ride can be assigned, or when a unit leaves the geofence (for example, a garage), a new ride is automatically created for it. More about the parameters that can be configured for rides are described in the Routes section.
Separate driver
This action is used to separate the driver automatically when the notification is triggered. This action can be useful when, for example, you want to separate the driver from the unit once the unit returns to the depot.
The Create, edit, delete drivers access right is required for this action. The driver separation can take place only within the resource to which the notification belongs.
Separate trailer
This action is used to separate trailers when the notification is triggered.
To work with this action, the Create, edit, delete trailers access right is required. Like for the driver separation, trailers should belong to the same resource in order for the action to be executed correctly.