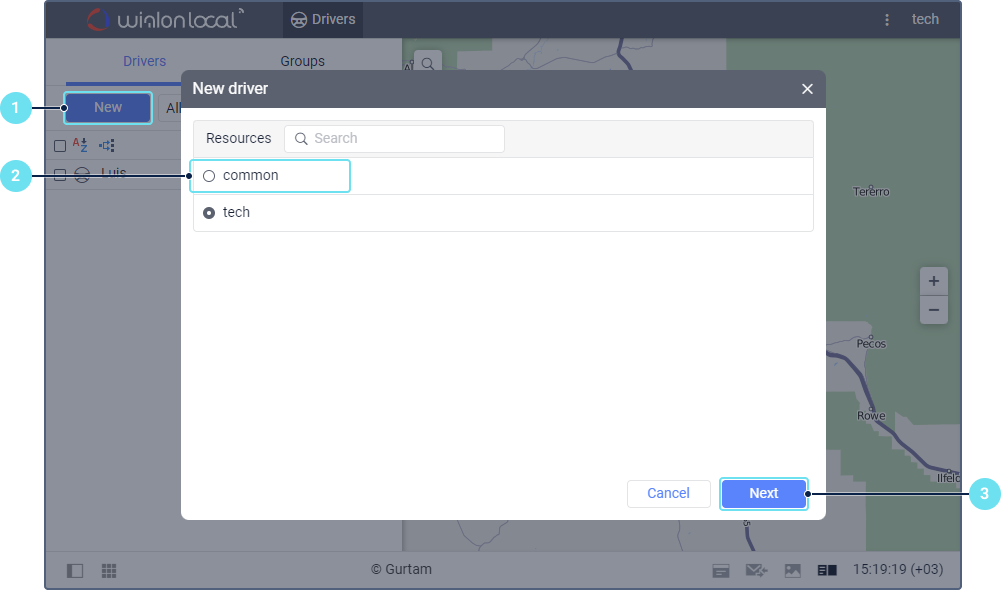
In order for the user to be able to create drivers:
- the Drivers service should be enabled in the properties of the account in the resource of which a driver should be created;
- the user should have the Create, edit, and delete drivers access right to the resource in which a driver should be created.
To create a driver, follow these steps:
- Click New on the Drivers tab.
- Select the resource in which you want to create a driver.
- Click Next.
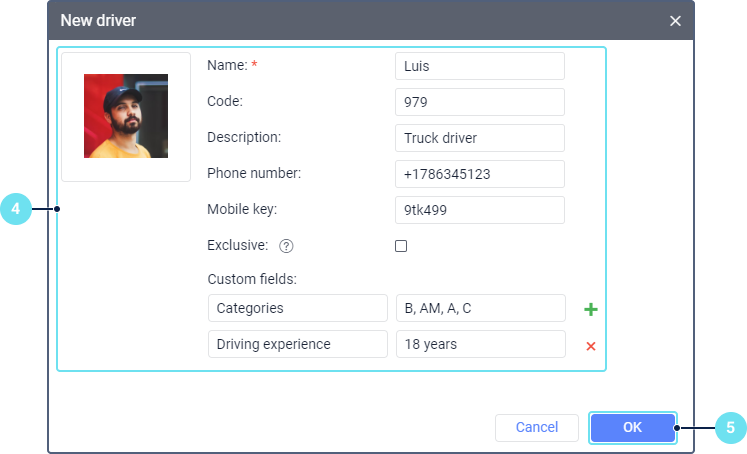
- Enter the driver name and specify other required properties.
- Click OK.
After saving, the new driver is shown in the list.
Driver properties
The table below shows the main properties of drivers. The required fields are marked with an asterisk (*).
| Property | Description |
|---|---|
| Name* | The driver's name in the system. When specifying it, take into account input rules. |
Code | The driver's unique identification code. If you want to use this code for the automatic assignment of drivers, make sure that the code (including the case) corresponds to the parameter value of the created sensor of the Driver assignment type. Otherwise, the driver assignment is not registered in the system. For example, you specify the avl_driver parameter in the sensor properties. The message from the unit contains the following parameter value: avl_driver=000a777e10. In this case, you should specify the value 000a777e10 in the Code field. If you applied conversion to a parameter, you need to specify the value after conversion in the field. |
| Description | Additional information about the driver. It is shown in the driver's tooltip. |
| Phone number | The driver's phone number. It should be indicated in the international format (for example, +370 ХХХ ХХ ХХХ). The phone number is shown in the driver's tooltip and can be used to make calls and send SMS messages to the driver. Drivers and units with the same phone numbers cannot exist in the system. |
| Mobile key | The driver's password required to log in to the Logistics Local mobile application. |
Exclusive | The option which allows you to avoid assigning several drivers to one unit at the same time. Take the following peculiarities into account:
|
| Custom fields | Custom fields with additional information about the driver. They are shown in the driver's tooltip. To add a custom field, enter its name, value (optional), and click on the icon . To delete a custom field, click on the icon . You cannot add same-name custom fields in the properties of one driver. After saving the properties, all custom fields are shown in alphabetical order. |
| Photo | The driver's photo or other image. It is shown in the driver's tooltip and used as an icon to indicate the driver in the list and on the map. To upload a file, click on the photo area and select the required file on the disk. Supported formats are PNG, JPG, GIF, and SVG. It is advisable to upload square photos. To delete the photo, point to it and click on the icon . |
Drivers, like any other resource content, can be copied from one resource to another using the import and export tool. Read about the particularities of their transfer here.
You cannot transfer groups of drivers.


