In this section, you can get information about active, planned and fulfilled routes in the form of reports. The reports are required for analyzing key parameters and optimizing the courier's work.
Report execution
To execute a report, specify its parameters in the filter (Report parameters) and in the settings above the table. To do this, follow the steps below.
- In the report settings, select the columns that should be displayed in the report.
- In the Delivery day field of the filter, specify the period for which the report should be generated. You can select the reporting period using a quick interval (yesterday, today, last week, last month, last 7 days, last 30 days) or the calendar. In the calendar, you should select the beginning and end of the interval. If the duration is one day, indicate this day as the interval beginning and end.
- In the Filtration field, select the object by which the data in the report should be filtered: by unit, by driver, by unit group, or by driver group.
- In the Object field, select the name of the item on which the report should be generated.
- In the Settings field, select what orders should be included in the report: all, visited, non-visited, visited in time, visited late, confirmed, rejected.
- Click Execute.
In the upper-right corner of the report, there are buttons for printing the report () or exporting the report to an XLSX () or PDF () file.
Report settings
In the report settings, you can select the columns that should be included in the report. To go to the settings, click on the icon .
Reports of two types are available:
- on routes;
- on routes and orders.
Reports on unit can contain the Statistics block with summary information about orders.
Follow the links to see a detailed description of the columns available in reports on routes, on routes and orders and in the Statistics block.
To include the required columns in the report, move them from the left list (Available columns) to the right one (Table). You can do this in the following ways:
- double-click on the row with the name of the required column;
- click on the arrow (→) that appears when you point to the row with the column name;
- drag the required row to the right while holding the left mouse button;
- click Add all to move all the columns to the right.
In the Table list (on the right), you can change the position of the selected columns (drag the row up or down holding the left mouse button) and delete them (click on the cross at the end of the row). Click Clear to remove all the columns from the list on the right.
Planned and actual routes
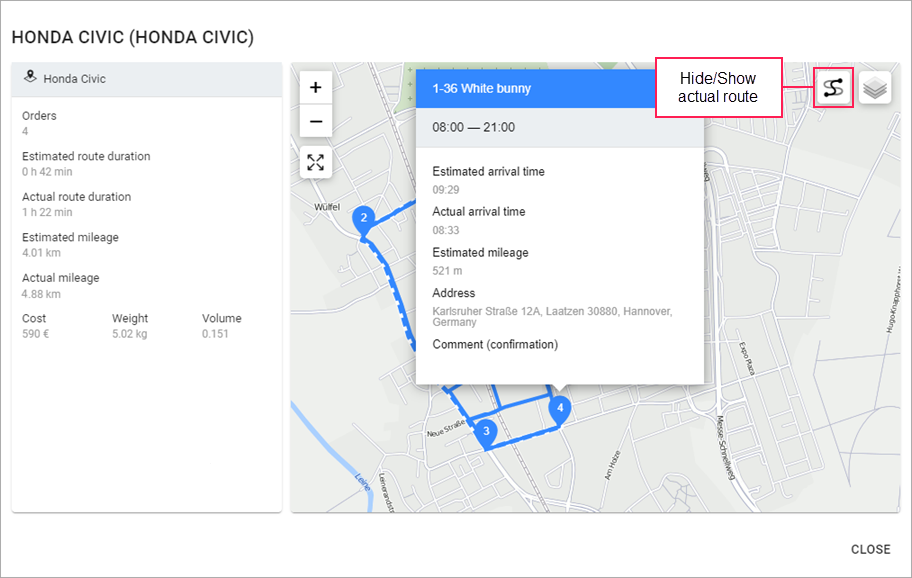
For routes stored in the history, there is a function which allows you to compare the planned and actual routes on the map. To use it, point to the line with the route in the table and click on the icon . The window that opens next consists of two parts: the route information and the map.
The window header shows the route name and the name of the unit that fulfilled this route.
The route information displays the following:
- unit name;
- number of orders in the route;
- estimated and actual route duration;
- estimated and actual mileage of the unit after visiting all the route points;
- cost, weight, and volume of goods in all the orders of the route.
The planned route is shown as a dotted line on the map by default. Click on the icon to add the actual route displayed as a solid line on the map.
The length of the actual route visible on the map is limited.
The numbers of the route points on the map correspond to the sequence in which they are visited. The markers which can indicate these points are described in the Route point markers on the map section.
If you click on a route point (warehouse or order), a window with the following lines opens:
- warehouse or order name;
- warehouse working hours or delivery interval in the case of an order;
- estimated and actual arrival time;
- estimated mileage;
- warehouse or order address;
- comments left by the courier when visiting the warehouse or confirming the order.
If the data is not displayed in any of the rows, you should add a column with the same name in the report settings.


