

This tool helps to quickly lay the shortest routes from one point to another with a visit to any number of intermediate points. You can specify the order of points yourself or use the order proposed by the Routing tool. You can indicate key points by double-clicking on the map or entering the required addresses. The resulting route can be saved as a geofence with or without control points or as a route and can be used for route or geofence control later on.
Selecting provider
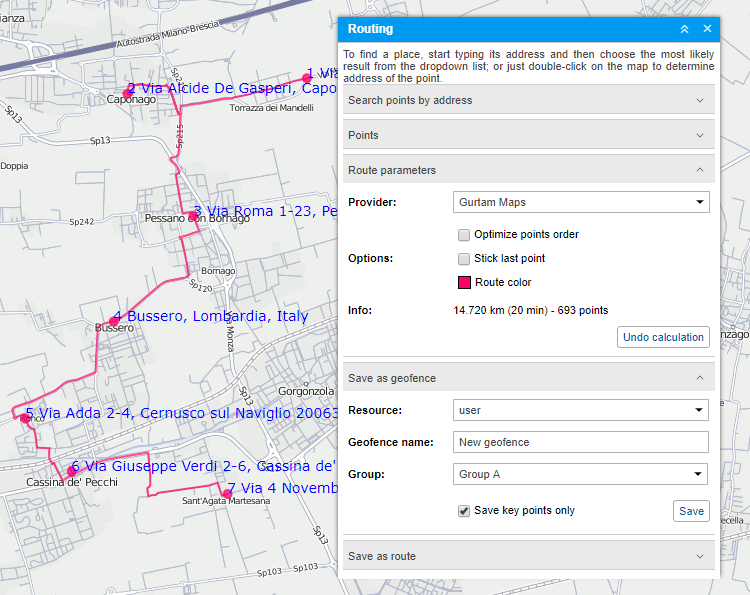
Gurtam Maps is a default cartographical service used to build a route. In addition, depending on the available maps, other map providers, such as Google, Yandex, HERE, and others, can also be used. However, if you use these maps, you should choose the order of points manually (or pre-determine it by Gurtam Maps). Some providers offer additional options. For example, if Google is selected, the route can be mapped taking into account different conditions: whether you travel by car (default option) or on foot, whether you want to avoid highways or not, and so on. Using Yandex, you can build routes considering traffic jams. Namaa maps allow you to select the traffic scheme (plan) that should be taken into account when planning a route.
Placing points
There are two basic ways to set key points for a route.
Using the mouse
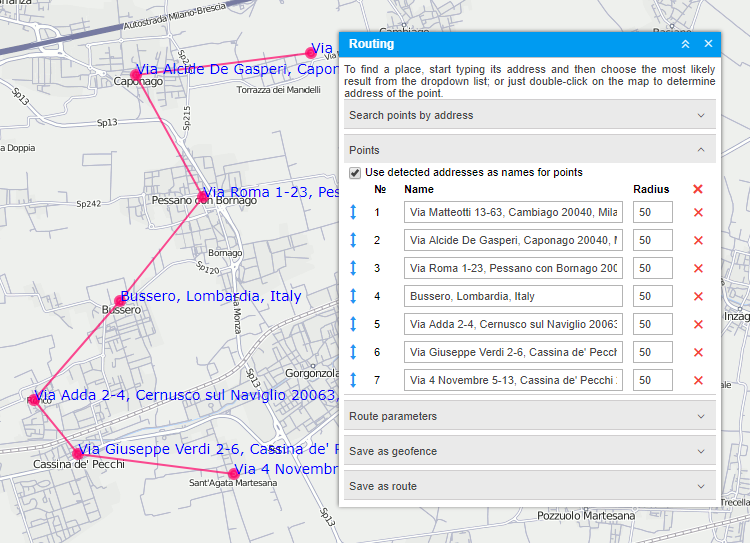
Just make several double-clicks on the map to indicate the key points. If the Use detected addresses as names for points option is enabled in the Points section of the window, the addresses are automatically registered as point names. If the address information is missing, the point is added anyway, but without a name.
Using the address tool
In the Address section of the window, indicate the addresses of the points you want to visit. The usage of the Address tool was described in detail in the previous section. The indicated points can be added to the route automatically if the Auto save of points check box is enabled, or manually (by clicking on the Add point button) if the check box is disabled.
If you are going to use this route for route control, it is recommended to choose the starting point of the unit to which this route will be assigned as the first point.
When at least two points are set, it is possible to draw the route. To do this, click on the Calculate button. Note that you might want to pre-edit key points, especially if you are going to save this route as a geofence or as a route.
The list of points is displayed in the Points section of the window. Here you can change the order of points, edit their names and radius, and delete them.
Route calculation
When building a route with Gurtam Maps, you can use a different sequence of route points:
- points follow each other in the order in which they were placed on the map. If you want to use this option, there is no need for any configurations;
- points rearrange to build the shortest route. If you want to use this option, enable the Optimize points order check box. In this case, the first route point is fixed, and a route is laid without being tied to roads. The last point can also be fixed. To use this feature, activate the Stick last point check box. As a result, regardless of the order of the points, the last indicated point is the last route point as well.
In addition, you can select the colour of the route line.
Having configured the required parameters, click on the Calculate button. After that, you can see a list of the available routes based on the indicated points in the Route parameters section. The length and approximate duration are specified for each of them. Click on the route in the list to view it on the map. Now you can select the most appropriate route and save it.
If you want to change some parameters (for example, add more points), click Undo calculation. If you want to build a new route, first remove all points in the Points section of the window.
If the calculation is made using routing, the route is built taking into account the existing roads. Gurtam Maps is supported as a default routing provider for this tool.
Saving as a geofence or route
After the route is created, the result can be saved as a line-shaped geofence or as a route. The Save as geofence section automatically opens by default after the calculation. Here you should enter the geofence name, select the resource and the geofence group (if you want to include the created geofence in an existing group) and click on the Save button.
There are two options for saving the route:
- if the Save key points only check box is enabled, the geofence will correspond to the line passing along the shortest path through the points of the route;
- if the check box is not activated, the geofence will correspond to the entire line of the route.
The newly created geofence will appear on the Geofences tab where it can be further edited.
The result can also be saved as a route. To do this, it is necessary to expand the corresponding section, indicate the name for the route, and click Save. The created route appears on the Routes tab where it can be further edited.
To build a route, you can also make use of a specially designed app Delivery Service.