

Trailers, the same as drivers, can be bound to units either manually or automatically.
Simultaneous bindings of trailers to units is the same as for drivers.
To bind or unbind trailers to units, the Create, edit, and delete trailers access right to the resource is required.
Manual binding
Manual binding and unbinding can be done in the Trailers panel. To the right of each trailer, there is the icon  or
or  which binds or unbinds the trailer. If you do not have enough access rights, the icon is disabled
  .
.
Click on the Bind to unit icon (), select the required unit, and click OK.
The contents of the list correspond to the work list of the Monitoring panel. If there are no units in the list, click on the Add all available icon ( ). If the list is still empty, it means you have no access rights to the units.

To unbind a trailer from a unit, click on the unit icon to the right of its name, and then use the icon . Besides, you can unbind the trailer by registering a new working shift or by deleting bindings from history.
Automatic binding
Automatic method of binding trailers to units requires special equipment, such as, for instance, iButton digital electronic keys.
Also, make sure to make the required adjustments in the system: both for trailers and for units. Follow the steps described below.
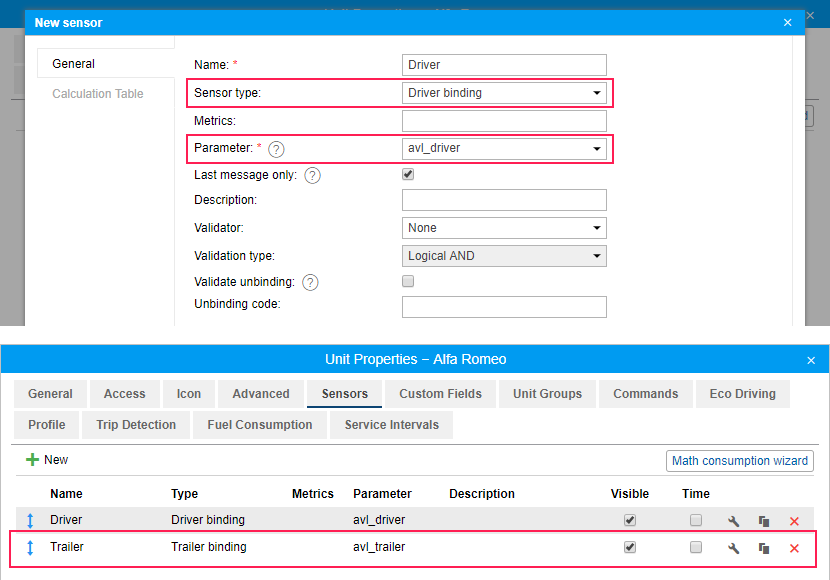
1. Create a special sensor of the Trailer binding type in the properties of each unit to which the trailer is supposed to be bound automatically. You can use the avl_driver parameter for this sensor or any other parameter depending on your equipment and its configuration.
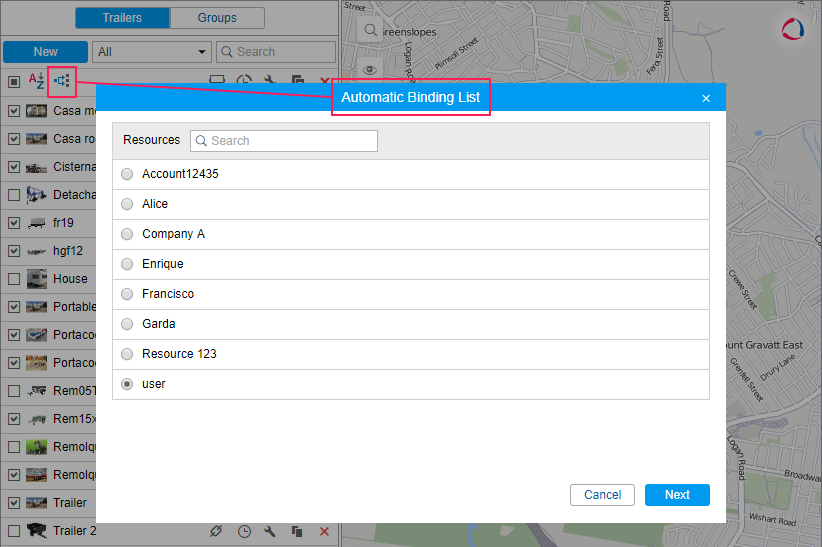
2. Click on the icon of automatic binding ( ) to create a list of units to which the trailers from this resource can be bound automatically. A box with the list of all available resources opens. Verify that you have access rights to the user that is the creator of the resource, otherwise, a warning will be displayed.
Select the resource whose trailers will be used in automatic binding. To learn which trailers belong to a particular resource, go to the Trailers panel and apply the filter by resource (drop-down list to the right of the New button).
After choosing a resource, click Next. If only one resource is available, it will be selected automatically.
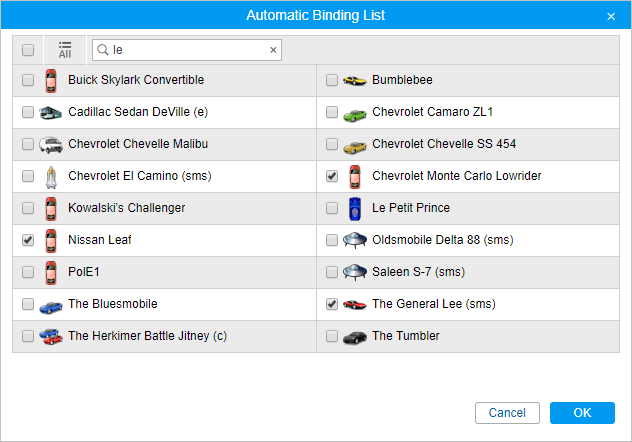
The next dialog box contains a list of units to which the trailers can be bound automatically. Select the required units.
The trailer will be automatically bound to a unit with the help of iButton if two conditions are met: this unit has a special sensor configured in its properties and it is indicated in the list of units bound automatically.
Automatic binding of trailers is removed in the same way: in the Automatic binding dialog box, select a resource and clear the boxes of units for which the automatic binding will not be used.
Registration of the working interval
This option allows to view the history of bindings, remove them if necessary, and register the shift of the trailer manually. To perform these actions, click on the Register work interval icon (![]() ) to the right of the trailer name.
) to the right of the trailer name.

To view the history of bindings, specify the required interval and click Show. In the list of bindings, you can see the unit name, the date and time of each binding and unbinding.
You can remove an incorrect binding or unbinding from the list by clicking on the icon ![]() at the end of the line.
at the end of the line.
You cannot remove the last binding or unbinding registered in the system.
To register a shift manually, click on the Register shift button in the lower left corner of the dialog box. Next, select the unit and specify the beginning and/or end of the shift. To activate the field of the shift end, select the check box next to it.
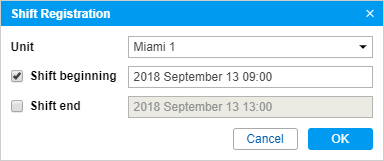
When registering a shift manually, the date and time indicated as its beginning and end should be in the past or present. If you specify the beginning and end in the future, the shift is registered with the current date and time.
To finish the shift registration, click OK.