A round is a combination of a route, its schedule and a unit assigned to them. A unit performs a route (that is, visits the check points of the route) in accordance with the assigned schedule.
Rounds can be created manually or automatically.
Manual round creation
To create a round manually, click on the Create manual round button next to the required schedule.
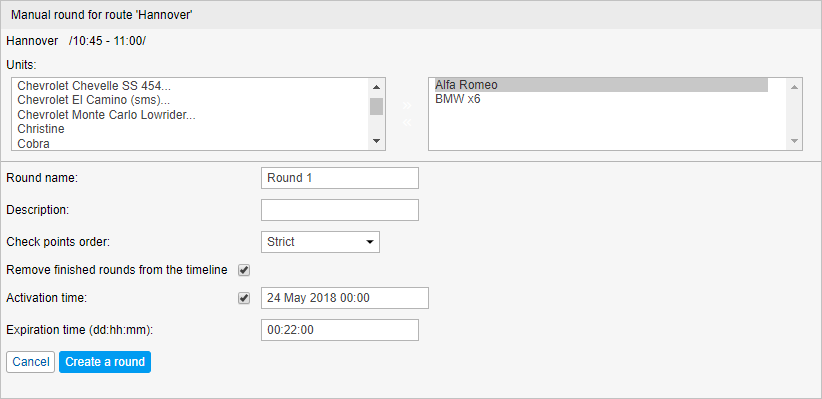
At the top, you can see the names of the selected route and schedule. Below, you can see two lists. The units to be assigned are displayed in the left one and those already selected go to the right one. The left list does not contain all the units available to you, but only those included in the monitoring panel work list. In case the work list is empty (when the dynamic work list is used or when the units have been deleted from the work list manually), the units available to you in accordance with the access rights will be displayed.
Then indicate the name of the round, add a description (optional), select the check points order, set the activation and the expiration time, and other parameters (see the Schedule section for more information).
The activation time is the date and time when the system starts to track the round. This parameter is especially important for schedules of the Relative to activation type. If you leave this field empty, the round begins when the unit enters the first check point (if the check points order is strict) or any check point (in other cases).
Next, click Create a round.
Automatic creation of rounds
You can enable automatic creation of rounds in two ways.
The first method is available for the schedules of the Relative to day type after the assignment of at least one unit. Activate the Automatically create rounds for this schedule option and click Save, or switch on the corresponding button before the name of the schedule in the work list.
The second method implies creating a notification and selecting the Create a round notification action.
Round list
To see the list of rounds created or planned for a certain schedule of a certain route, click on the button .
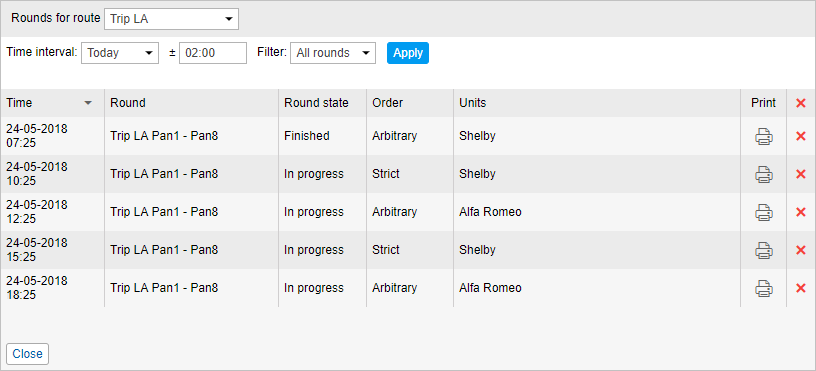
Select the time period (Hour, Today, Yesterday, Week) or set a custom interval. For the first four options, you can extend the time period for several hours (+hh:mm). It is convenient if the working shift ends after midnight.
Use a filter to specify the rounds you need. You can display either all rounds or those of a certain status: in progress, pending, finished, estimated, or aborted. Having set all the parameters, click on the Apply button to display the required rounds. Besides, in the dropdown list in the upper left corner, you can choose whether to display the list of rounds for one route or for all the routes simultaneously.
The table shows the following information: the start time of the round, its name, state (finished, aborted, estimated, in progress, history), check points order (arbitrary, strict, skipping possible), and the assigned units.
You can print out the information about any round. To do it, click on the printer button in the Print column next to the required round. The printing report consists of two tables. The first one provides the information about the round (its name, description, state, units, activation time, route name and schedule), the second — about its check points (their sequence number, address, the arrival time, and if activated in the schedule, the departure time). Click on the Print button to print it out.
At the end of the line there is the delete button . It removes the rounds and, as a result, they disappear from the timeline and receive the History status. However, all the information about them is stored in the database and is available in reports.


