

To create an order, select New order in the Planning item of the navigation bar.

The window of the order creation is divided into five sections:
- order parameters;
- map;
- custom fields;
- client's contact information;
- attachments.
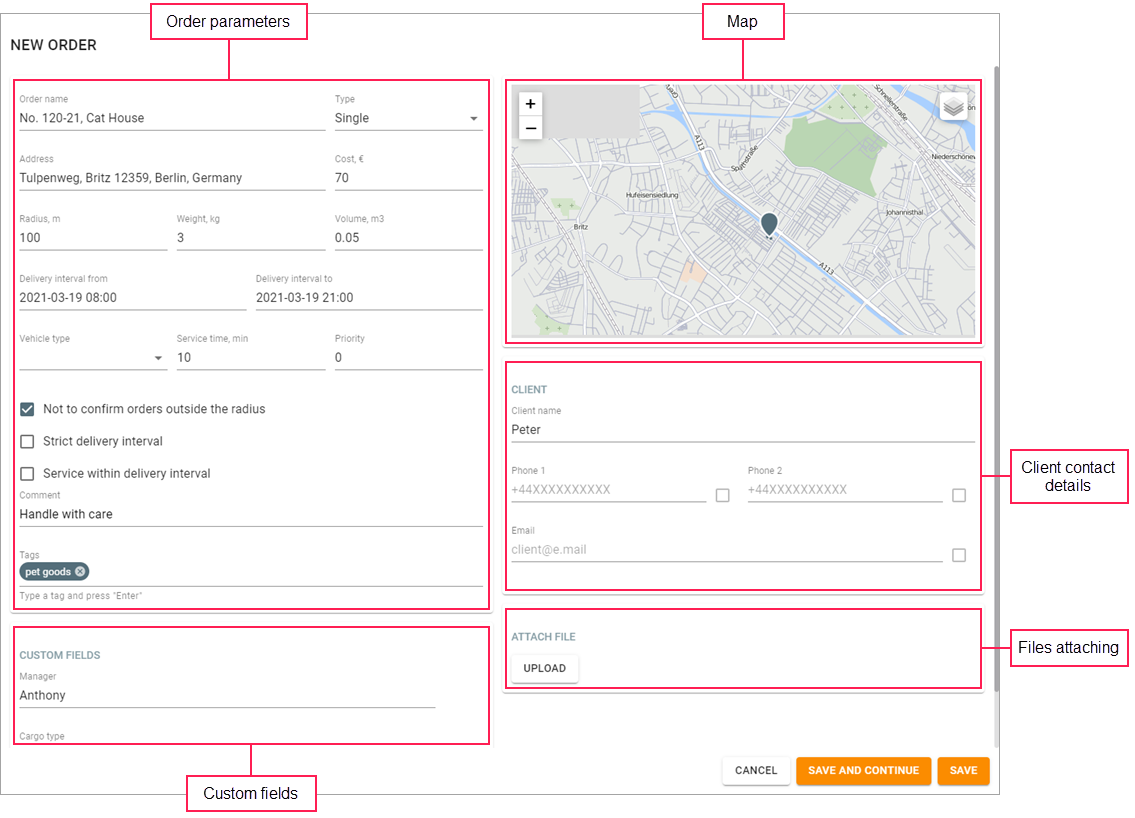
Order parameters
In this section, you should indicate basic information about the order and delivery. The Order name and Address fields are required.
| Parameter | Description |
|---|---|
| Order name | The name of the order. |
| Type | The type of the order. There are two types of orders:
|
| Address | The delivery address. You can specify it in one of the following ways:
|
| Cost | The cost of goods in the order. The monetary units in which the cost should be displayed can be specified on the General tab of the settings. |
| Radius | The area around the delivery point within which the order can be fulfiled if the Not to confirm orders outside the radius option is enabled. If you indicate a geofence as the address, the radius is counted from its centre. |
| Weight | The weight of goods in the order. |
Volume | The volume of goods in the order. You can change the unit of volume measurement on the General tab of the settings. |
| Delivery interval from/to | The beginning and end of the interval within which the driver should fulfil the delivery. You can enter the interval manually or specify it in the calendar. To select a one-day interval in the calendar, double-click on the required date. The date is not specified for permanent orders. |
| Vehicle type | The type of the vehicle. The list of types is formed from the values specified on the Profil tab of the unit properties in Wialon (Comment field). If the Vehicle type field is filled in, then the vehicle types from the orders included in the route will be automatically selected in the filter at the second stage of planning. |
| Service time | The approximate time of unloading or loading goods. It is taken into account when planning and calculating the automatic termination time of the route. |
| Priority | The order priority expressed as a number from 1 to 99. The higher it is, the higher the priority of the order. If the Exclude orders from the route action is selected in the Route restrictions section of the settings, then the orders of a lower priority will be excluded if the restrictions are violated. The priority does not influence the sequence of orders in the route and the probability of not arriving on time. |
| Not to confirm orders outside the radius | The option which, when activated, allows a driver to confirm the order only within the specified radius from the place of delivery. |
Strict delivery interval | The option which allows planning the route adhering to the indicated delivery intervals. |
Service within delivery interval | The option which allows including the service time in the delivery interval. This means that the driver should not only arrive at the route point, but also attend to the client within the delivery interval. Otherwise, it will be considered that the point has been visited late. |
| Comment | A comment on the order. |
| Tags | Custom keywords which you can use to sort orders on the Planning page. To add a tag, type its text in the field and press Enter. |
Custom fields
In this section, you can fill in the custom fields created on the same-name tab of the settings.
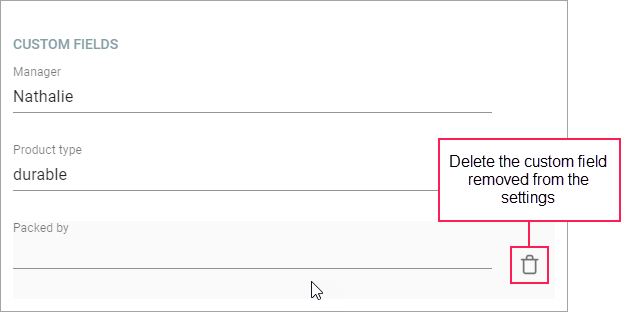
If you have saved a custom field in the order and then deleted it in the settings, it remains in the order. If you want to delete it, point to the line with the field and click on the icon ![]() .
.
The indicated values of the custom fields are displayed:
- in the table on the Planning page;
- in a report with detalization;
- in the mobile application if the corresponding option is activated in the settings.
Map
The marker on the map shows the address specified in the order parameters. To change the address, drag the marker. Besides, instead of entering the address manually, you can just click on the map in the required place.
Client's contact information
The client's contact information is required so that the driver can contact the client using the Logistics Local mobile app. It is also required for sending notifications.
Client name. The name of the client.
In the Phone 1, Phone 2 and Email fields, you can indicate the phone numbers and the email address to which client notifications should be sent.
Attaching files
You can attach one or several files to the order and the driver will be able to see them in the order in the mobile application.
To attach a file, click Upload, select the file on your device, and click Save after filling in all the required fields in the window.