Notice Board
In the Notice board window, you can create information messages (notices) and send them to users.
Creating notices
To create and send a notice, follow the steps below.
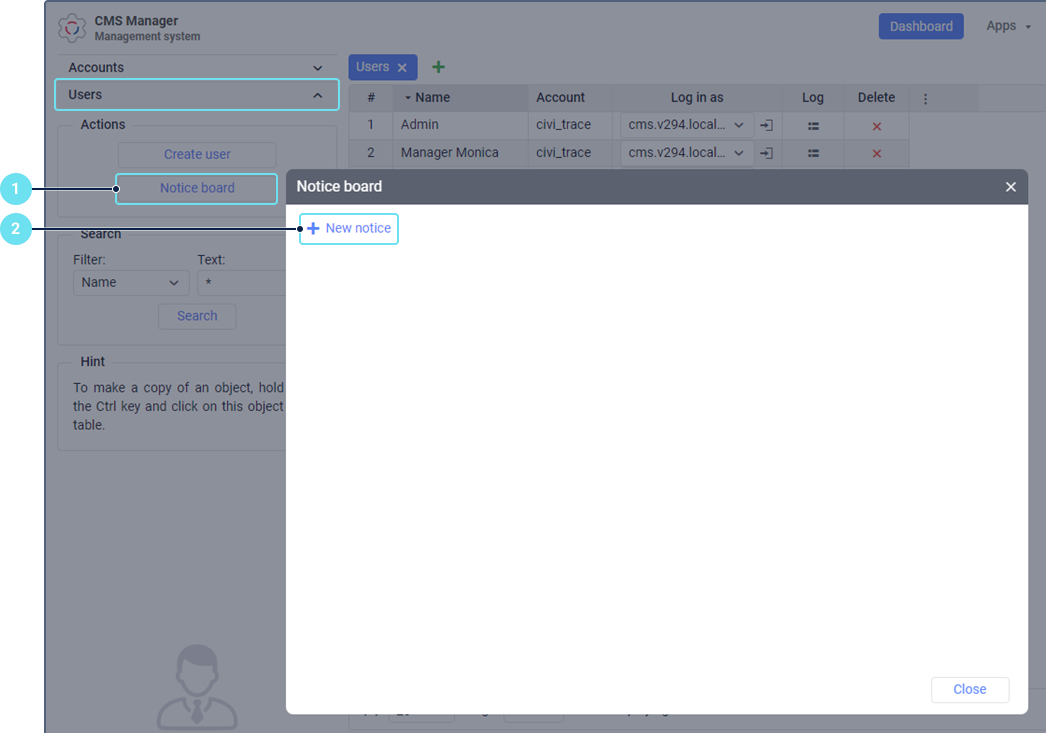
- In the Users section, click on the Notice board button.
- In the window that opens, click New notice ().
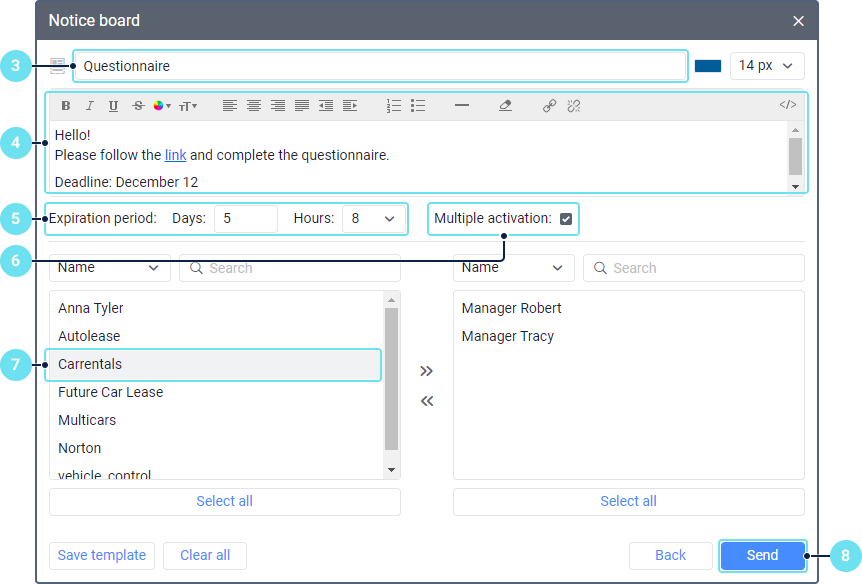
- In the Subject field, specify the notice name. You can select the font color and size for it. To do this, use the palette to the right of the name and select the required font size in the drop-down list. The available sizes: from 12 to 18 px.
- Enter the notice text (any number of characters). Above the input field, there are tools which allow you to perform the following actions:
- customize the font style;
- select the text color using the palette;
- select the font size;
- align the text or add indents;
- create a numbered or bulleted list;
- add a horizontal line (icon );
- clear formatting (to do this, select the text and click on the icon );
- add a hyperlink (to do this, select the text you want to use as a hyperlink, click on the icon , add the link to the address bar, and save it);
show the code of the entered text (icon ).
You can also insert PNG and JPG images into the text. To do this, copy the necessary image from any tool and paste it into the text field using the shortcut Ctrl+V.
- Specify the expiration period of the notice (from 1 hour to 30 days).
- If necessary, enable the Multiple activation option. It allows you to show the notice to the selected users for the specified expiration period every time they log in to the system. If the option is disabled, the notice is shown once until the user closes it.
- Select the users who should receive the notice and move them from the left list to the right one using the icon or by double-clicking them. To search for users, use the dynamic filter above the list. You can search by name, creator, account, billing plan, custom or administrative fields. To select all the users in the list, click Select all.
- Click Send.
When sending the notice, you can also save it as a template. To do this, click OK in the window that opens (or Cancel, to send the notice without saving the template).
The sent notice is shown for all the selected users in the management and monitoring systems. In Wialon for Android/iOS it is shown every time when logging in, once in 8 hours at the most, and is also available in the settings of the Notice board section.
Was this helpful?
Download
All pages
Only this page


