Logistics conceptual diagram
While training partners, the team of trainers noticed that users do not always understand the interconnection of elements in our niche applications. This is especially evident if a partner plans to create a proprietary solution based on the application. To solve the problem, we created this diagram. It will give you a general idea of how Logistics works, although it may not be optimal for learning the application from scratch.
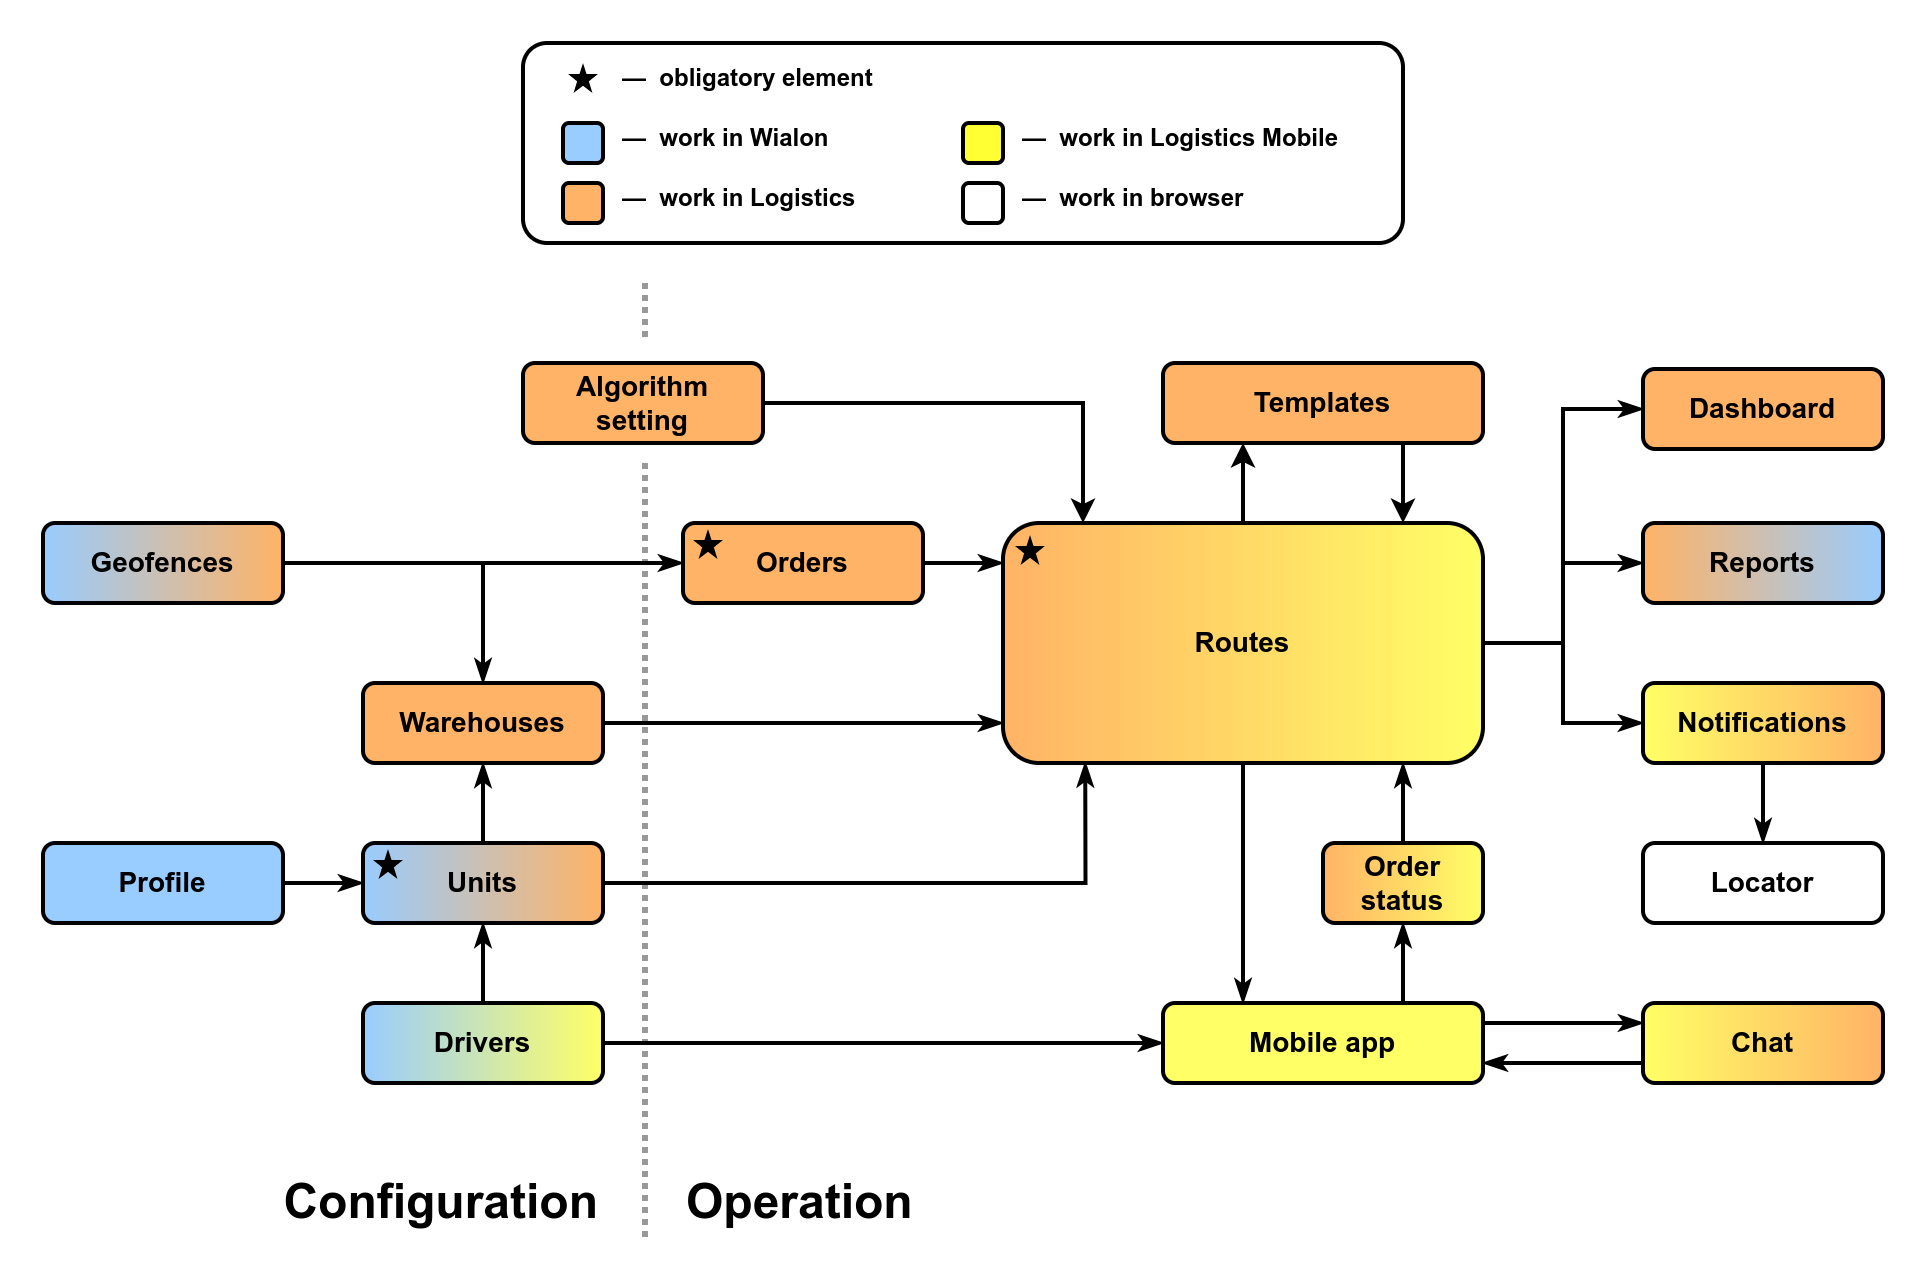
Obligatory elements
Obligatory elements (★) are elements without which the creation or full use of other elements is impossible.
The obligatory elements of Logistics include: units, orders and routes. Other elements are optional, but will make the work with the application more convenient or provide users with new features.
Stages of work
In the diagram, a dotted line distinguishes two stages of work with the application: configuration and operation. It is assumed that the Wialon administrator and/or the dispatcher configures the elements on the diagram’s left side before the everyday use of Logistics begins.
I shall note that the Algorithm setting element is intentionally placed so as to refer to both stages of work. This is because, when calculating the optimal route, the dispatcher can change the algorithm “on the fly” if he/she is not satisfied with the resulting distribution of orders by routes and units. However, in some cases, configuration can be done once and forever according to the specific requirements of the client.
Behavior models and interfaces
In the Logistics application, you can roughly identify 4 behavior models, which are associated with different interfaces, and they are indicated in the diagram by different colors:
- The Wialon administrator works in the Wialon monitoring interface (blue), where he/she creates and configures units, and also adds drivers and geofences.
- The dispatcher works in the Logistics web interface (orange), where he/she partially changes unit characteristics, creates and edits geofences, creates warehouses, configures the algorithm, adds orders, generates routes and templates, monitors the execution of routes, communicates with the courier and views notifications, reports and general statistics.
- The courier uses the Logistics Mobile (yellow) application, where he/she views the routes assigned to units, sets order statuses, receives notifications, and communicates with the dispatcher.
- The client can receive a link that will enable tracking the delivery of his/her order. This link is optimized for browser (white) on smartphone and computer.
Explanation of diagram elements
Logistics uses units created in the Wialon interface. On the Profile tab in the unit properties, you can fill in the Carrying capacity and Useful volume fields, which will allow you to distribute only the permissible number of orders per unit. These and some other unit properties can also be set on the Units tab in the Logistics interface, then they can affect the filtering of orders and units, as well as reports.
Geofences added in the monitoring interface or in the Logistics interface can be used in different ways: firstly, geofences can replace addresses for orders; secondly, the areas corresponding to the warehouse operation territory can be attached for filtering orders by location; thirdly, when the Planning by geofences option is enabled, the route will be generated using only those units that were attached to geofences.
You can attach geofences or units to Warehouses, which will allow you to filter the list of orders or units when generating a route. Alternatively, a warehouse can be used as the start, intermediate, and end point of a route.
There are many options in the Logistics Algorithm settings, but this diagram focuses on the Optimization settings block, which allows you to choose from 3 planning modes, as well as Route restrictions. The last setting allows you to take into account the maximum cargo weight and volume, if these were specified in the unit properties and the order, as well as the maximum number of orders, duration, route distance and idle time. If the automatically generated route exceeds at least one of the selected limits, the route is considered invalid, which leads to one of 3 consequences: multiple routes will be created, extra orders will be excluded from the route, or the unit will return to the intermediate warehouse to load the remaining goods.
There are several ways to create Orders. A standard one is to add orders manually (geofences, among others, can be used as an address), but to speed up the addition of a large number of orders, you can use the import from a file or API. The order properties must necessarily indicate the name, delivery interval and address, but if you specify more parameters, you will get more options. For example, weight and volume can be taken into account when distributing cargo among units with specified characteristics, and the client’s email and phone number will provide the ability to send Notifications to the cargo recipient (including a link to the Locator). Separately, it is worth highlighting the order type: a one-time order is removed from the list after execution, while a permanent order remains. Permanent orders can be further combined into a template to quickly create the same routes in the future.
To generate a route, the dispatcher selects orders and units. If you are working with permanent orders and the Template creation option is enabled at the initial stage, the result will be saving the Template on the same-name tab. Otherwise, the result will be saved as a planned Route. When the time comes to execute the route, it will automatically become active, and the dispatcher will be able to monitor its execution and set the Order status in the Logistics web interface.
Since orders are distributed by units, the Driver must be assigned to the unit to view the route. In the driver properties in the Wialon interface, you should specify the Phone number and Mobile key, which are used as a login and password for courier to enter the Logistics Mobile application. The courier can also set the Order status in it and communicate with the dispatcher in the Chat.
After the route execution, the dispatcher can view the Report in the Logistics interface (the monitoring interface provides the Orders table for this). You can also use the Dashboard with statistics and Notifications. The latter are available for the dispatcher in the web interface, for the driver in the mobile application, and for the client, you can send an email or SMS, which may contain a tag that, when sent, will convert into a link to Locator.