How to get an SSL certificate
You may need an SSL certificate if you log into Wialon using a site with an address other than hosting.wialon.com/eu/us/org (i.e., you use an extra-site). SSL certificate allows the use of HTTPS connection to secure the personal user’s data. If an SSL certificate is not used, an HTTP connection is used, and your site is marked as not secure in the browser.
SSL certificates are issued by special certification authorities. These certification authorities are trusted parties that authenticate the website owner’s identity and issue digital certificates confirming that the connection to the site is secure. You should contact an SSL provider who will work with the certification authorities.
In this article, we list the requirements for adding SSL certificates, and also describe the sequence of steps to obtain certificates.
What files need to be sent to us
In case you would like to enable HTTPS for your site, please, send an email to support@wialon.com. Your email must contain the following information:
- the site name for which the SSL certificate should be applied;
- signed (issued) by a third-party SSL certificate (signed by Comodo, GlobalSign, etc.);
- private key along with the passphrase if it has been specified.
Before sending the files to us, please ensure that the files contain the corresponding data. You can open files with the help of a text editor to check the content.
-
A file with the certificate usually has one of these extensions: CRT, PEM, or TXT. The files should have the following content:
-----BEGIN CERTIFICATE----- <> -----END CERTIFICATE----- -
The file with the certificate should NOT contain a certificate request that looks as follows:
-----BEGIN CERTIFICATE REQUEST-----
<>
-----END CERTIFICATE REQUEST-----
If you see this information in the file, it is not a certificate file but a certificate request. We do not need it when adding the SSL certificate.
-
A file with the private key usually has one of these extensions: CRT, PEM, or TXT. The files should have the following content:
-----BEGIN RSA PRIVATE KEY-----
<>
-----END RSA PRIVATE KEY-----
Requirements
-
From our side, only commercial certificates valid for a year or more are accepted.
-
Self-signed and short-term certificates are not accepted.
-
Let’s Encrypt certificates are not accepted.
-
The SSL certificate and private key must correspond to each other.
-
We do not host third-party files to confirm ownership of the domain.
To get the SSL certificate, you need to confirm domain ownership. There are different ways to do it. Please note that we don’t host third-party files for this purpose, so please select an alternative method of domain ownership confirmation when selecting the confirmation type. For example, you can use email. With this option, an email containing a unique code and a confirmation link will be sent to the email address of the domain’s administrative contact.
You can get more details about alternative validation methods from your SSL service provider.
SSL certificate generation
The easiest way to get an SSL certificate is to ask your SSL provider to generate the SSL certificate for you, and they will create all the required files on their side. In this case, you don’t need to use the following instructions.
The following files must be generated to get an SSL certificate: a CSR request and a private key.
If you need to create the mentioned files on your side, please follow the brief instructions below. The steps depend on your operating system (Linux, macOS, or Windows).
Before generating a CSR request and private key, we recommend contacting the SSL service provider to learn some nuances. For example, some companies ask not to enter an email address, challenge password, or an optional company name when generating the CSR.
How to get an SSL certificate on Linux/macOS
-
Make sure that OpenSSL is installed. For that purpose, open the terminal and run ‘openssl version’. If OpenSSL is installed, the version will be displayed. If OpenSSL is not installed, please, do it by the corresponding commands that depend on your operating system. You can find out the required command in the documentation available on the Internet.
-
Use OpenSSL to generate a CSR and match the private key. For that purpose, execute the command below to generate a 2048-bit RSA private key and CSR. When executing the command, it will be necessary to enter data such as a passphrase, country, domain for which the CSR request will be generated, and others.
To skip a field, press Enter on the keyboard.Remember the passphrase because it is used to encrypt the private key. You will need it to access the generated private key.
openssl req -newkey rsa:2048 -keyout PRIVATE_KEY.key -out CSR_REQUEST.csr- The Country Name (optional) — a two-letter country code.
- State or Province Name (optional) — your state or province name, or use the Locality name if you have none.
- The Locality Name field (optional) — your city or town.
- The Organization Name field (optional) — the name of your company or organization. If the company or department has an ‘&’, ‘@’, or any other symbol using the shift key in its name, the symbol must be spelled out or omitted to enroll.
- The Common Name field (required) — the Fully Qualified Domain Name of the website the certificate will protect. It should be set the same way the client will address it. In most cases, this will be the entire domain name.
- Email Address (optional) — your email address. The email used for CSR generation will not be used for domain control validation or delivery of the issued certificate.
- The Challenge Password field (optional) — might be needed for certificate revocation.
-
You will get 2 files: CSR request and private key. Please save the private key somewhere where the risk of its being deleted will be minimized.
-
Send two files from the previous step to the certificate provider. The provider will send you a signed certificate and the private key.
-
Send us a signed certificate, private key, and information on which site they should be added to.
-
We will recheck, add them, and inform you about the results.
In case you face issues using OpenSSL, you can replace step 2 by using Digicert OpenSSL CSR Wizard. This service helps to create a CSR request. Just fill in the form and press Generate. As a result, the service will create a console command with all required options. Copy this command and execute it in the terminal. Please note that this approach still requires OpenSSL to be installed.
How to get an SSL certificate on Windows
OpenSSL
-
Download and install Win32 OpenSSL or Win64 OpenSSL.
-
Press Win on the keyboard and type ‘cmd’.
-
Click the right button on the Command prompt and select Run as administrator.
-
Move to the folder where you’ve installed OpenSSL. For example, it can be:
cd C:\Program Files\OpenSSL-Win64\bin -
Run the following command:
set OPENSSL_CONF=*OpenSSL base folder*\bin\openssl.cfg -
Restart your computer to apply the changes.
-
Press Win on the keyboard and type ‘cmd’ to find the Command prompt.
-
Click the right button on the Command prompt and select Run as administrator.
-
Go to the subfolder ‘bin’ of your OpenSSL folder. If you’ve installed by default settings, it might look like:
cd C:\Program Files\OpenSSL-Win64\bin -
Enter the following command to generate a private key file with the name ‘PRIVATE_KEY’ and a certificate request file with the name ‘CSR_REQUEST’.
openssl req -newkey rsa:2048-keyout PRIVATE_KEY.key -out CSR_REQUEST.csr
-
Enter the PEM pass phrase. It is used to output an encrypted private key.
-
Enter the following information that will be incorporated into your certificate request:
-
Country Name (optional) — a two-letter country code.
-
State or Province Name (optional) — your state or province name, or use the Locality name if you have none.
-
Locality Name field (optional) — your city or town.
-
Organization Name field (optional) — the name of your company or organization. If the company or department has an ‘&’, ‘@’, or any other symbol using the shift key in its name, the symbol must be spelled out or omitted to enroll.
-
Organizational Unit Name (optional) — your unit or department name.
-
Common Name field (required) — the Fully Qualified Domain Name of the website the certificate will protect. It should be set the same way the client will address it. In most cases, this will be the entire domain name.
-
Email Address (optional) — your email address.
The email used for CSR generation will not be used for domain control validation or delivery of the issued certificate.
-
-
Enter the following extra attributes to be sent with your certificate request:
- A challenge password (optional) — a password by which an entity may request certificate revocation.
- An optional company name (optional).
-
The files with the required private key and certificate request will be generated and saved in the folder
C:\Program Files\OpenSSL-Win64\bin -
Send two files to the certificate provider. The provider will send you a signed certificate and the private key.
-
Send us a signed certificate, private key, and information on which site they should be added to.
-
We will recheck, add them, and inform you about the results.
IIS Manager
-
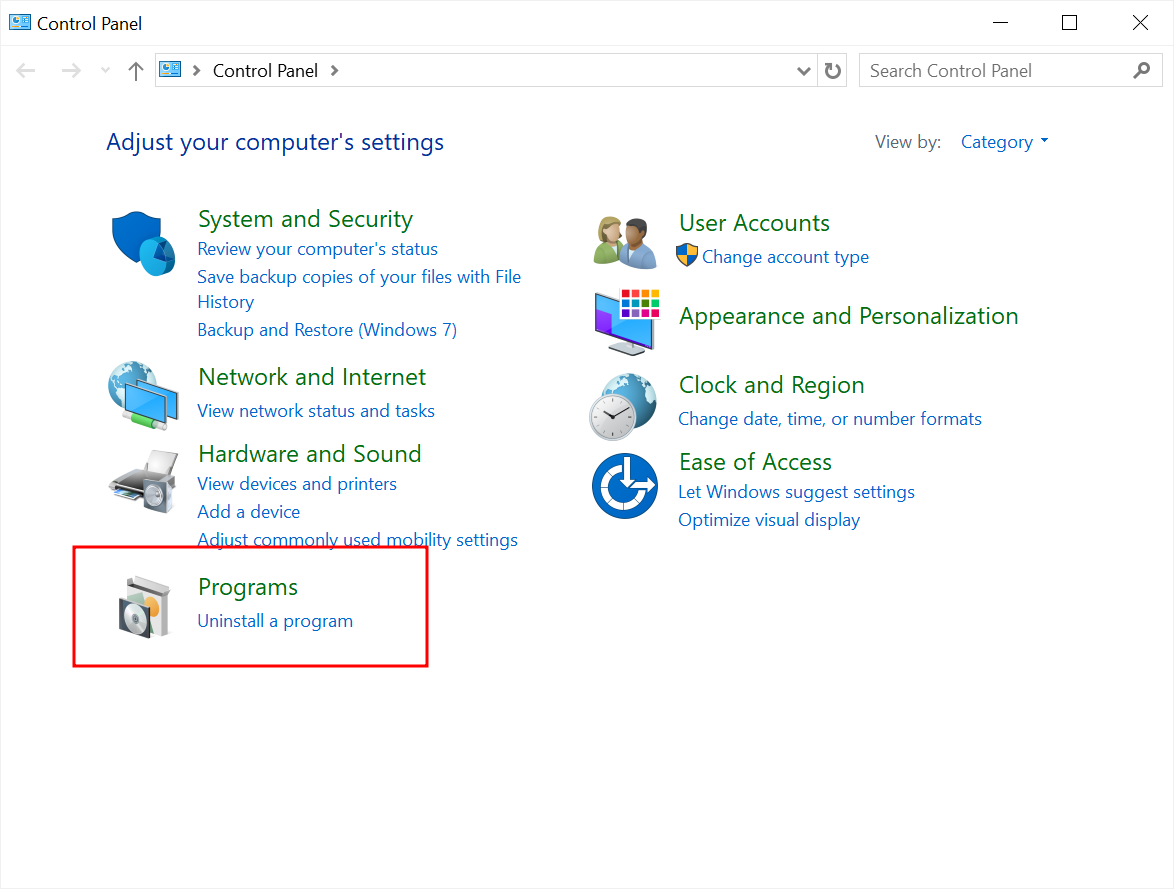
Press Win on the keyboard and type ‘Control Panel’. Then click it in the search results.
-
Select Programs.
-
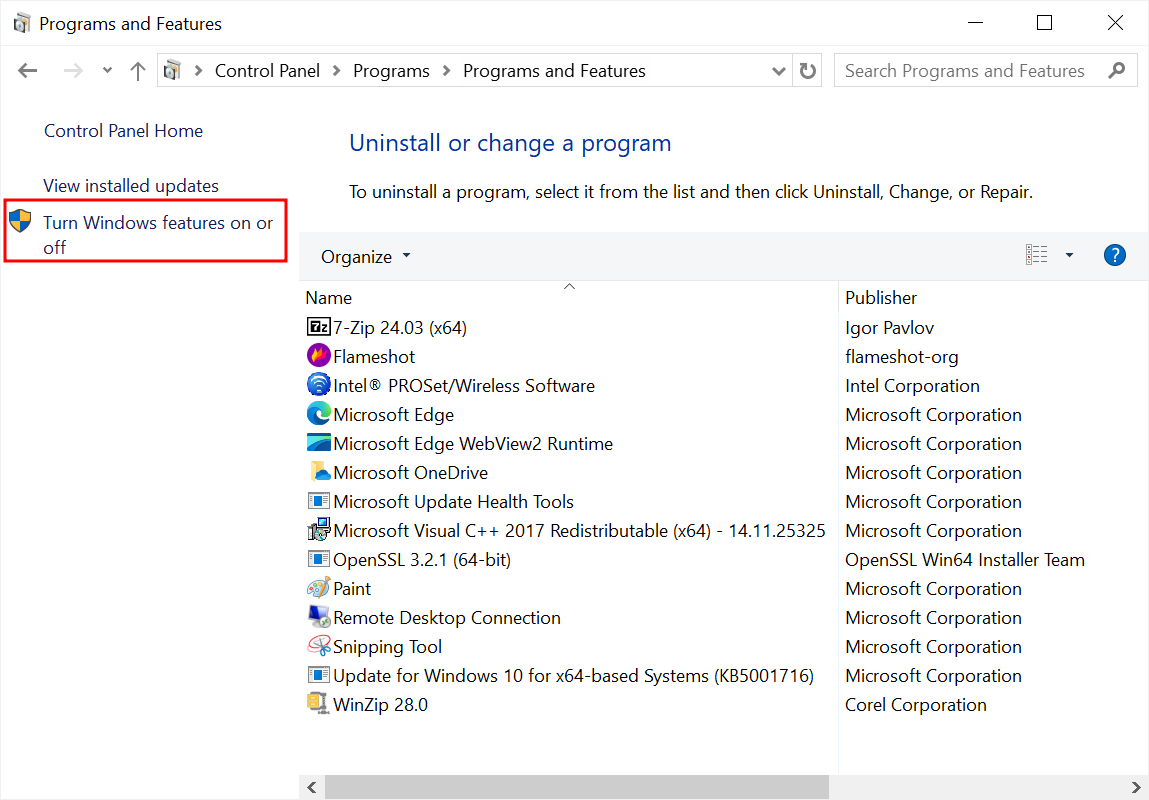
At Programs and Features, click Turn Windows features on or off.

-
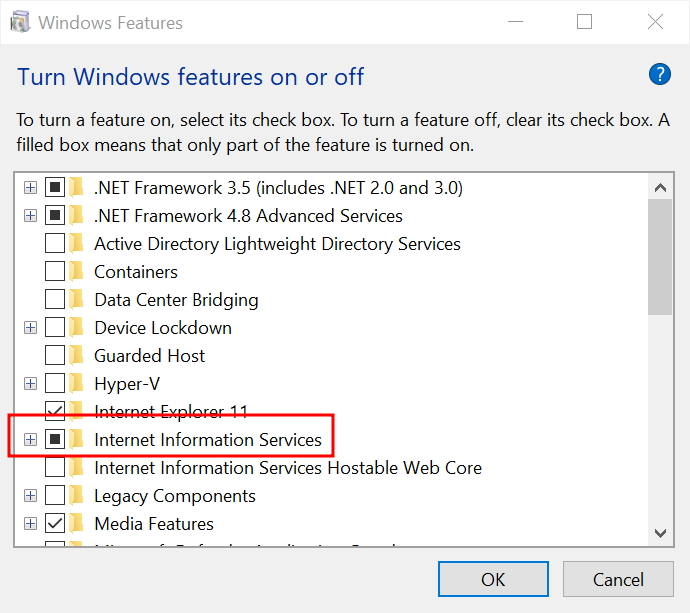
In the new window, click the checkbox next to Internet Information Services and press OK.
-
When installation is complete, press Close.
-
Press Win on the keyboard and type ‘Internet Information Services (IIS) Manager’ in the search bar. Then click it from the search results to launch.
-
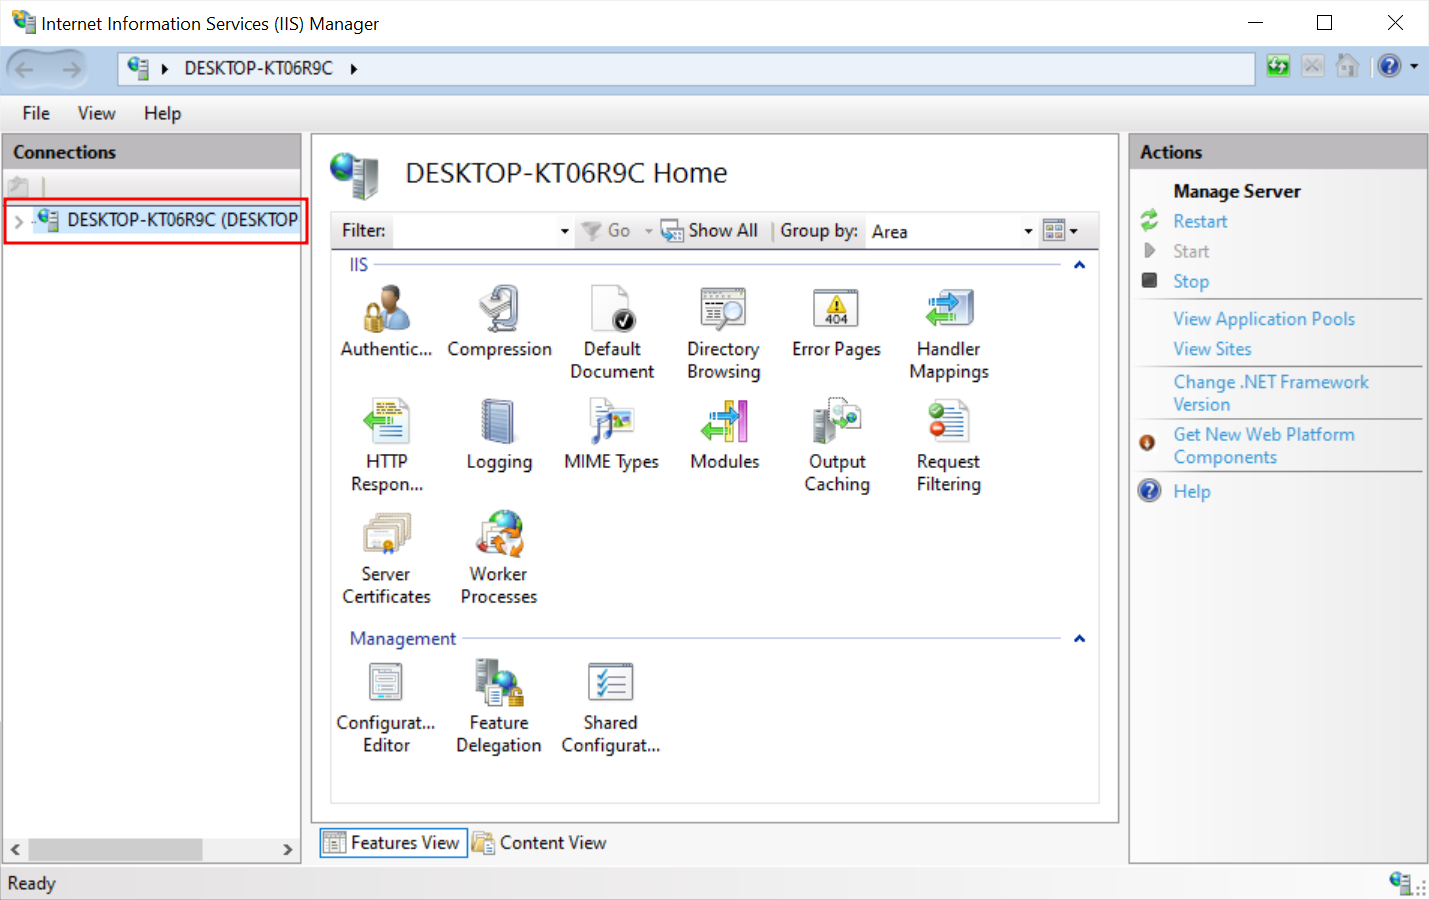
In the new window, in the left column Connections, select the server.
-
Double-click the Server Certificates icon in the center panel of the window.
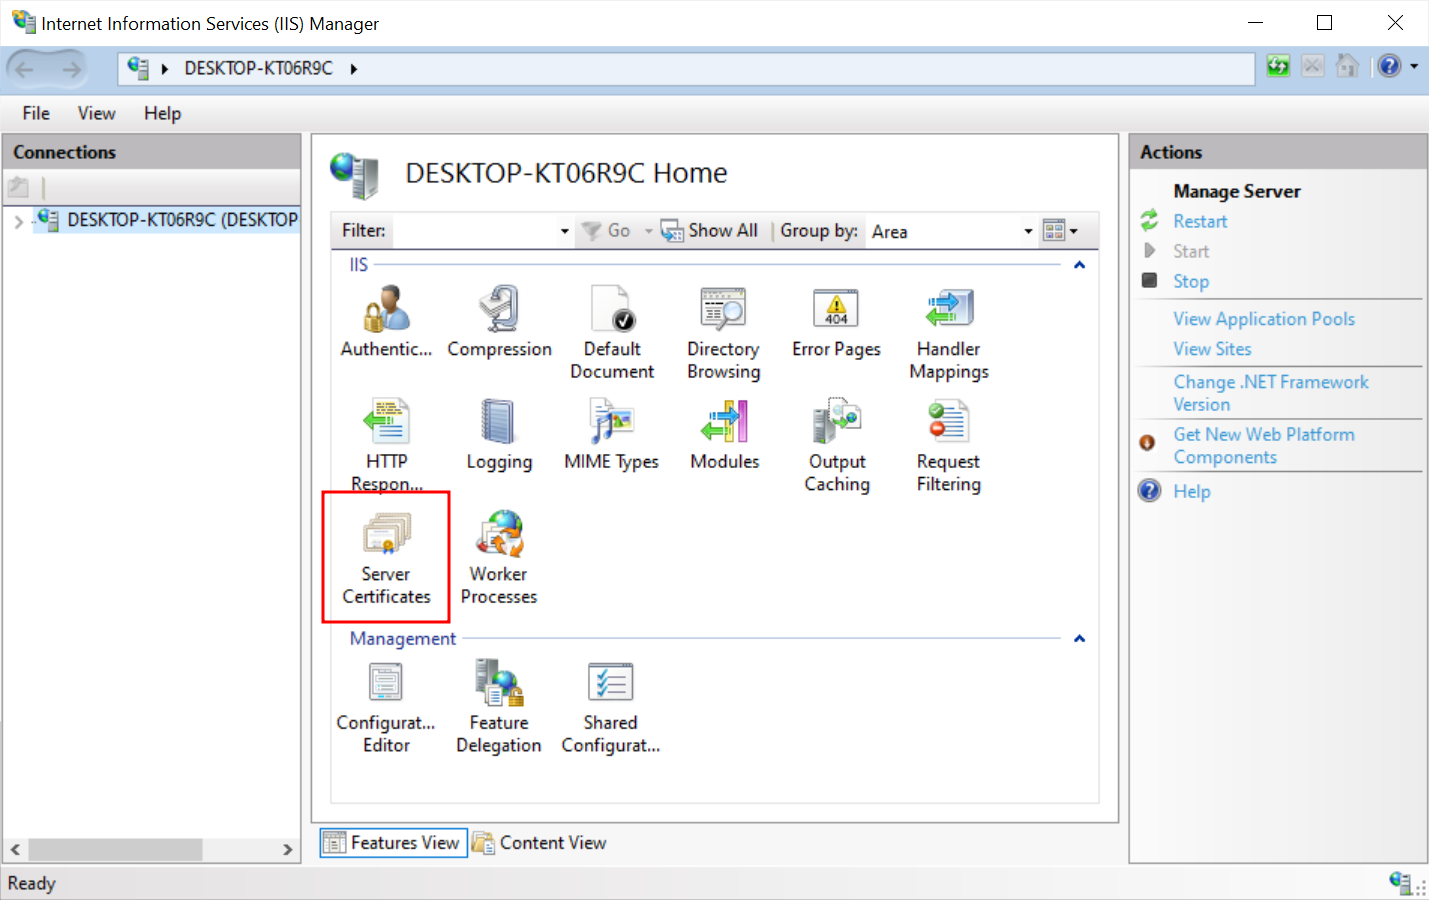
-
Click the Create Certificate Request link in the Actions column on the right side of the window.
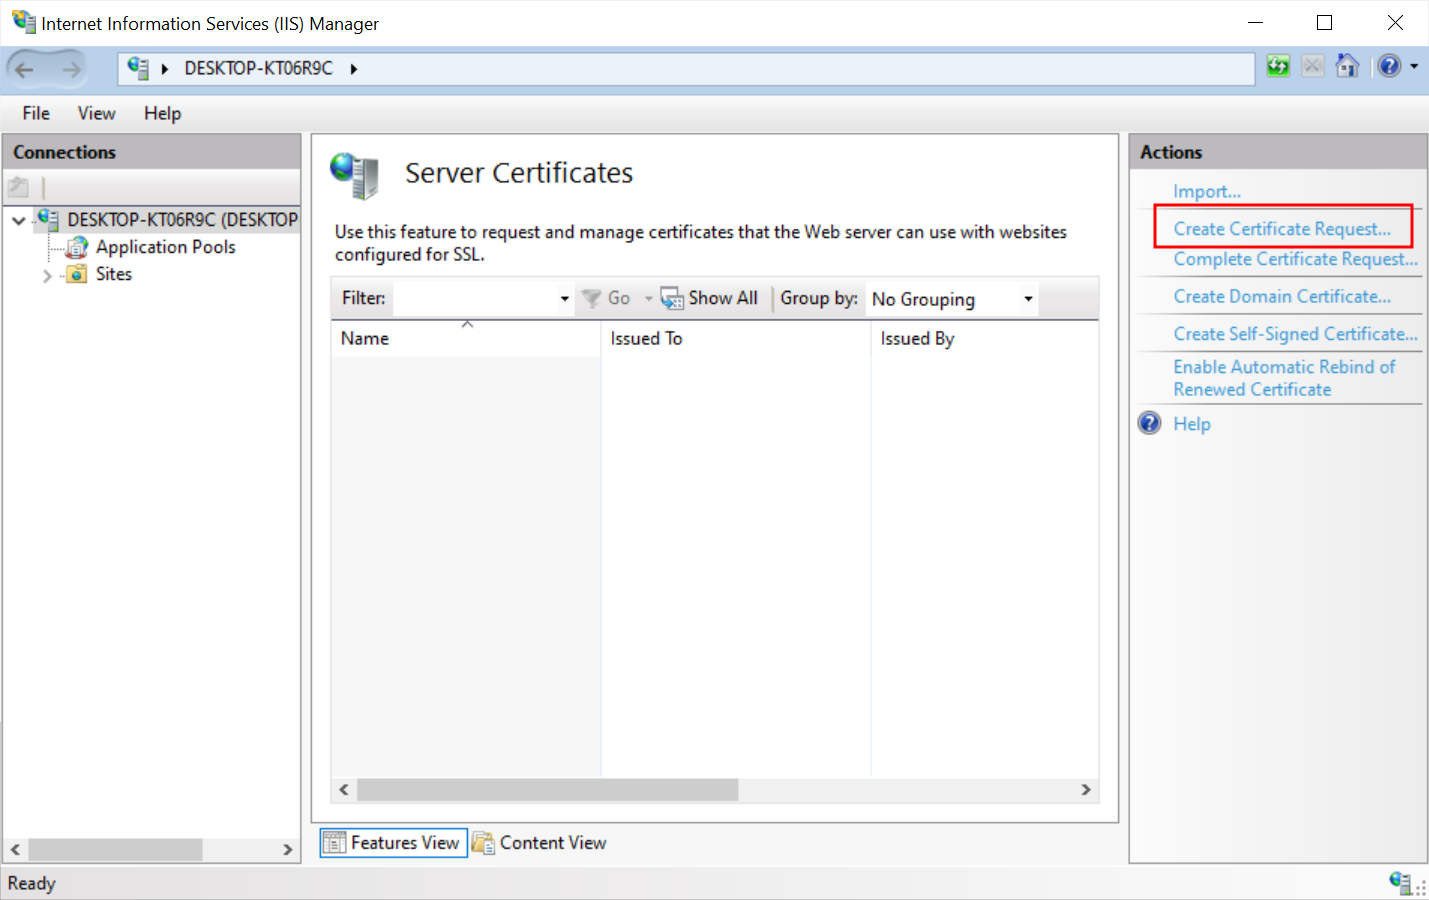
-
Enter the required information and press Next:
-
Common Name field — the Fully Qualified Domain Name of the website the certificate will protect. It should be set the same way the client will address it. In most cases, this will be the entire domain name. You can also set a wildcard, like
*.mydomain.com. -
Organization — the name of your company or organization.
-
Organizational Unit — your unit or department name.
-
City / Locality — city or town where your company is located.
-
State / Province — your state or Province name, or use the Locality name if you have none.
-
Country/ Region Name (optional) — select from the drop-down list.
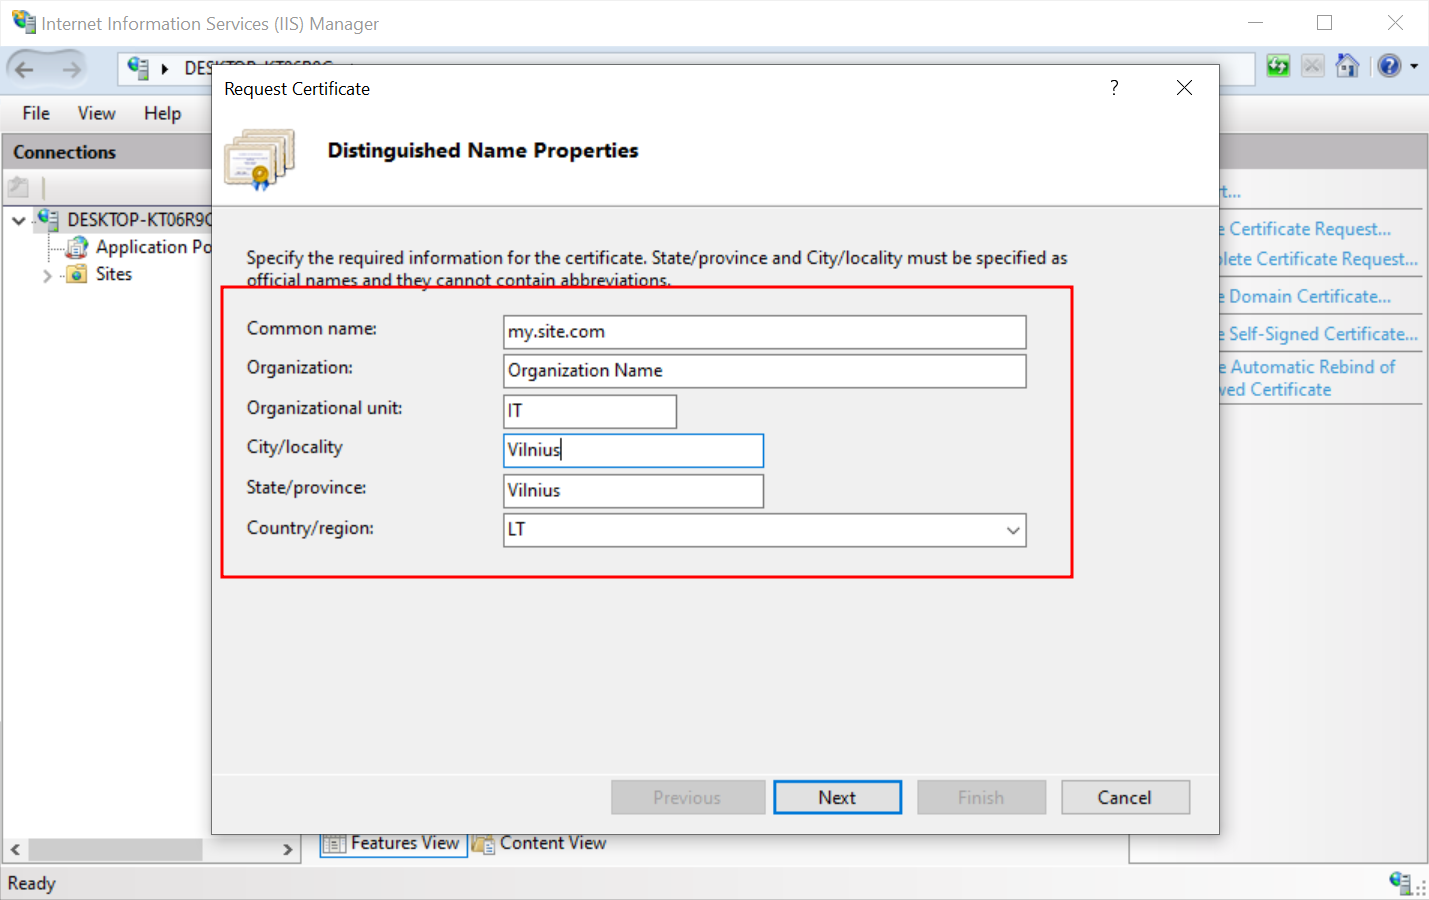
-
-
Set Cryptographic Service Provider Properties. In the drop-down menu, select Microsoft RSA SChannel Cryptographic Provider as the cryptographic service provider, 2048 as the Bit length and press Next.
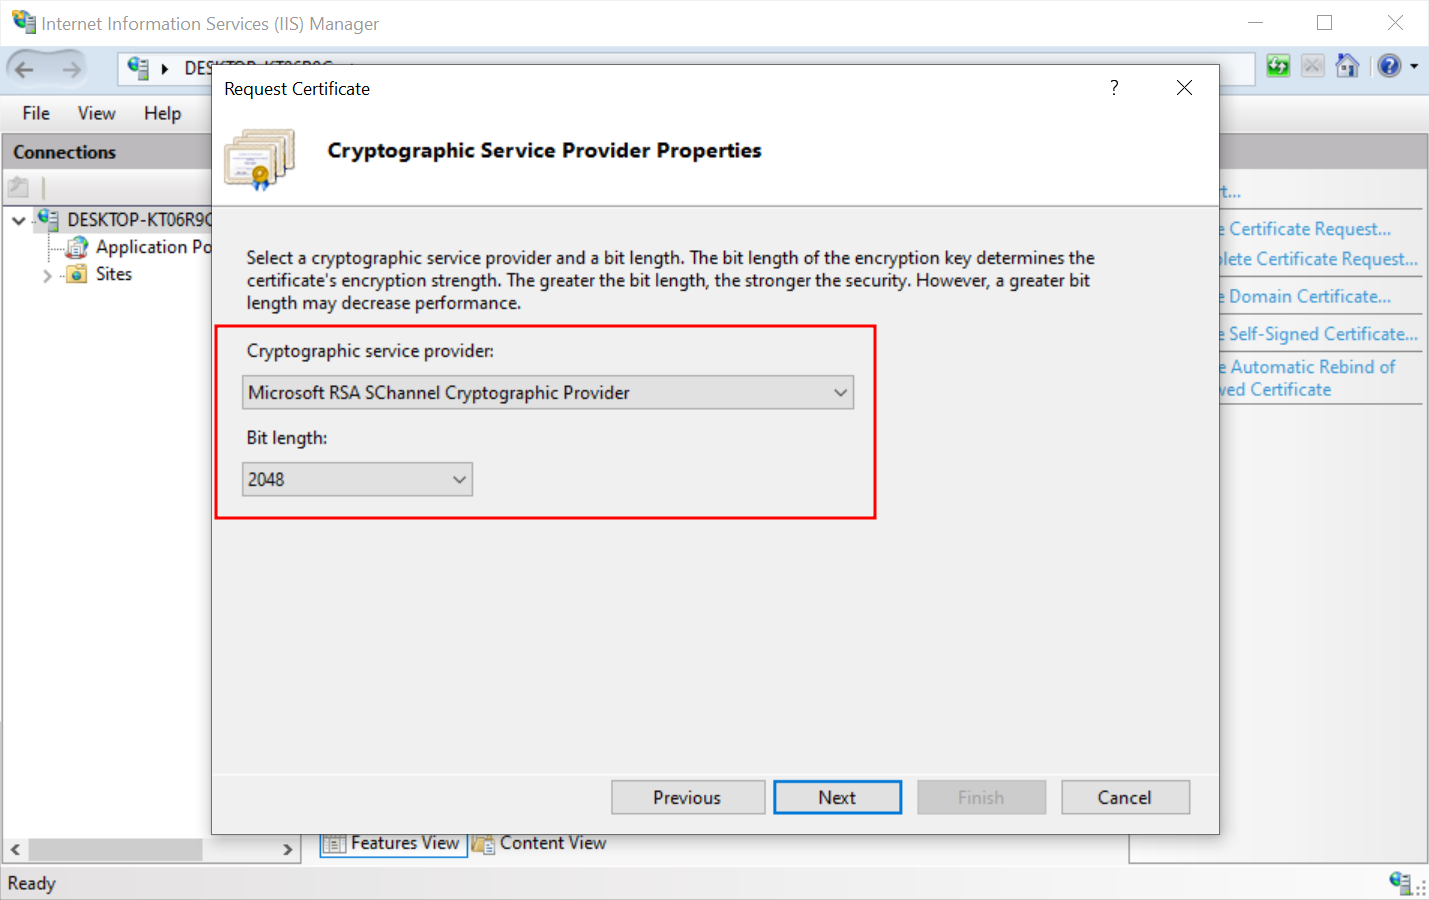
-
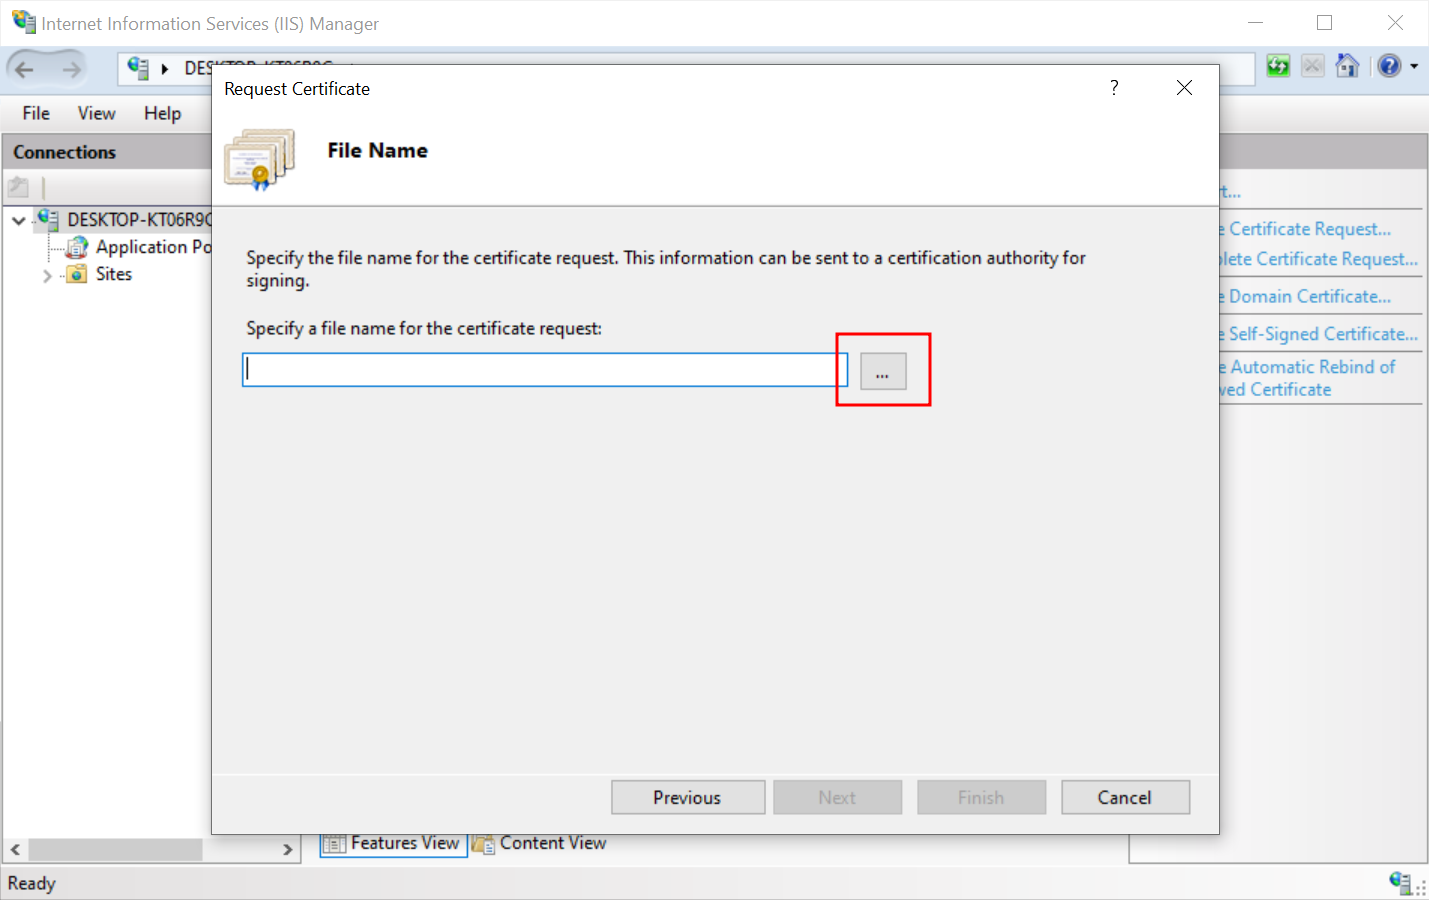
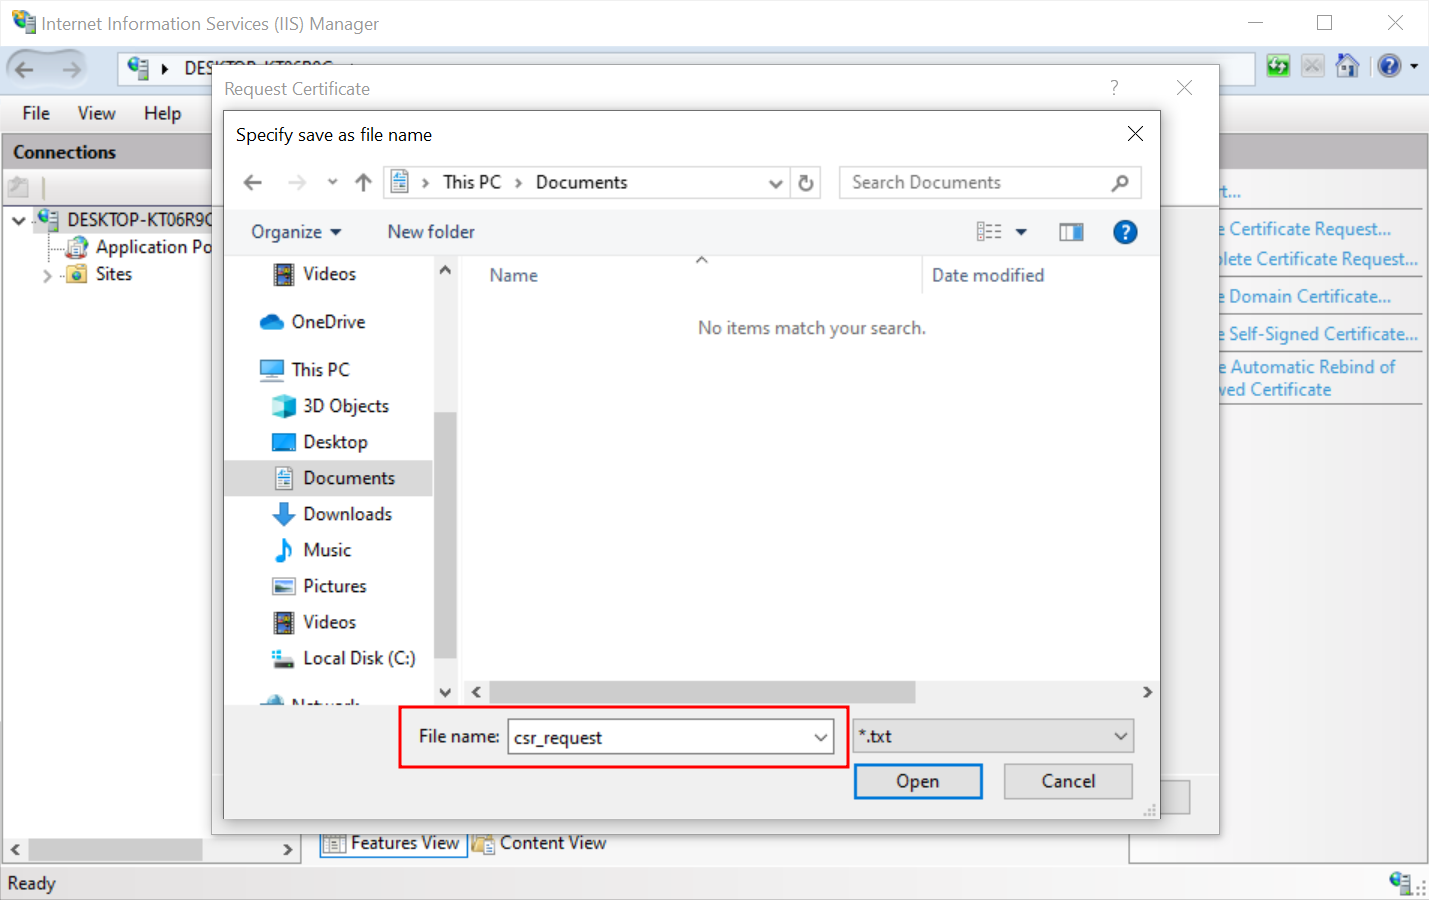
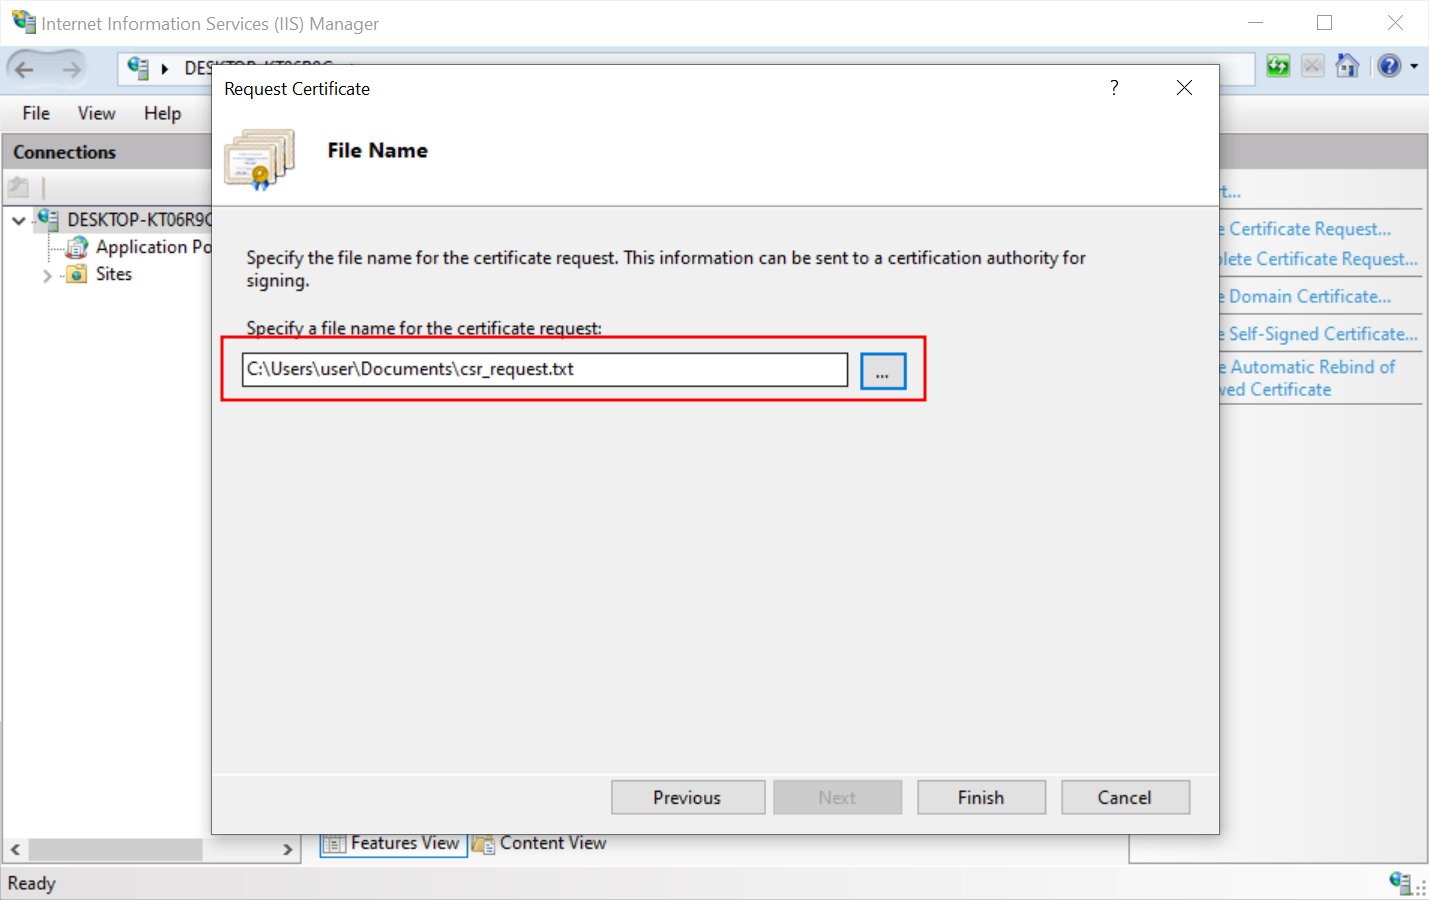
Click the button with three dots to select where the CSR request should be placed and add its name. Press Finish.
-
Close Internet Information Services (IIS) Manager.
-
Press Win on the keyboard and type ‘Microsoft Management Console’ or ‘mmc’ in the search bar. Then click it from the search results to launch.
-
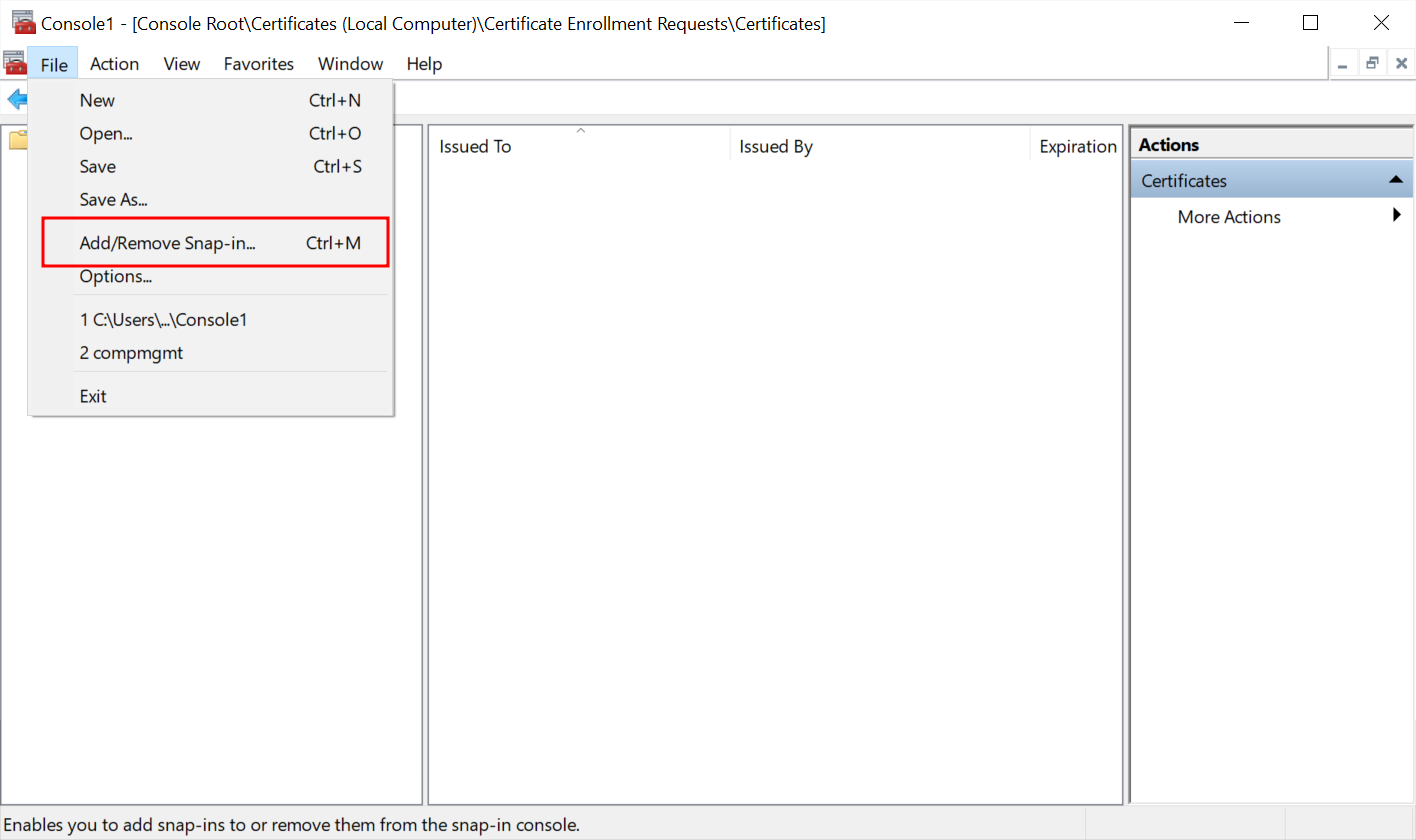
In the new window, press File > Add/Remove Snap-in…
-
In the new window, in the left column, select Certificates and press Add > button.
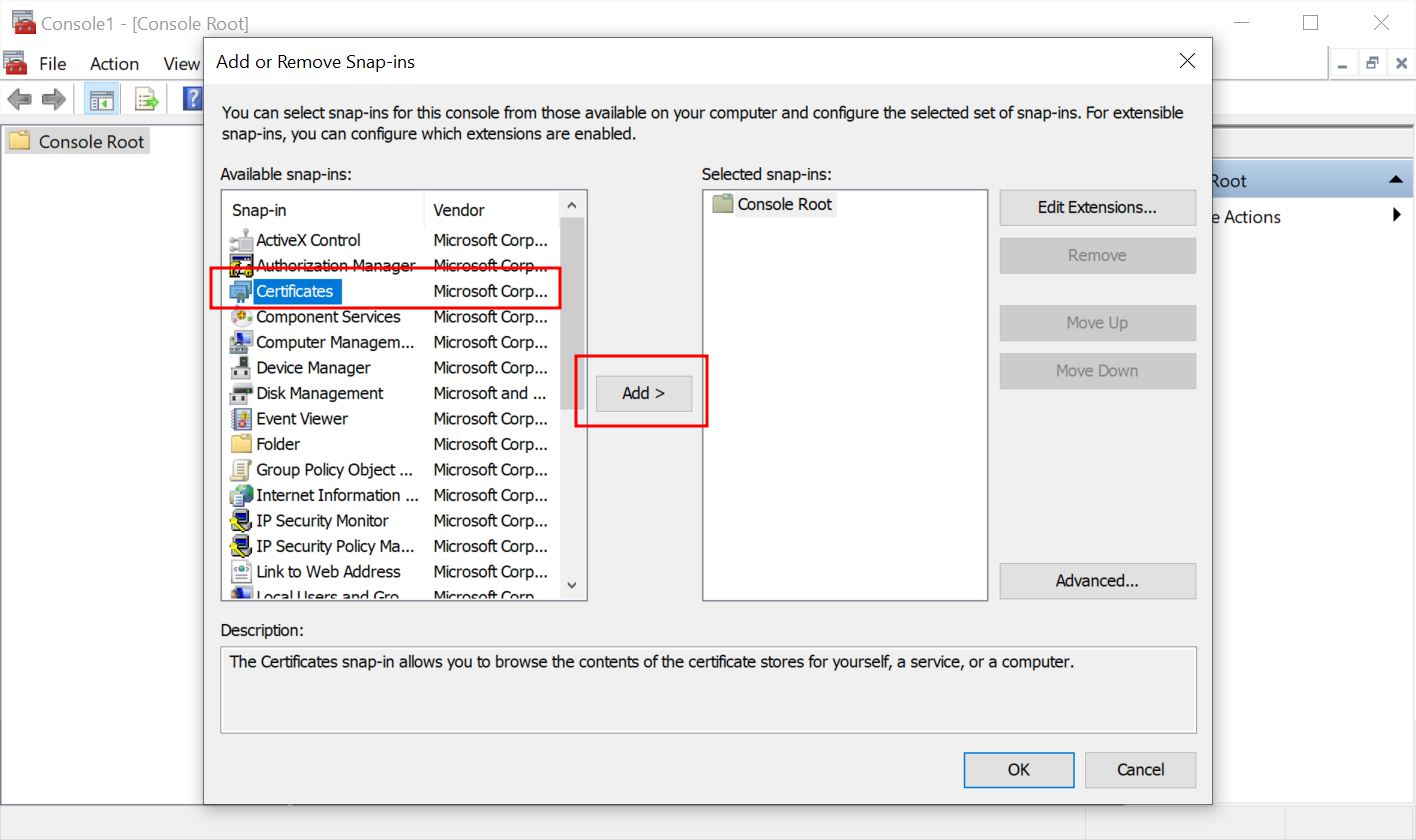
-
This snap-in will always manage certificates for Computer account and press Next.
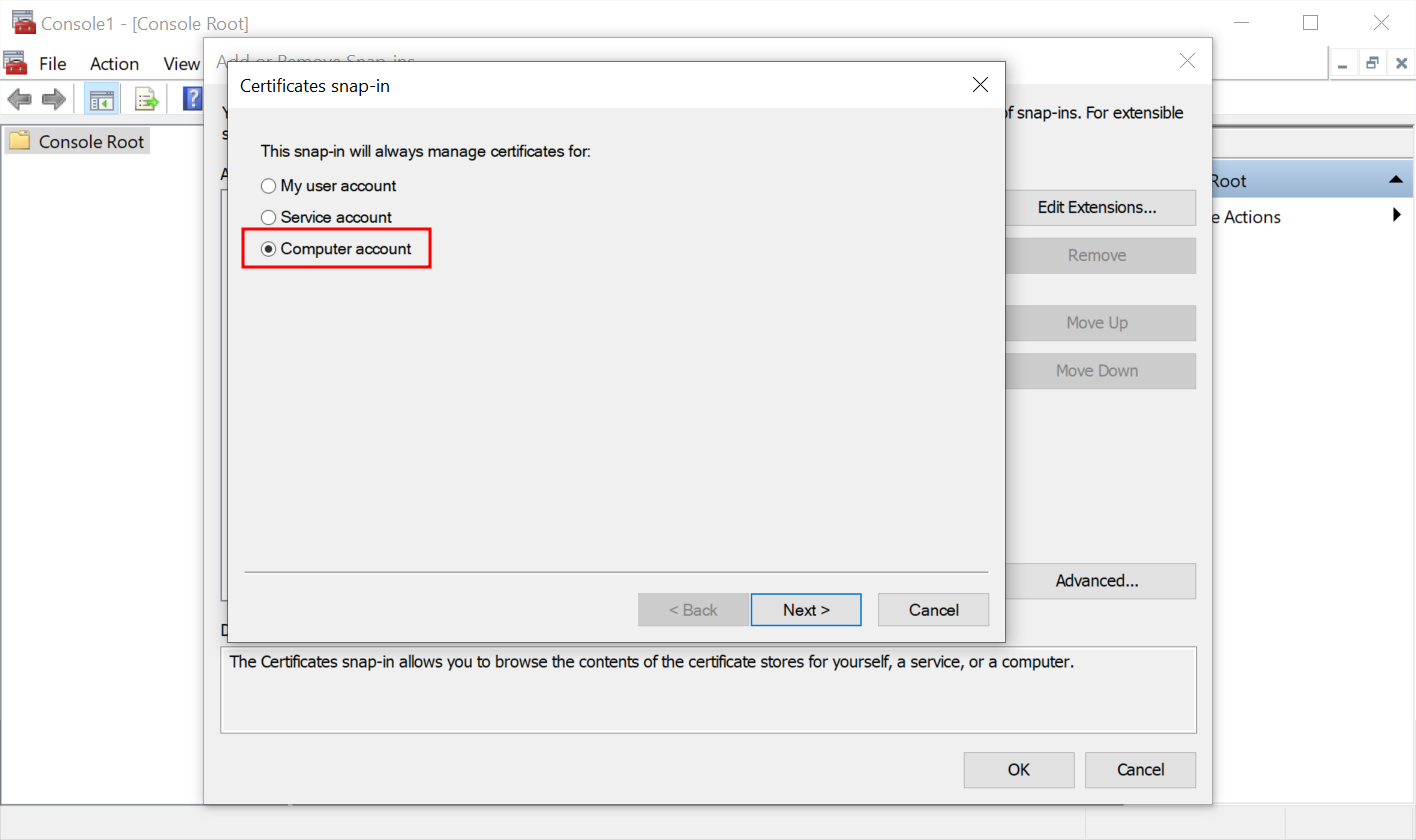
-
This snap-in will always manage Local computer (the computer this console is running on) and press Finish.

-
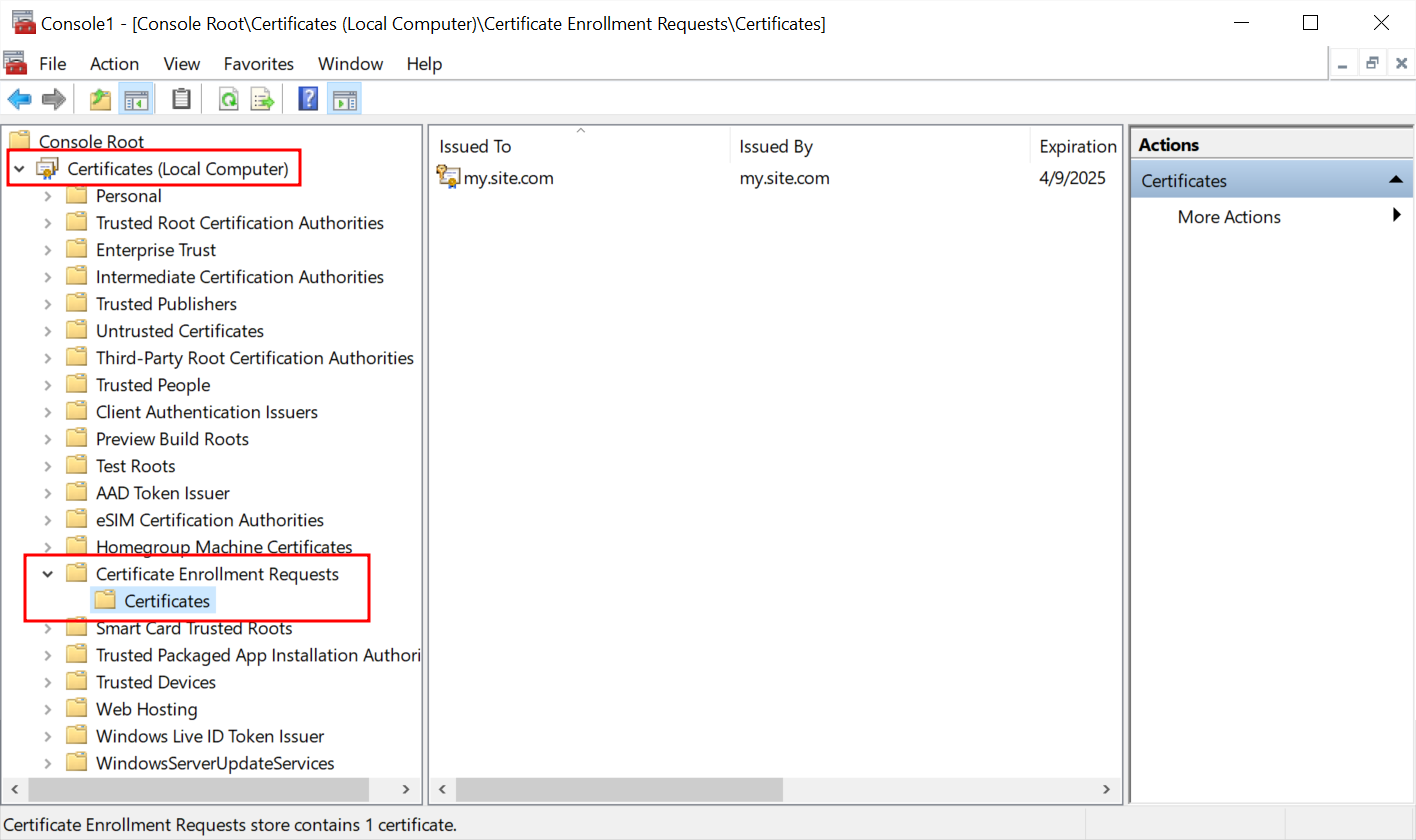
Press OK to save the changes.
-
In the left column, select Certificate Enrollment Requests and click Certificates below it.
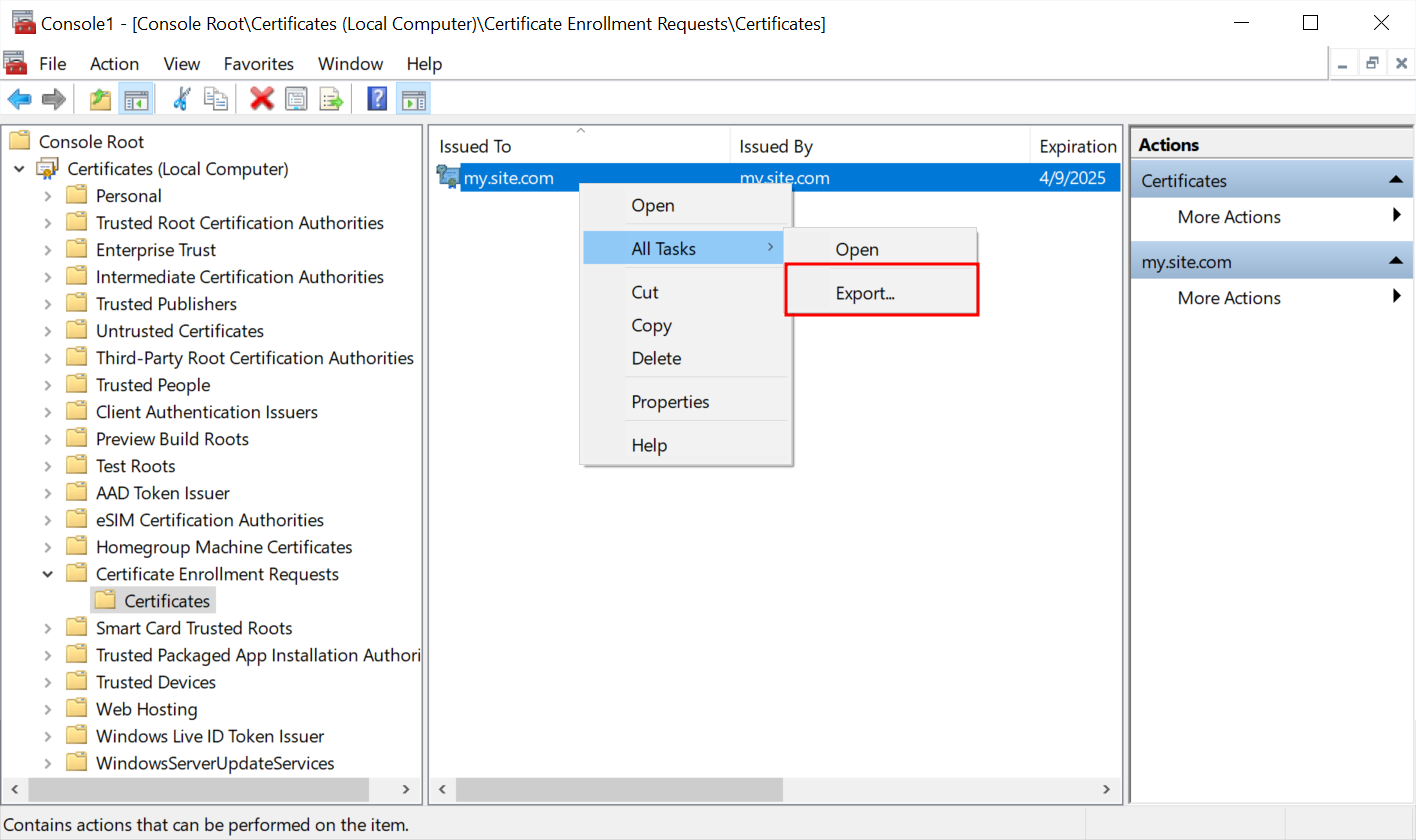
-
In the center panel of the window, find the required certificate request and right-click it. Select All Tasks > Export…
-
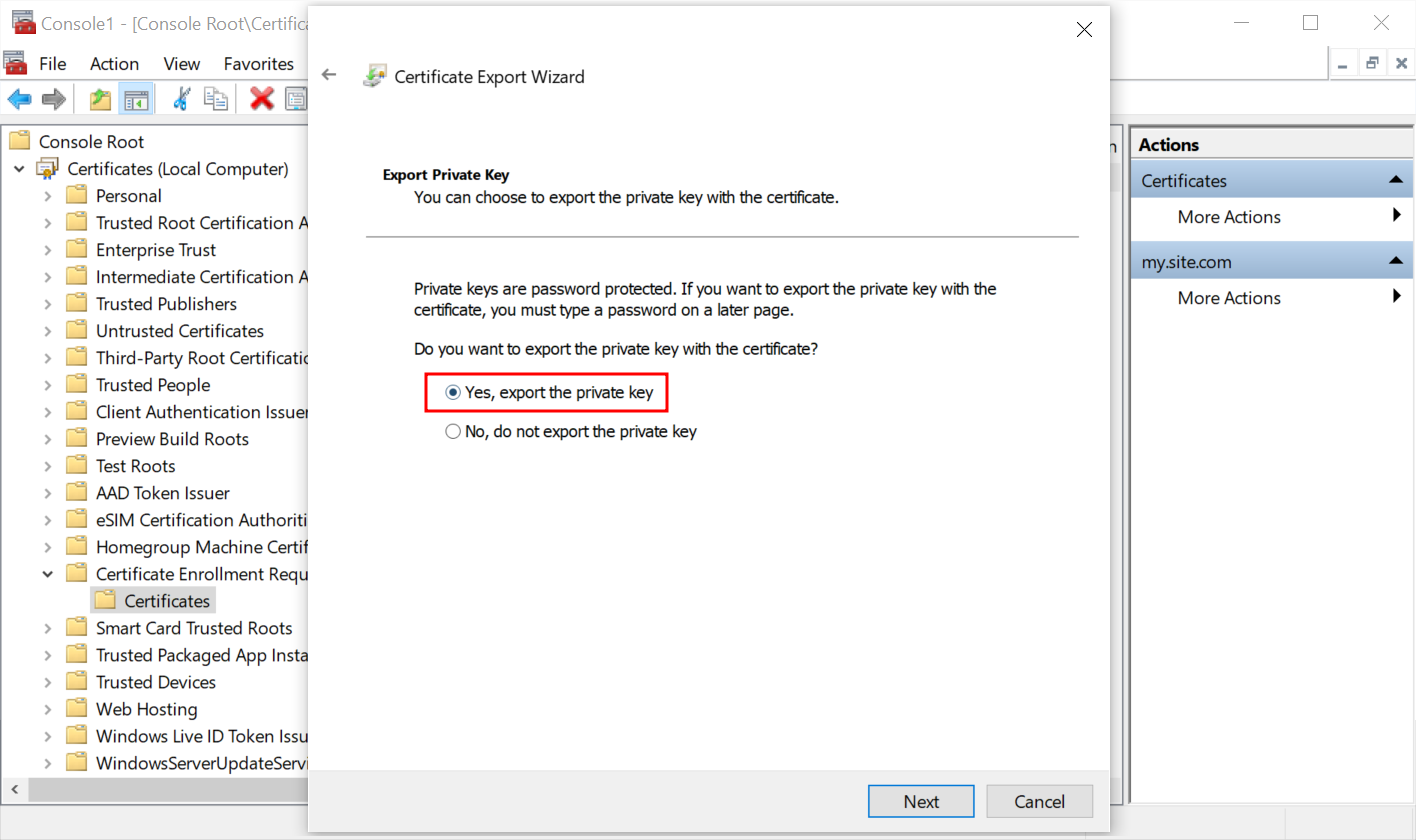
Select the answer Yes, export the private key.
-
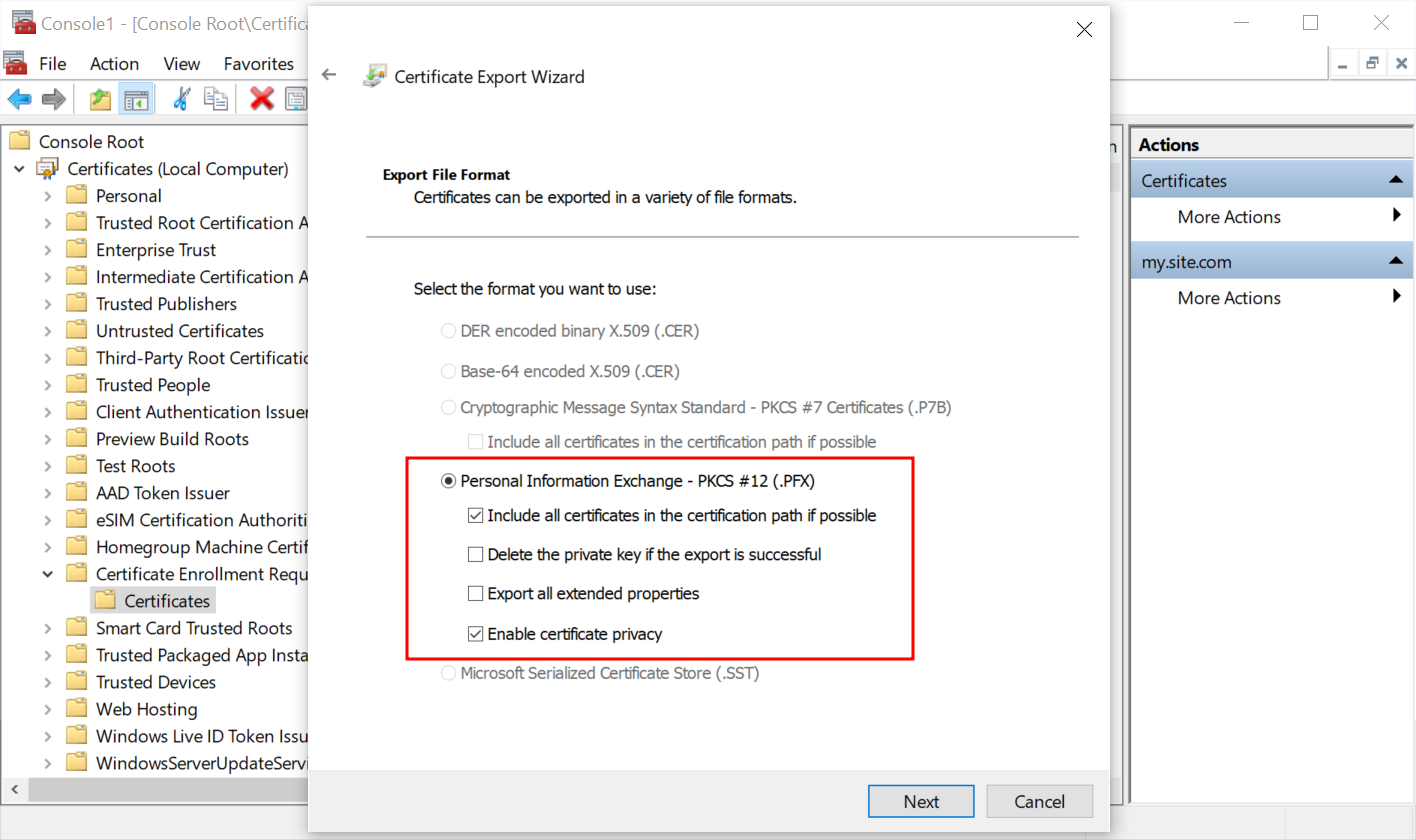
Select the format Personal Information Exchange - PKCS #12 (.PFX).
-
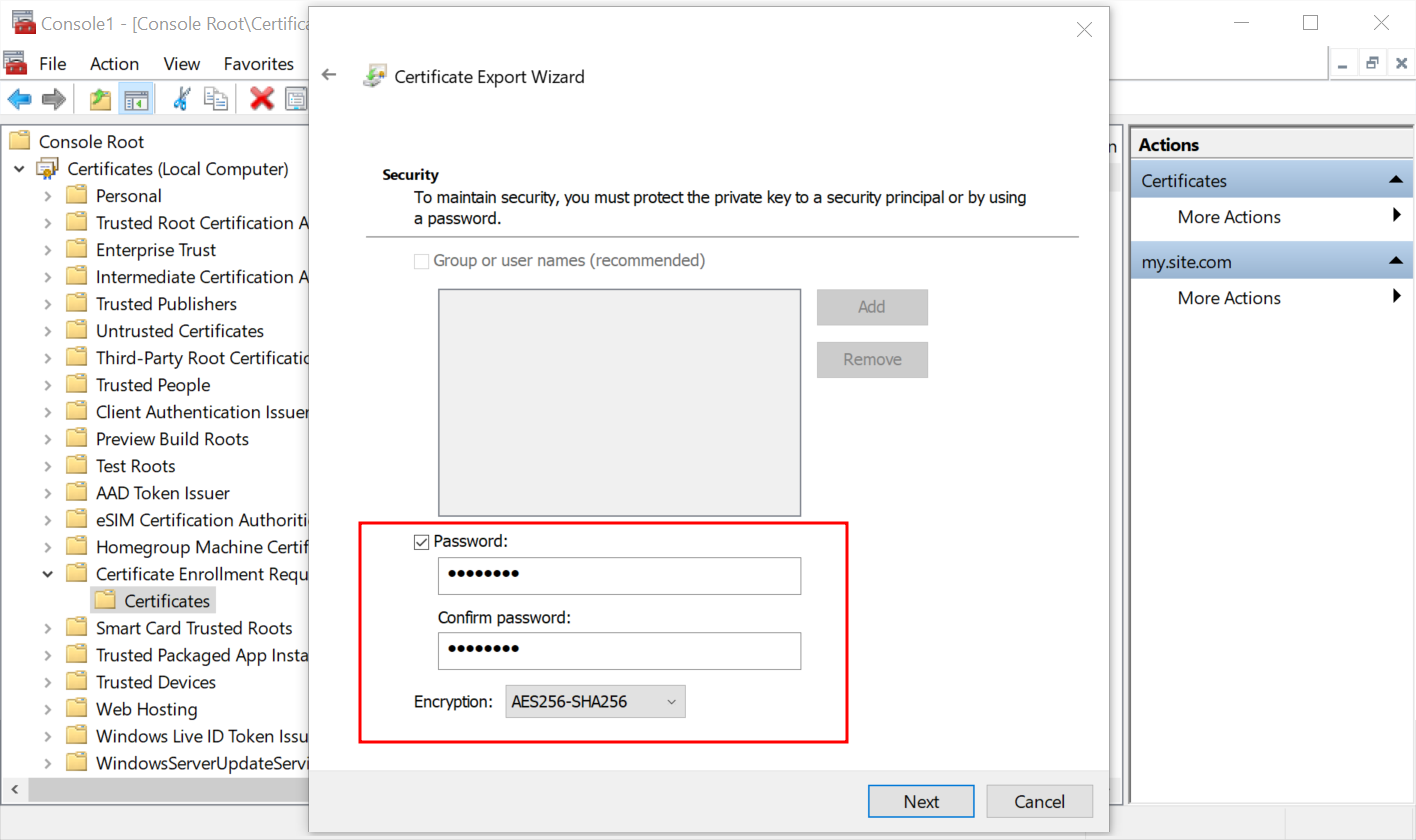
On the next step, mark the Password option. Enter the desired password in the Password and Confirm password fields and press Next.
-
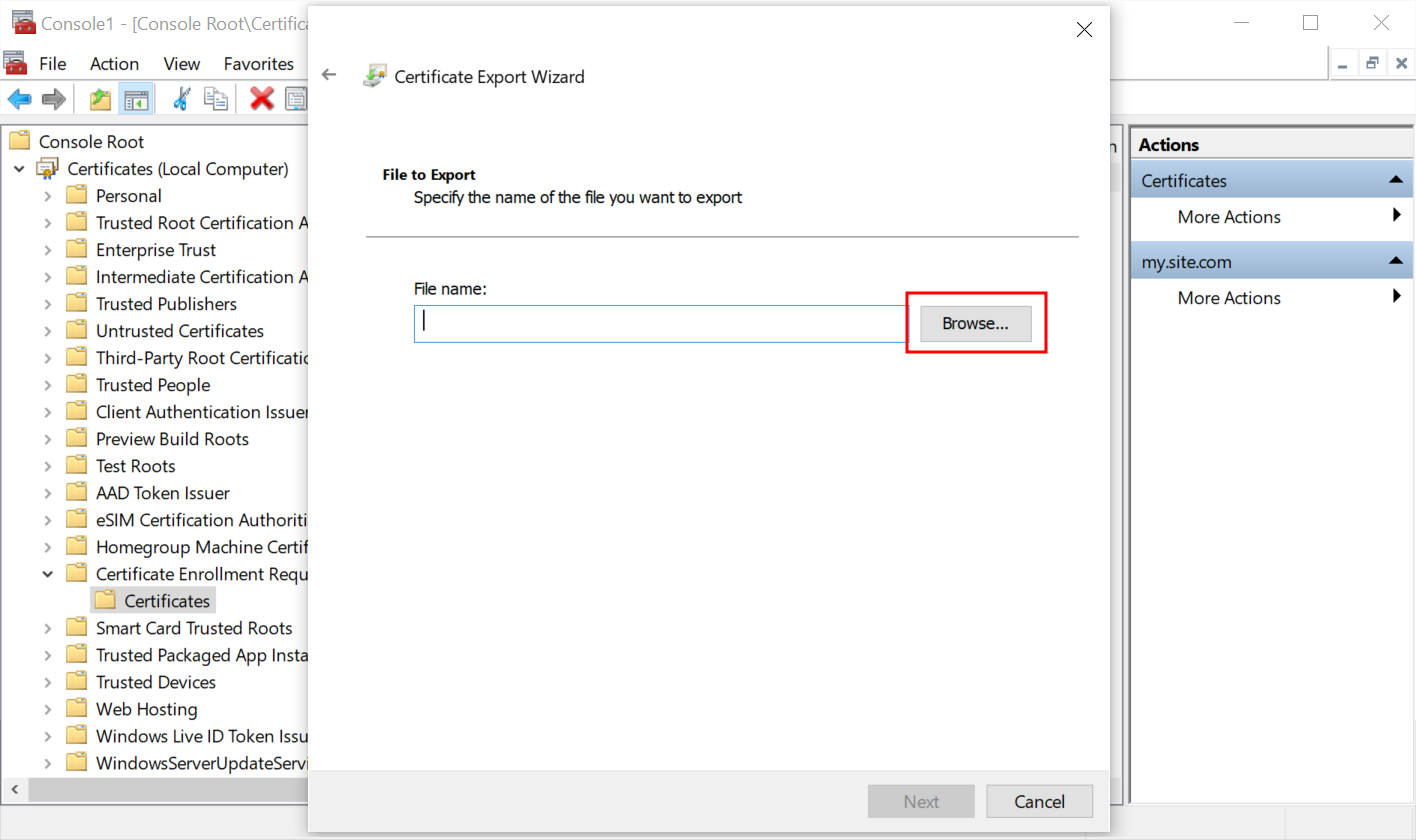
Click the Browse… button to select where the files should be saved and set the filename. Press Next.
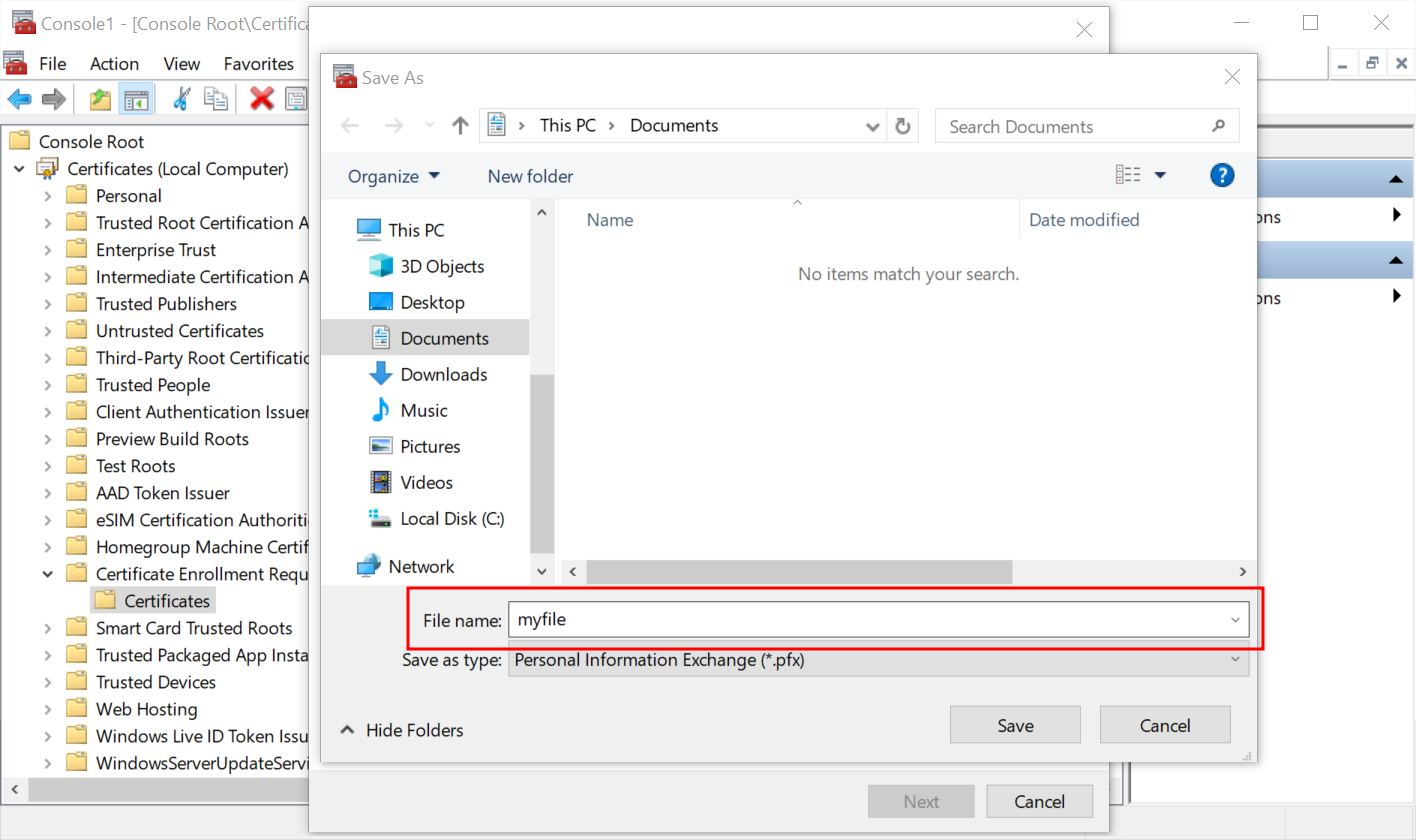
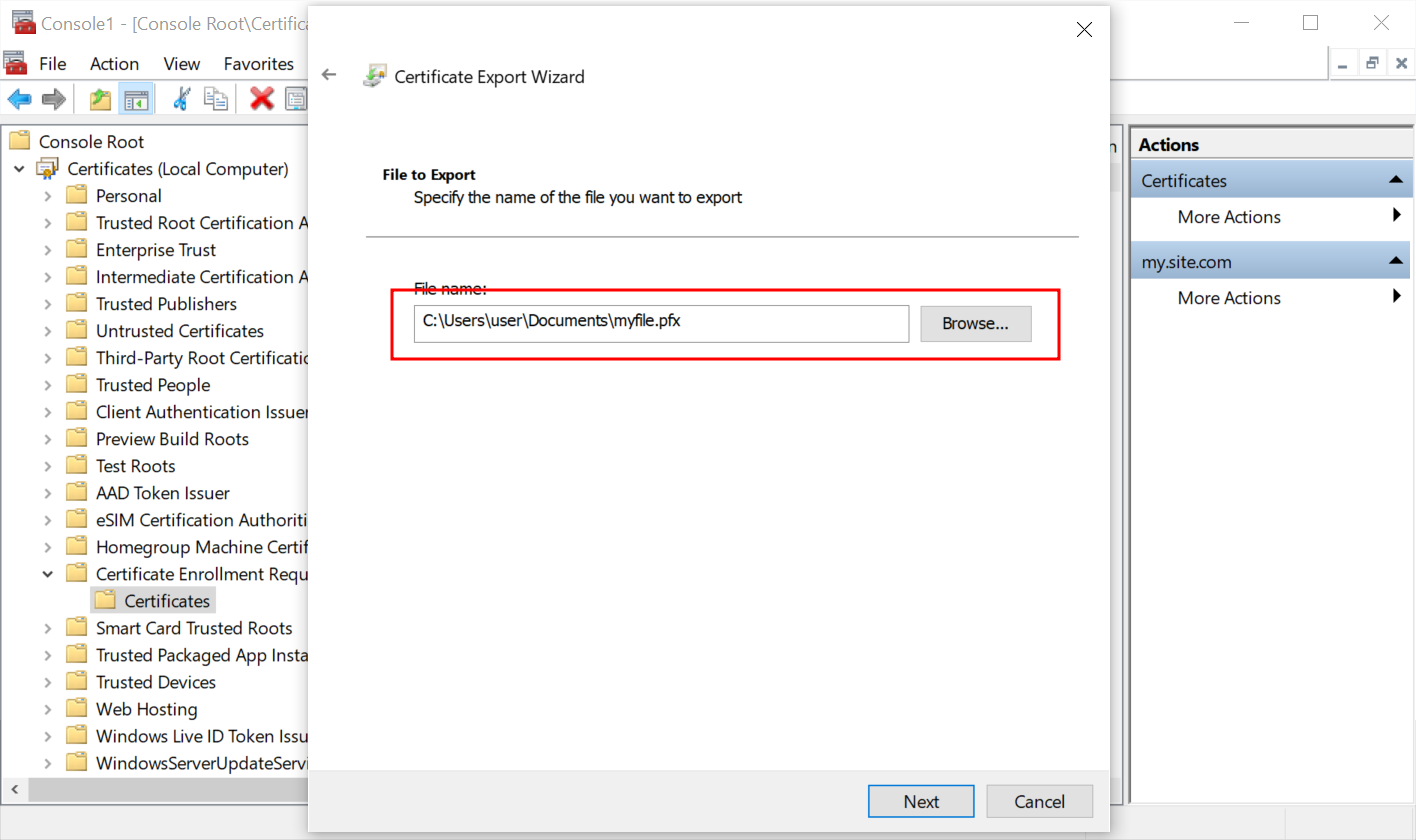
-
Check the displayed data and press Finish.
-
Send two files to the certificate provider. The provider will send you a signed certificate and the private key.
-
Send us a signed certificate, private key, and information on which site they should be added to.
-
We will recheck, add them, and inform you about the results.
Common questions
Is it possible to set up the site to use only HTTPS?
Yes, it’s possible. If you already have an SSL certificate added for your site or request to add your certificate, please let us know if you would like your site to be accessible via HTTPS only.
By default, the website will be available via HTTP and HTTPS. If you want to switch to HTTPS-only mode, just let us know. We will enable force HTTPS redirection, so when you log in to HTTP://your.site.com, you’ll be forcibly redirected to HTTPS://your.site.com.
Which type of SSL certificate to choose?
We don’t restrict the certificate type, and it’s possible to apply different types of certificates.
Depending on the number of websites and domain names you use, you can send us the following types of certificates:
| Certificate type | Description |
|---|---|
| Single Domain Certificate | Configured for a particular domain name and can secure only it. |
| Multi-Domain TLS/SSL Certificate | Can be configured to allow multi-domain. For example, one certificate can secure the following sites: www.your_domain1.com, www.your_domain2.com, mail.your_domain.com, test.your_domain2.com, etc.The list of sites for which the certificate can be applied is pre-defined. If another site subsequently appears, you will need to issue an additional certificate for that site. |
| Wildcard TLS/SSL Certificate | Configured with a wildcard character (*) in the domain name field, so it can secure multiple subdomain names on the same base domain. For example, a certificate generated for *.your_domain.com, can be used for www.your_domain.com, mail.your_domain.com, monitoring.your_domain.com, etc.You do not need to add any changes to the certificate or issue additional certificates if you have an additional site on the same base domain. Additional subdomains can be added or removed at any time. Keep in mind that a wildcard certificate is used only for subdomains at the same level where the asterisk is set. So a certificate generated for *.your.site can be used for monitoring.your.site, but it can’t be used for www.monitoring.your.site. |
Currently, there are three types of TLS/SSL certificates. They differ in the vetting and verification processes needed to obtain the certificate.
| Type | Description |
|---|---|
| Domain Validation (DV) | It has the lowest level of validation. These certificates only verify the ownership of the domain name. |
| Organization Validation (OV) | It offers higher assurance than DV. These certificates require validation of the organization’s identity in addition to domain ownership. |
| Extended Validation (EV) | It provides the maximum amount of trust to visitors. EV certificates undergo the most rigorous validation process, including verification of legal identity, physical address, and operational existence of the organization. |
For what server should I issue the certificate?
It would be preferable if the certificate was generated for the Nginx server.
What should I do if the private key doesn’t match the certificate?
Find the private key to generate the SSL certificate and send both files to us.
If you have issues finding the required file, contact your SSL provider.
How can I know when the certificate expires?
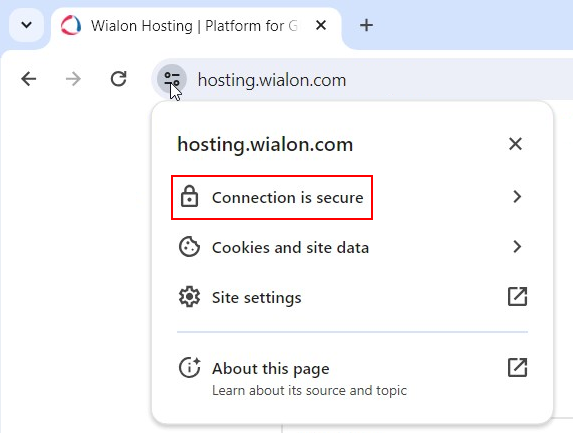
The easiest way is to visit your site by following the instructions:
-
Open your site in the browser.
-
Click on the icon near the address bar of the browser.
-
In the pop-up window, click on the Connection is secure.
-
Then click on the Certificate is valid.
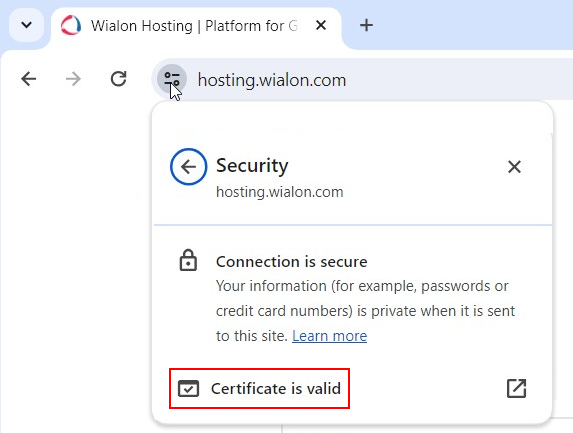
-
Check the field Expires On in the new window.
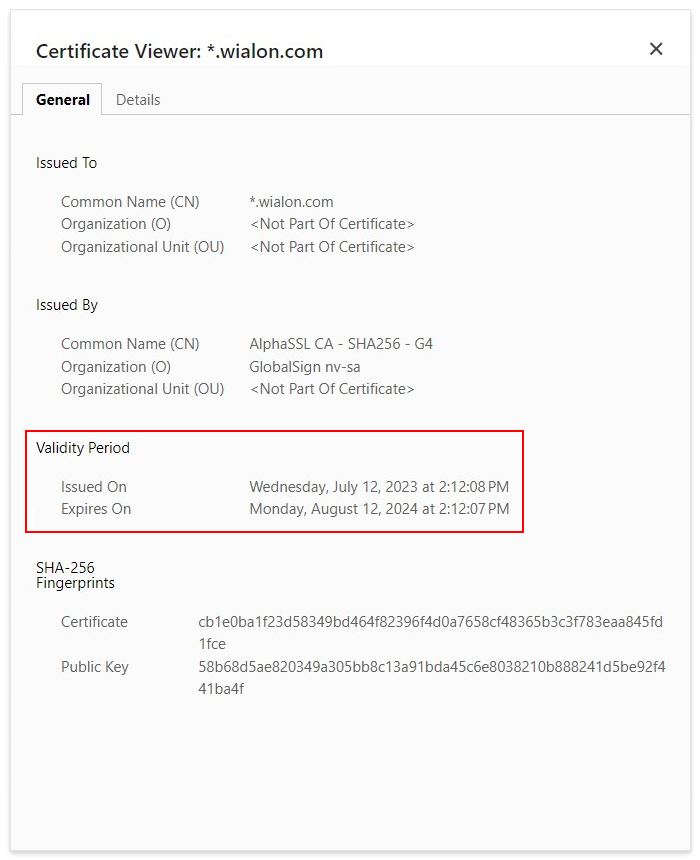
The example is provided for Chrome. The instructions for other browsers should be similar.