

Based on the title, it may seem that the Routes module should be suitable for any request related to vehicle route control. However, this module has specific features that make it ideal for solving certain tasks and completely unsuitable for others. Different options for route control were mentioned in the meetup 4 ways of routes control in Wialon and how to choose the right one. This article will discuss the key settings of the Routes module and examples of its application.
Overall Concept
Routes from the module of the same name are macro-objects and are not part of the resource, unlike report templates, notifications, etc. The thing is, a route itself is a multi-layered object that requires an understanding of check points, schedules, and rides for proper configuration.
The key feature of routes is their focus on the time of visiting check points rather than how the vehicle moves between these points.
The main questions that need to be answered when using the Routes module are as follows:
- How will check points be added?
- What type of schedule will be used?
- What order of passing check points will be chosen?
- How will a ride be created?
- How will the result be tracked?
Each of these questions has 3 possible answers. Let's consider each of them.
Adding Check Points
The first layer of routes consists of check points that are included in it. Check points are areas on the map that a unit must visit. They can be added using three methods:
Adding points from the map is similar to using the Address tool: you can double-click on the desired location on the map or enter the address in the corresponding field. The found point will be the center of the check point. By default, the radius is 100 meters, but it can be manually changed if necessary.
- Adding points from geofences involves selecting the desired one from the list of available geofences. In this case, there is no need to specify a radius since the geofence already has a defined area.
Adding points from units is similar to the previous method: you simply need to select a unit from the list. Since a unit corresponds to a point, a radius must be set for it (by default, it is 100 meters).
An important step in creating check points is optimizing the order of visiting them. During optimization, the map displays the estimated shortest route between check points, but after saving the route, the check points will simply be connected by dashed lines since the Routes module does not track the unit's location between check points.
Types of Schedules
The second layer of routes consists of schedules, which represent the expected arrival time at check points and, optionally, the departure time from them. Multiple schedules can be added for a set of check points.
There are three types of schedules:
Absolute — this type of schedule can only be used once, after that it should be changed, copied, or deleted.
This type of schedule takes into account not only the time but also the specific date.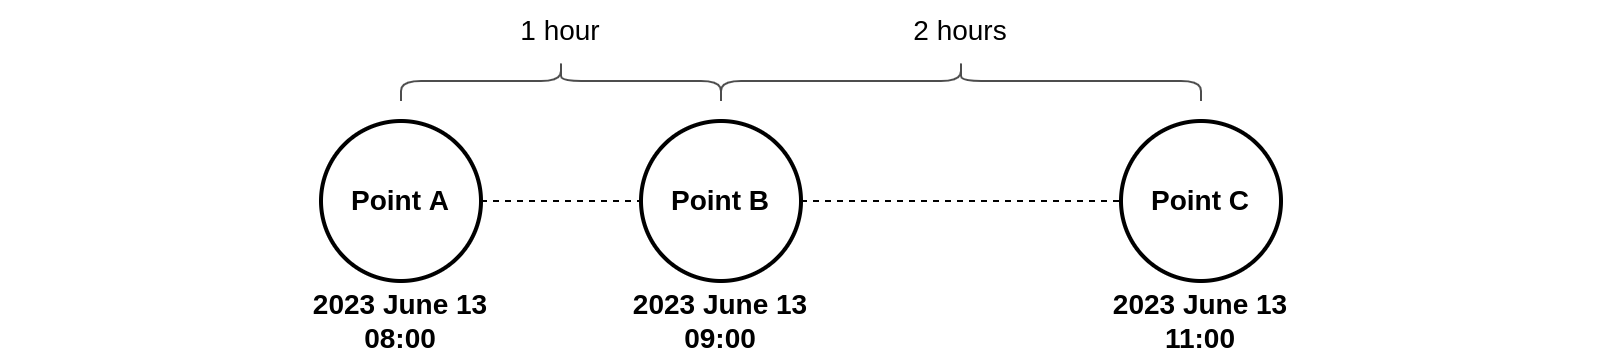
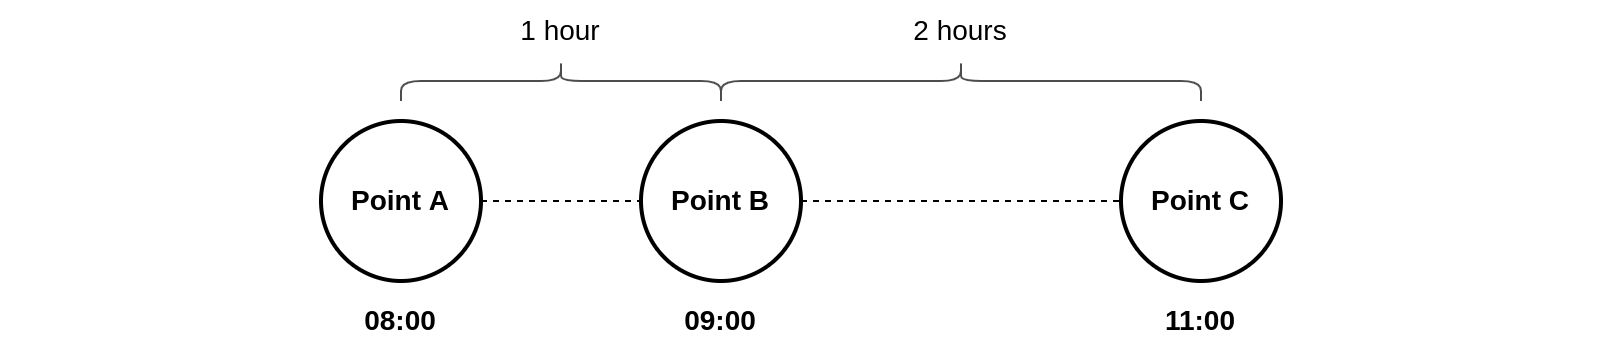
Relative to day — this type of schedule can be used once a day.
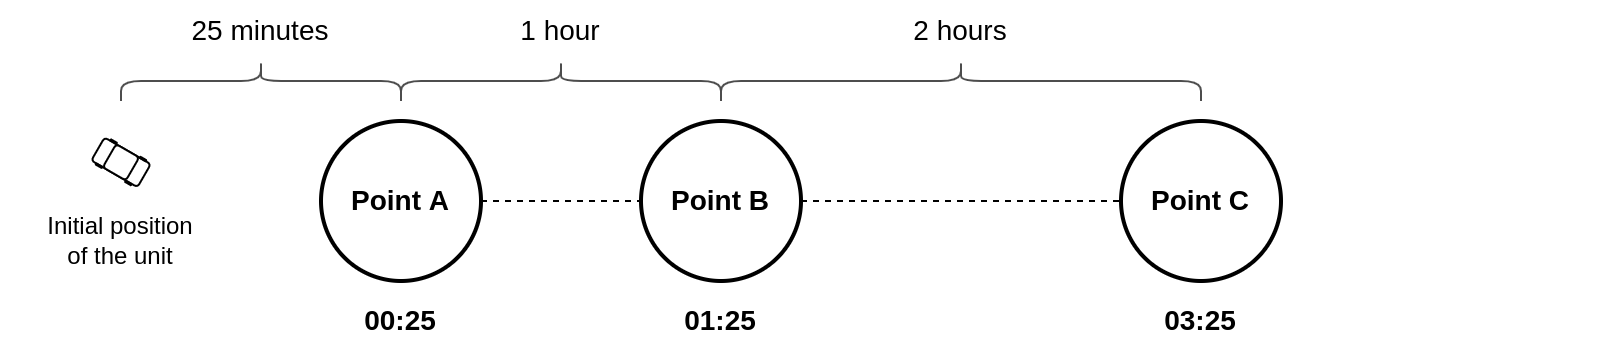
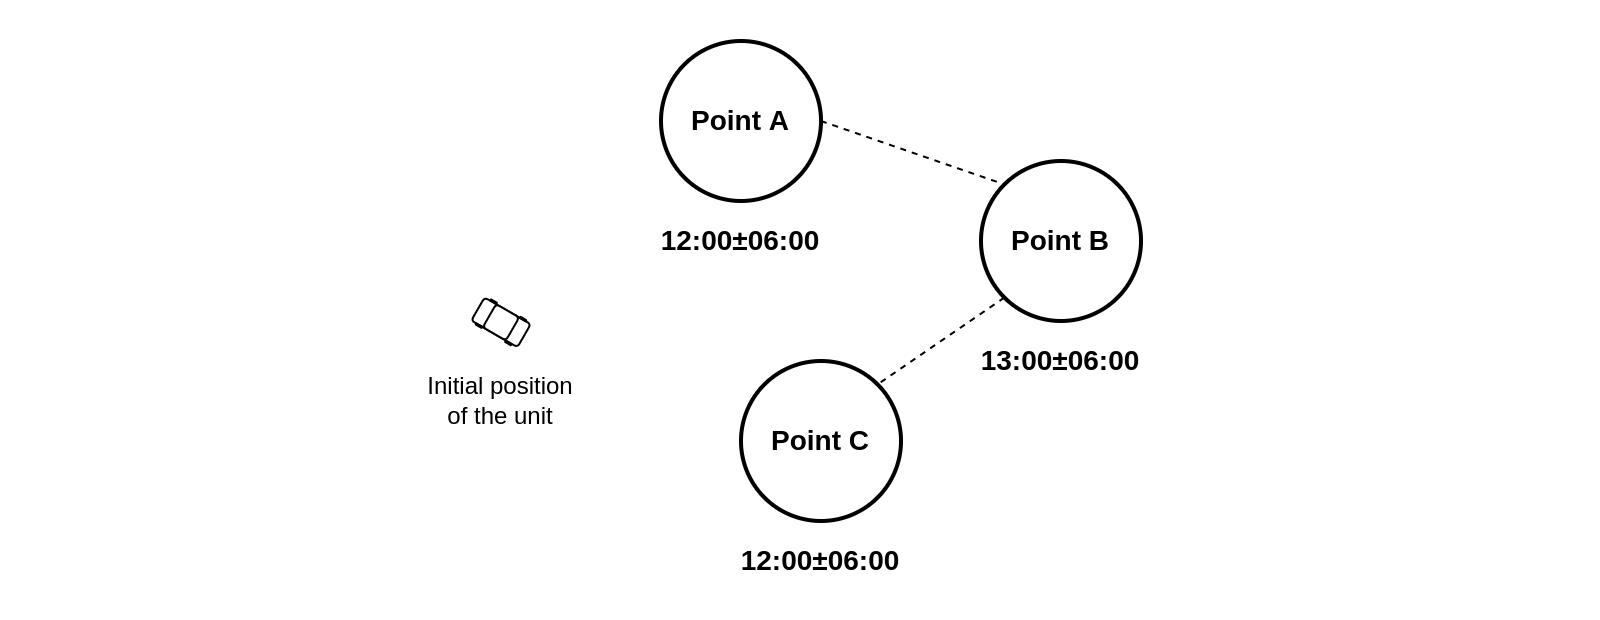
Relative to activation — this type of schedule can be used multiple times a day.
The activation time is the time specified when creating a ride, at which the movement of the unit to the check points begins to be tracked.
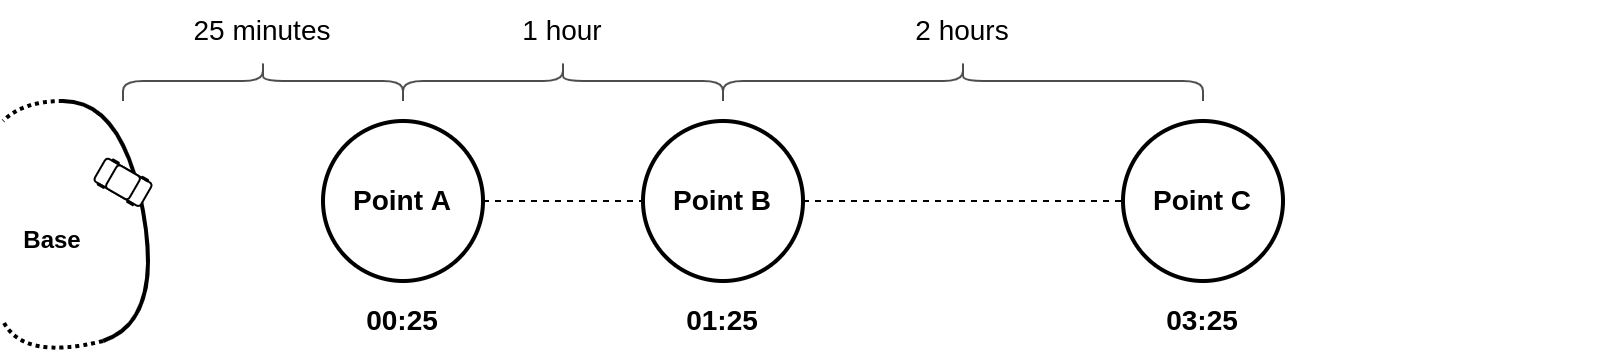
Most often, when working with this schedule, the activation time coincides with the time of visiting the first point, so the schedule lists 00:00 as the time for it, and then the time is calculated based on the time it takes to travel from the first point to the second, from the first point to the third, and so on.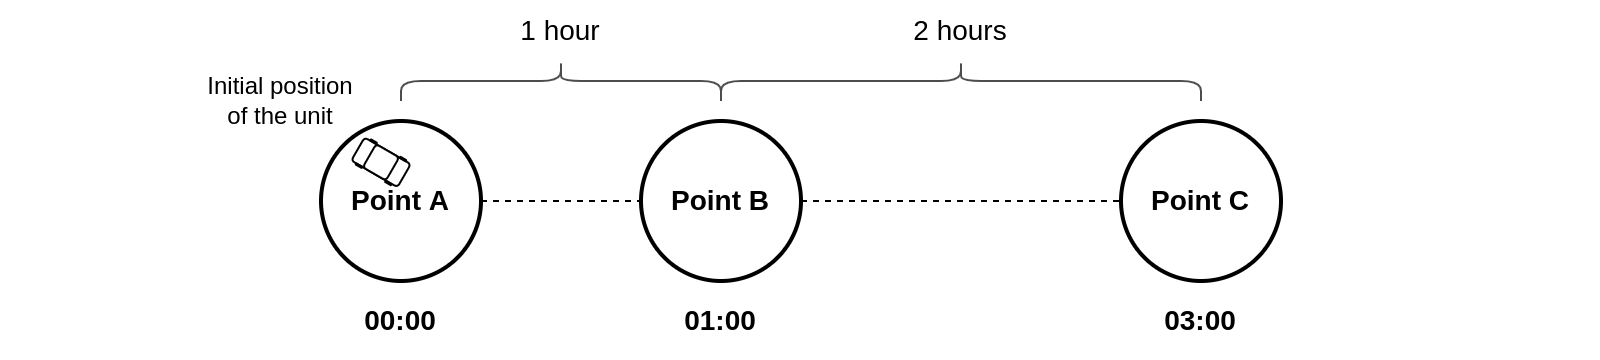
However, there can be a different situation when the ride is activated before the unit enters the first point. In this case, the schedule adjusts the time based on how long it will take for the unit to move from the activation time to the first point, from the activation time to the second point, and so on.
The examples above show how to fill in the Arrival field for different types of schedules. In addition to that, the Departure field can be filled in for each check point, allowing you to record the time that the unit should spend at that point. Additionally, for each time, an acceptable Variation can be specified, which represents the allowed time corridor for a delay or being ahead of schedule that is not a violation.
Also, any type of schedule can have a Time limitation, which allows the schedule to be applied only during certain months, days of the month, week days, or hours.
Check Points Order
Initially, the check points order can be specified in the schedule, but later it can be changed to another when creating a ride. The available options are listed below:
- Strict — all the check points must be passed in the established order without skipping.
- Skipping possible — the check points are expected to be visited in the established order but can be skipped, at the same time it is mandatory to visit the last check point.
- Arbitrary — the check points can be passed in any order.
None of the schedule types prohibit entering overlapping ranges of arrival and departure times with variation taken into account. The use of this approach depends on the order of passing the check points.
For example, if the Strict or Skipping possible orders of passing points are chosen, the unit must visit them in a fixed sequence but in case of applying significant variation the visiting time can be almost any. As a result, there is control over the sequence, but not over the visiting time.

If the Arbitrary check points order is chosen, then with significant variation there is control only over the fact of visiting but not over the time and sequence.
Creating rides
Rides are the implementation of routes and they combine check points, schedules, and units. It is rides that allow tracking the movement of a unit through the check points according to the specified time.
A ride can be created in three ways:
- Manually — this method can be used when there is a dispatcher who can create a ride at the right time. It is unlikely that this approach will be suitable when there are a large number of rides.
- Automatically for schedules with the Relative to day type. This type of schedule clearly determines the time of creating a ride on any day, so it is enough to select units in the schedule and enable the option Create rides for this schedule automatically.
Automatically using notifications with the Create a ride action. This method logically combines with schedules of the Relative to activation type.
For example, a notification can be created that will start a ride when the unit leaves any of the selected geofences.
With such a setup, any departure of the unit from the Base geofence will lead to creating a ride. Therefore, if the unit leaves the base not only for a ride, additional properties must be used to distinguish these departures from each other. For example, the unit may only leave for a ride at a certain time, or only with an assigned driver, or only when the certain button in the cabin is pressed, etc.
Tracking methods
Different approaches can be used for tracking routes:
- Reports allow gathering information about the route for a specific period. The Rides and Check points tables can be used for a unit or a unit group, and the Rides and Log tables can be used for route reports.
- Notifications allow real-time tracking of rides. The only type of notification, Route progress, includes the following:
- Ride status: started, finished, and aborted.
- Activity at check points: arrival, departure, and skip.
- Schedule control: delay, outrunning, and return to the schedule.
The timeline also allows you to track rides in real-time. It is a special panel available at the bottom of the Routes tab. Its main feature is that units are not visible on it but the schedule is displayed in the form of ranges from Arrival to Departure (when clicking on the icon
 , the range will be expanded considering the allowed Variation), and the vertical line corresponds to the current time.
Configuration examples
When using the Routes module, a number of settings need to be made, which were mentioned above. For convenience, they are collected in a cheat sheet table, where one option needs to be selected in each column.
The cell color in the table indicates the frequency of use based on our experience of working with partners: green means often, yellow means sometimes, and red means rarely.
Check points | Schedule* | Check points order | Creating a ride | Tracking |
|---|---|---|---|---|
Addresses | Absolute | Strict | Manually | Reports |
Geofences | Relative to day | Skipping possible | Automatically (Relative to day) | Notifications |
Units | Relative to activation | Arbitrary | Automatically (Notifications) | Timeline |
* The Arrival field in the schedule must be always filled in, as it is the essence of schedules, and the Departure and Variation fields are optional. Time limitations can also be specified.
Below are examples of using the Routes module and suitable settings for them.
Bakery Delivery to Grocery Stores
Every morning, a truck must deliver fresh baked goods from the bakery to the same stores. Unloading and filling out invoices at each point takes a total of 10 minutes with an allowed delay time of 5 minutes.
Proposed settings:
- Check points can be added through the addresses or geofences.
- The ride is done once in the morning, so a relative to day schedule would be suitable.
For each point, the Departure field will contain a time 10 minutes later than the Arrival field. The Variation field should be set to 5 minutes.
No need to set time limitations. - Since the optimal order of visiting can be calculated in advance and check points can not be skipped (usually, batches of baked goods are not large and are always sold within a day), the order of visiting points will be strict.
- The departure time is the same every day, so rides can be created automatically (relative to day).
- Let's assume that during the delivery process, there are no expected real-time problems that need to be solved, so a report on a unit with a Rides table will be suitable for tracking.
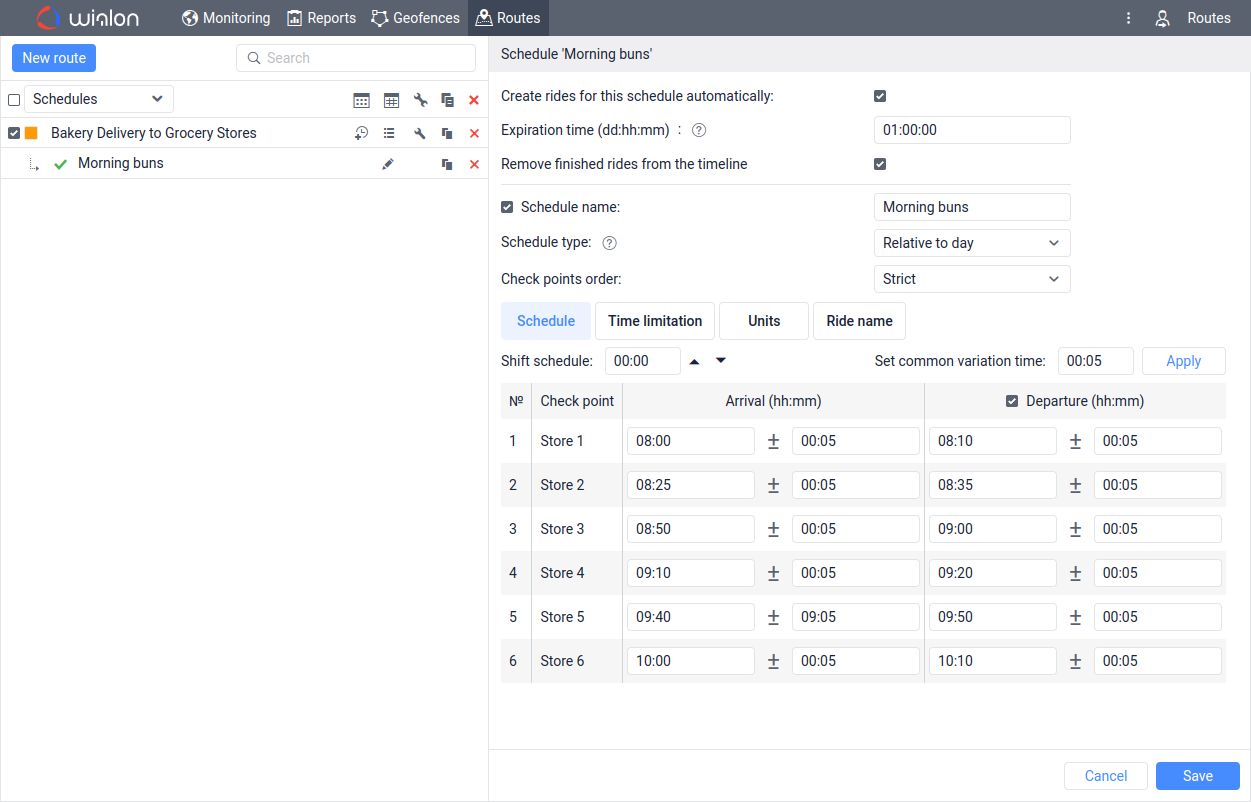
Schedule settings
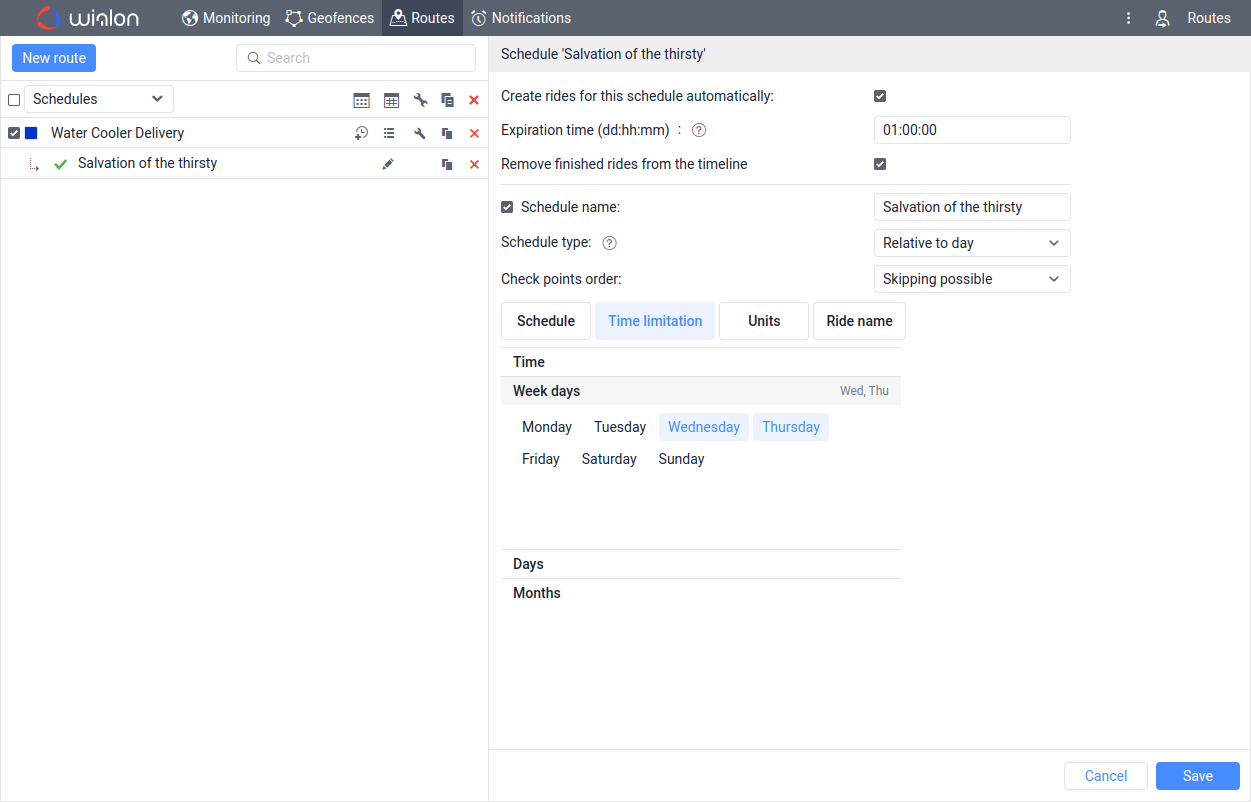
Water Cooler Delivery
A van delivers 5-gallon water bottles for office coolers. The customers are regular and their information is stored in the system. However, not all customers finish their water by Wednesday (which is a standard delivery day), that’s why an additional delivery day is available — Thursday. The exact visiting time is not significant, we have only an approximate range: from 10:00 to 14:00. Due to the flexibility of the schedule, unloading and filling out invoices can be not taken into consideration.
Proposed settings:
- Check points can be added through the addresses or geofences. The warehouse can be specified as the last point, where the delivery starts and ends.
- The ride is done once in the middle of the day, so a relative to day schedule would be suitable.
For all check points, the Arrival field can be set to 12:00. The Departure field can be left empty. The Variation field can be set to 2 hours.
Time limitations: only Wednesday and Thursday. - Since not all points need to be visited on the same day, the Skipping possible option should be selected as the order of visiting.
- The departure time is approximately the same every day, so rides can be created automatically (relative to day).
An additional ride on Thursday can be launched manually if necessary, but in that case, the time limitations in the schedule should only include Wednesday, so that automatic ride creation happens only on that day. - Customers occasionally contact the administrator to check the real-time delivery status, so notifications and a timeline can be used for tracking.
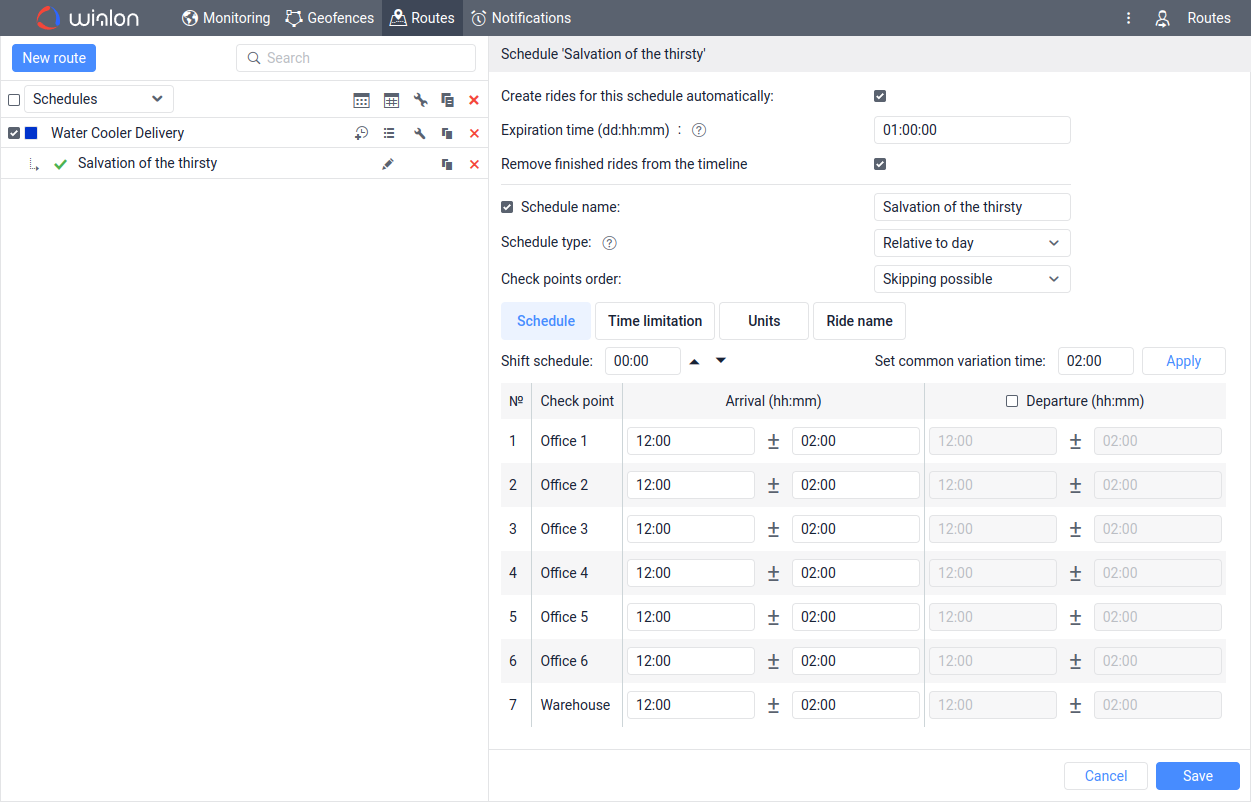
Schedule settings
Time limitations settings
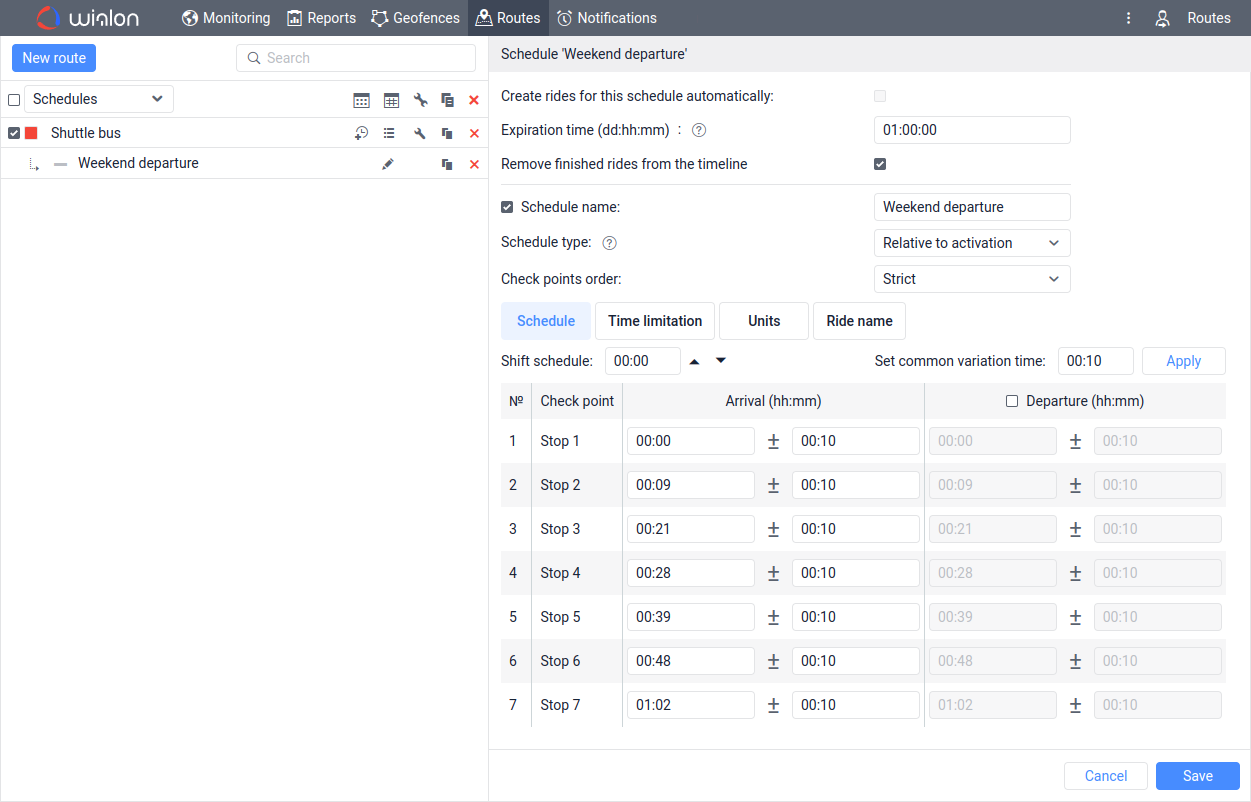
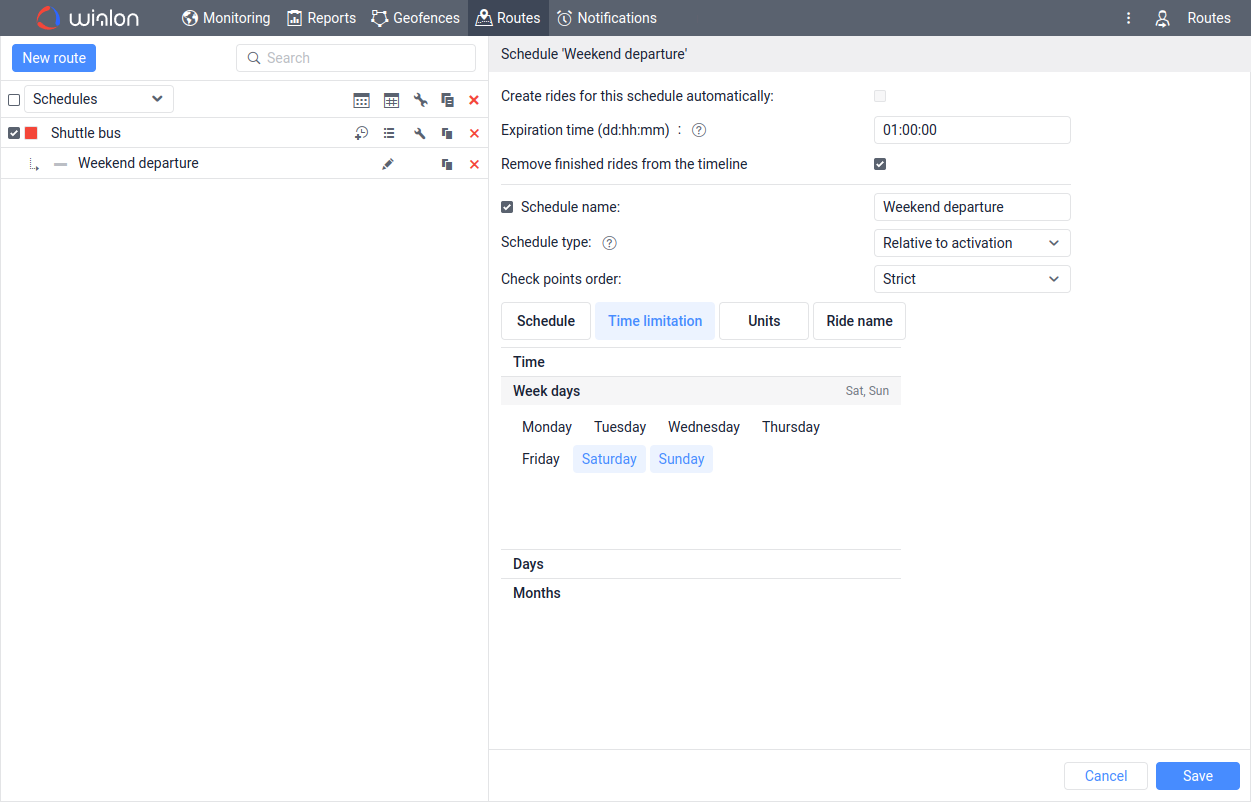
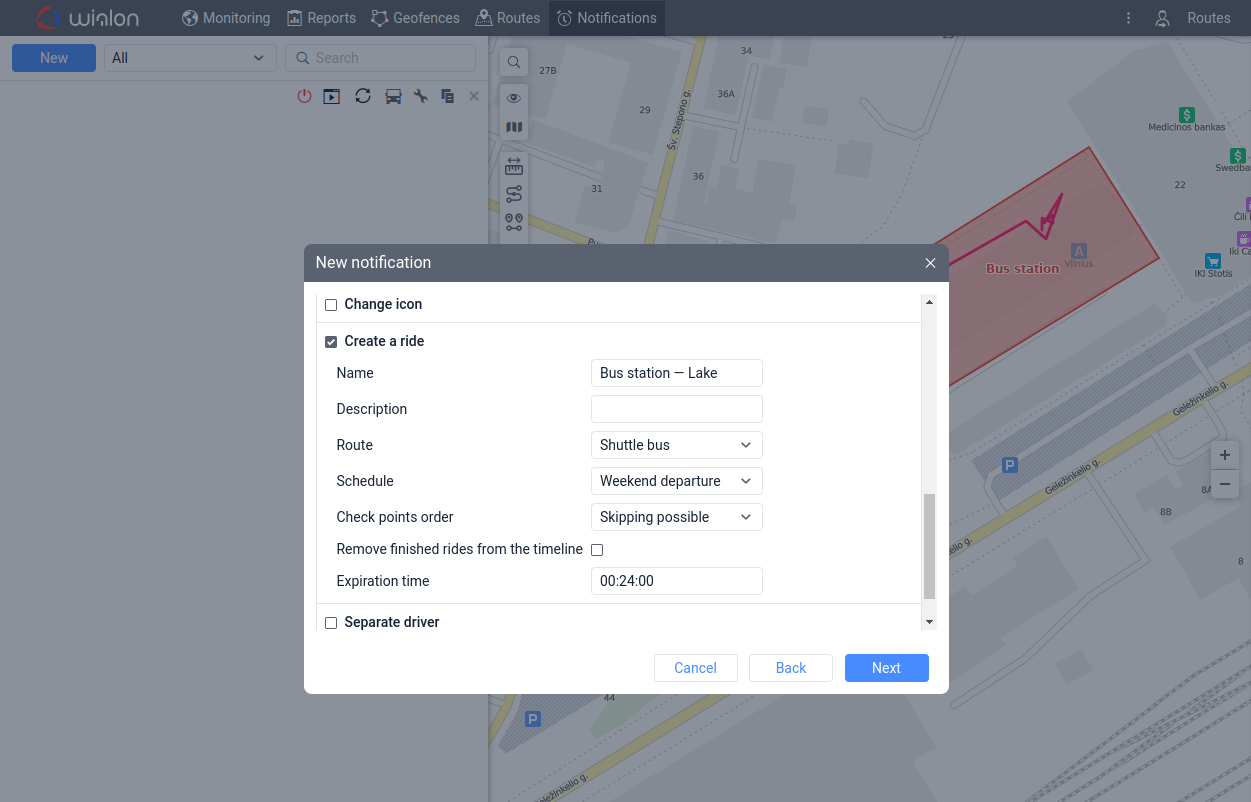
Shuttle bus
On weekends, a shuttle bus waits at the station until there is a certain number of passengers inside. After that, it starts the ride and visits each check point. The same route is performed multiple times a day.
Proposed settings:
- Check points can be added through the addresses or geofences. The passenger waiting point at the beginning of the route is enclosed by a geofence. The first check point of the route is placed immediately after this geofence.
- The ride can be done multiple times a day, so a relative to activation schedule would be suitable.
The Arrival field for the first point is set to 00:00, and for the other points, it is filled out relative to the first point. Since the shuttle bus spends little time at each stop, the Departure field can be left empty. The Variation field can be set to any value based on the usual situation on this route (e.g. 10 minutes).
Time limitations: Saturday and Sunday. - This case describes a specific public transportation route, so the order of visiting points will be strict.
- Since the unit starts moving only after enough people get inside, the exact start time of the ride is unknown. Rides must be created using a notification, and the criterion for starting will be leaving the geofence at the beginning of the route where the empty shuttle bus is waiting for passengers.
- Let's assume that during the delivery process, there are no expected real-time problems that need to be solved, so a report on a unit with a Rides table will be suitable for tracking.

Creating geofences for check points
Schedule settings
Time limitations settings
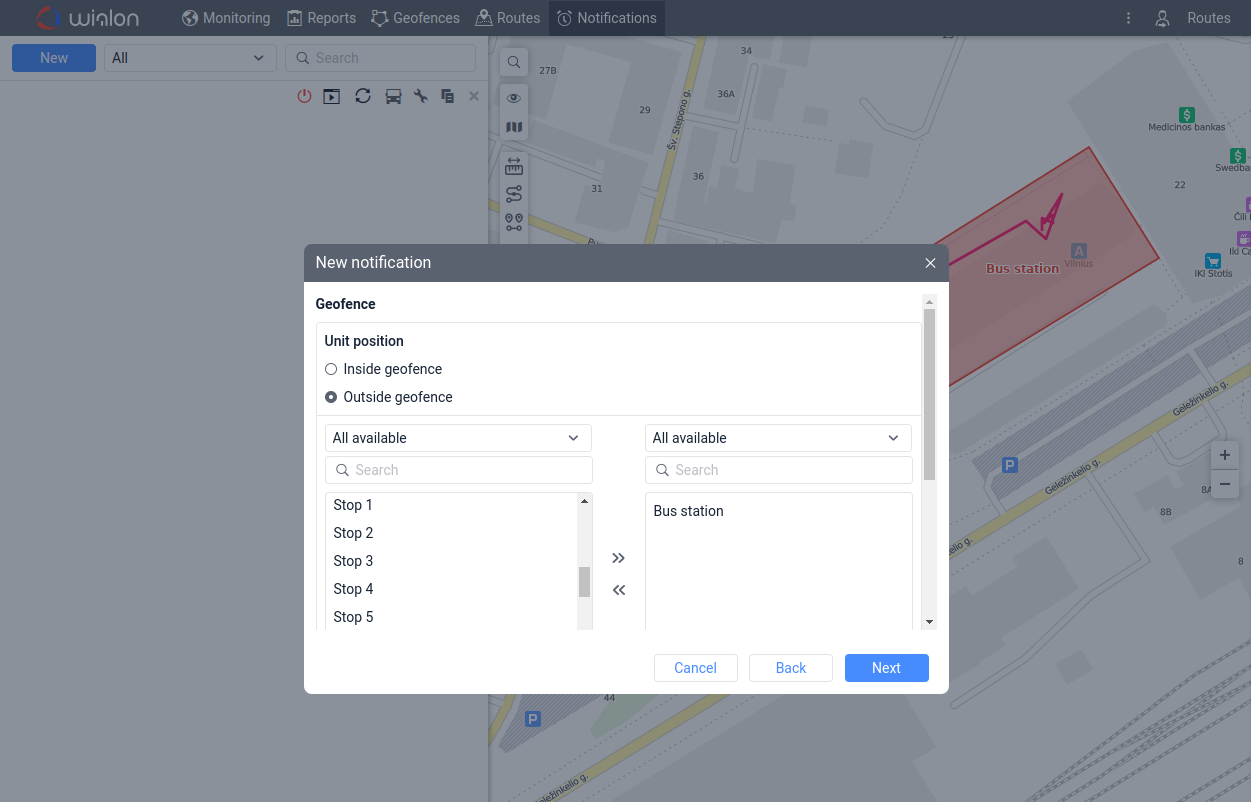
Choosing the type of notification to start a ride
Choosing the action in the notification