Creating Routes
To create a route, follow the steps below.
- Specify the addresses of the obligatory route points and, if necessary, add any number of waypoints.
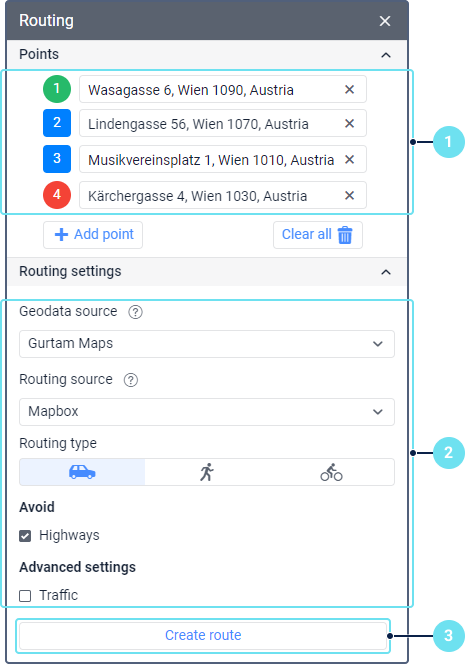
- Specify the routing settings, if necessary.
- Click Create route.
After that, the map displays the route built in accordance with the added points and the specified settings. To change the points or settings and build the route again, click on the icon  in the upper-left part of the window, make the necessary changes and click Create route.
You can also plan routes in the Logistics application.
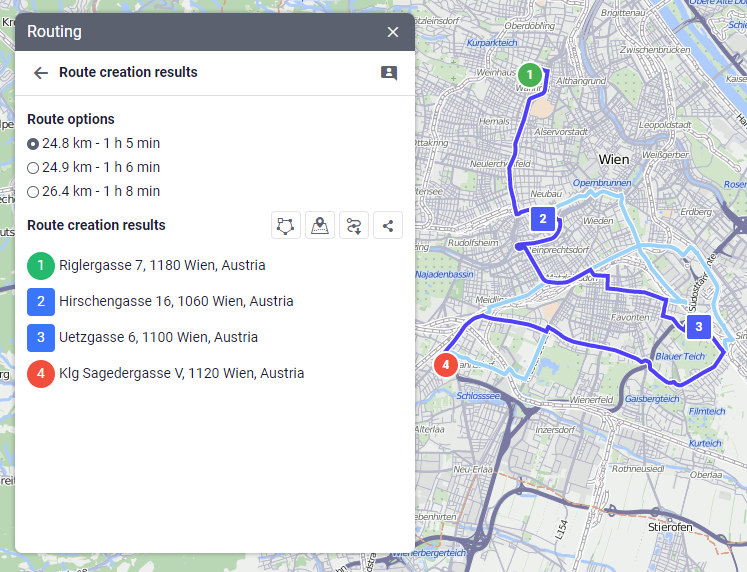
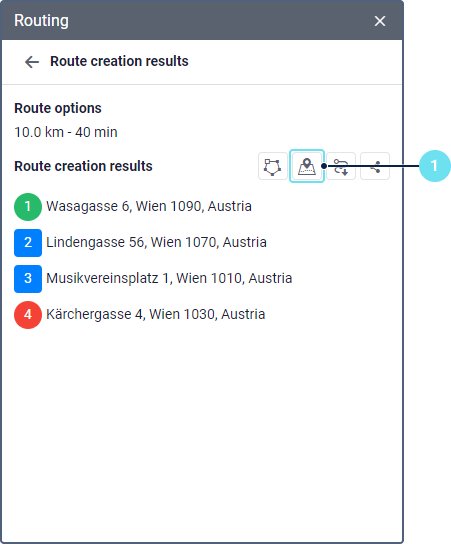
Route creation results
As a result of creating a route, you can see:
- route option indicating the distance from the departure point to the destination point and the time required to travel this distance;
- markers and addresses of all waypoints.
Also, you can see icons for saving the route as a geofence or route.
Alternative routes
If the Alternative routes option is enabled (only available with such routing sources as Google, HERE, Sygic), then the Route options section can contain several available options with different distances and time. You can select a suitable option both in the section itself and on the map. On the map, the selected route is highlighted in dark blue, and the available alternatives are light blue.
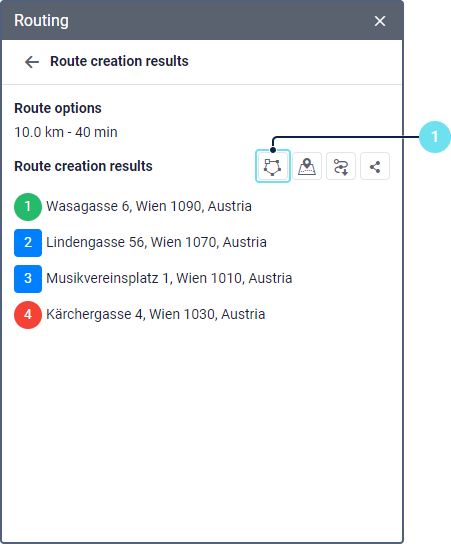
Actions with the route
You can perform the following actions with the created route:
- save it as a geofence or a route;
- export it to a KML or KMZ file;
- create a link to it in Google Maps.
Saving the route
You can save the created route as a geofence or as a route to work with it on the Geofences or Routes tabs, respectively, and use it when monitoring units, running reports, configuring notifications, etc. To do this, the Create, edit and, delete geofences access right to the resource is required. Also, the following services should be enabled in the billing plan or account properties:
- Geofences, to access the Geofences tab;
- Routes, to access the Routes tab;
- Geofence groups, to add the geofence to a group.
Two options are available:
Save as geofence
To save the route using this option, follow the steps below.
- Click on the icon
 .
.
- Enter the geofence name (1–1024 characters). See character restrictions.
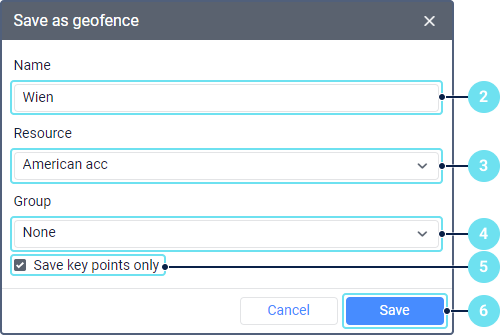
- Select the resource in which the geofence should be stored.
- Select the group to which the geofence should belong (optional).
- If necessary, enable the Save key points only option:
- if it is enabled, the saved geofence has the shape of a line which passes along the shortest way through the route check points without taking the roads and specified routing settings into account;
- if it is disabled, the saved geofence has the shape of a line which passes through the check points, taking into account all the roads and the specified routing settings.
- Click Save.
Saving may take some time. As a result of successful saving, a geofence is created in the shape of a line corresponding to the planned route.
Save as route
To save the route using this option, follow the steps below.
- Click on the icon
 .
.
- Enter the route name (4–1024 characters). See character restrictions.

- Click Save.
As a result of successful saving, a route is created. It consists of the check points of the planned route which are connected without taking the roads and specified routing settings into account.
Exporting the route to KML or KMZ
To save the route as a KML file, click on the icon  in the window of the created route and specify the name of the new file (not less than four characters). If the Compress file option is enabled, the file is archived and saved in KMZ format.
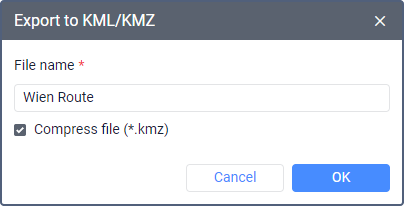
As a result, the route is saved as a geofence in the file. You can then import it into other applications that support this format or into other accounts in the monitoring system using the export and import tool.
Creating a link to the route in Google Maps
This option is available only if Google or Gurtam Maps are selected as a routing source.
To generate a link, click on the icon  in the window of the created route. You can copy and share the generated link or open it directly in Google Maps.
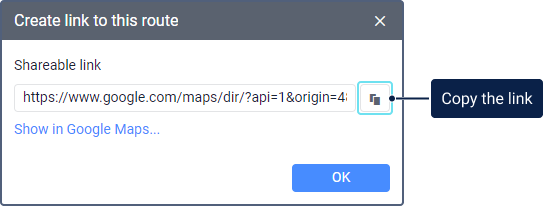
In Google maps, the route is recreated from the points you have specified, so it may differ from the one in the monitoring system. In this case, from all the specified routing settings, only the transportation mode remains the same.