How to choose the number of digital input/output (I/O)
Digital input and digital output are electrical contacts (connector pins) that are energized by the voltage of only two levels: one of them corresponds to the on-state (1, or On), and the other one — to the off-state (0, or Off). Hence, digital inputs and outputs are used to connect tracker and devices or circuits that transmit only two possible states. For example, you can connect a door status sensor to the tracker’s digital input so that the tracker can determine whether the door is open or not. And you can connect an anti-theft device to the tracker’s digital output that will be controlled by the tracker and block the ignition.
I should note that if the client requires an exact numerical value, an analog connector is needed. Because if you, for example, use a digital input for FLS, you can only find out whether there is fuel in the tank or not.
The number of digital inputs and outputs on the tracker may be quite large (for example, Galileosky 7x may have from 6 to 10 digital inputs, depending on modification and configuration). Therefore, users often wonder to which digital input or output the installer connected the device a client is interested in. Follow the instructions below to get the answer.
Displaying digital inputs/outputs
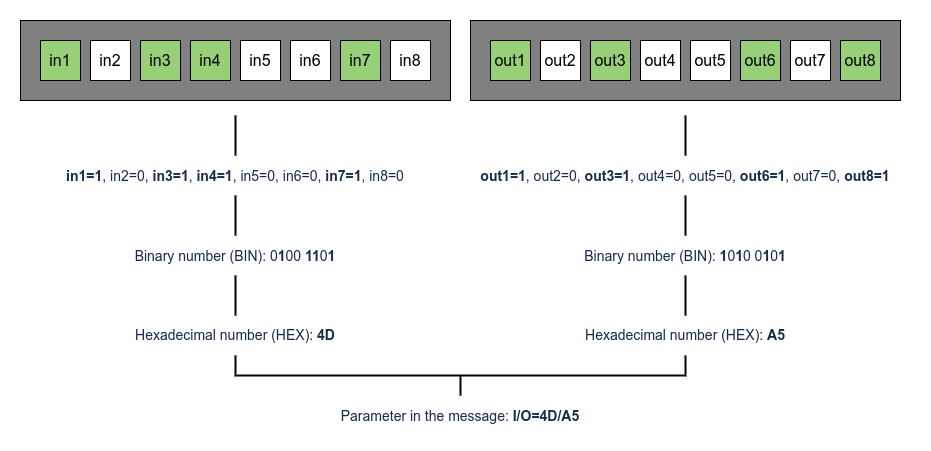
At first, it should be noted that the state of digital inputs and outputs in Wialon is represented as two hexadecimal numbers (HEX) obtained from binary numbers (BIN), in which each bit corresponds to an input/output with the same number. The parameter with these values is named I/O (short for Inputs/Outputs) and contains two numbers separated by a slash: to the left, there is the value corresponding to the state of all inputs, and to the right — the state of the outputs.
Why was this implementation chosen? Let’s look at an example.

Suppose that some vehicle attachments are connected to digital inputs 1, 3, 4 and 7 and outputs 1, 3, 6 and 8. Also, suppose that all the mentioned inputs and outputs are activated in the considered message. If separate parameters were used for each of them in the message, you would see the following:
in1=1, in2=0, in3=1, in4=1, in5=0, in6=0, in7=1, in8=0, out1=1, out2=0, out3=1, out4=0, out5=0, out6=1, out7=0, out8=1
In the current implementation in Wialon, you will see the following entry:
I/O=4D/A5
The obvious conciseness of the entry is a key advantage.
Defining the number of an activated digital input/output
If the number N of an input or output is known, the corresponding parameter will be inN, and the output parameter will be outN. For example, the parameter for the fourth input is in4 and for the output — out4.
However, if you don’t know the number of an input or output to which the hardware is connected, you can use one of two methods: selection or a mathematical approach.
Selection
When connecting hardware, installers most often use the first inputs/outputs. So, if we talk about a device or circuit that transmits information to the tracker, you should check in1-in4, and if it’s about a device or circuit that the tracker controls — out1-out4.
To find the needed input, you can create 4 sensors with the Custom digital sensor type based on these parameters (for example, the first sensor will have in1 in the Parameter field, the second — in2, and so on). Then go to the Messages panel, select the Data Messages type, and specify Sensor values in the menu below. After that, query messages for the interval when the hardware was first turned off and then turned on to find the moment of transition from Off to On in one of the columns, each of which corresponds to the created sensor.
This is the fastest practical way to find the needed input (similarly, you can work with outputs, but in this case, you should use the parameters out1, out2, and so on). If it doesn’t work, you can use a mathematical approach.
Mathematical approach
If you don’t know the number of an input/output to which the hardware is connected, you can use the following instructions:
- Go to the Messages panel, select the Data Messages type, and specify Raw data in the menu below.
- Query messages for the interval when the hardware was first turned off and then turned on.
- After displaying the table with messages from the tracker, pay attention to the Parameters column and find the I/O parameter there (it’s located at the very end of the line).
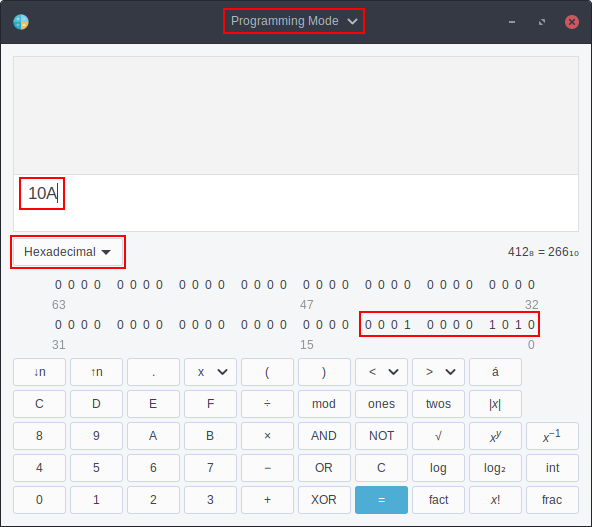
Suppose that the message where the hardware was turned off has the I/O=102/0 parameter, meaning that digital outputs are deactivated (or not even connected), and some digital inputs are activated. - Open the Calculator application (it is preinstalled on every computer, or you can find its analogs on the internet) and switch it to the Programming mode (or a similar one that allows you to convert values from one numeral system to another).
- Switch the calculator to a hexadecimal numeral system (HEX).
- Enter the value 102 found earlier.
- The application will automatically (or by pressing the enter key) show you the given number in different numeral systems. We need the binary format entry (BIN), which consists only of zeros and ones.

-
Examine the resulting binary number. Note that the bit number is counted from right to left (as in the decimal system, where ones are to the right, tens are to the left of them, then hundreds, thousands, and so on): 0001 0000 0010
-
Determine the bit numbers for a given number (bit numbering in Wialon starts from 1):
Number 12 11 10 9 8 7 6 5 4 3 2 1 Value 0 0 0 1 0 0 0 0 0 0 1 0 -
From this entry, we can conclude that in this message, inputs 2 and 9 are activated (i.e., in2=1, in9=1), and all other inputs are deactivated (i.e., their value is zero).
-
Now find the message where the hardware was turned on. Suppose it contains the I/O=10A/0 parameter.
-
Repeat steps 4-8 for the 10A value.

-
Determine the bit numbers for a given number:
Number 12 11 10 9 8 7 6 5 4 3 2 1 Value 0 0 0 1 0 0 0 0 1 0 1 0 -
In this message, inputs 2, 4 and 9 are activated (i.e., in2=1, in4=1 and in9=1).
-
Compare the results of steps 10 and 14. As you can see, they differ only in the state of the in4 parameter, which means the hardware in the given example was connected to input 4.
Using digital inputs/outputs
You can use the digital input or output parameter the same way as any other parameter.
When creating sensors for digital inputs/outputs, types from the Digital group are most suitable since they imply only two states (On and Off).
A unique use case, which is only available for digital inputs, is a notification with the Digital input type, for which you don’t even need to create a sensor.