Creating Stops
Stops can be created manually or imported from a file.
Creating stops manually
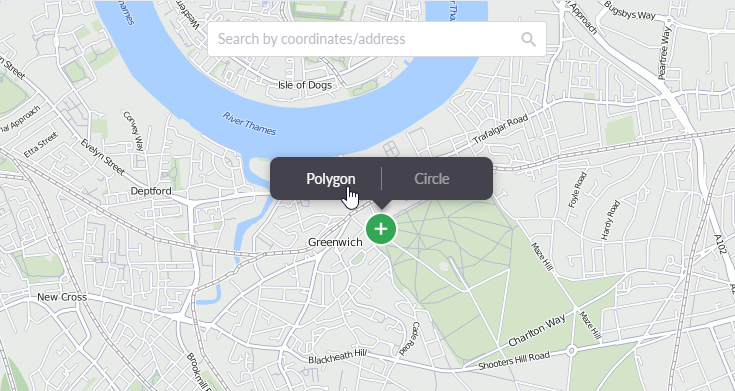
To create a stop manually, move the map to the required place and right-click on it or use the search by coordinates/address at the top of the map. In the pop-up menu, select a circle or polygon depending on which form you want the stop to be (you can change the type in the stop parameters window). The circle is created faster, but the polygon can be shaped more precisely.

Working with the circle:
- To edit the radius of the circle, drag the point on its circumference or enter the radius manually in the stop parameters window at the bottom.
- To move the circle to another location on the map, drag the point in its centre.
Working with the polygon:
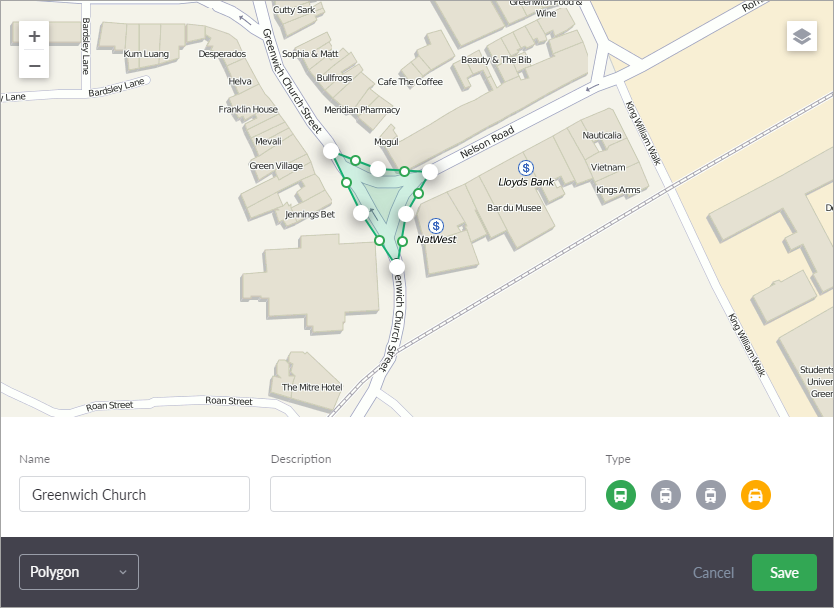
- The polygon should consist of at least three points.
- Large points are the real points of the polygon. Left-click on the point to delete it, or drag it to change the location.
- Small points are the potential points of the polygon. They are placed between all the real points automatically. Drag potential points to turn them into real ones.
In order for the stop to be marked as visited, the message from the unit should get into the specified zone. That is why the correctly chosen shape, size, and location of the stop are extremely important for the functioning of the system. It is not recommended to create stops that are too small, as, in case of a GPS error and infrequent sending of data, the coordinates of the unit may simply not get into the specified zone. Also, it is not recommended to create stops that are too large, as the coordinates can enter into neighbouring areas and, as a result, false visits can be recorded. The correct approach to the creation of stops in each specific case should be defined individually, empirically, and taking into account the specific features of the equipment used.
Stop properties
The obligatory property of the stop is its name. The stops with the same name can exist in the system. This is justified in cases when, for example, they are located on different sides of the crossroads or have different directions. To distinguish between the same stops, it is recommended to use the Description field.
Each stop can be assigned one or more types according to the kinds of transport that stop by. It can be:
 bus;
bus; trolleybus;
 tram;
tram; route taxi.

Specify the types of stops to make it easier to find them when creating a route (there is the corresponding filtering). If nothing was selected when creating/importing a stop, it receives the No type status ( ).
).
To finish, click Save for the created stop to appear both in the list on the left and on the map.
Importing stops
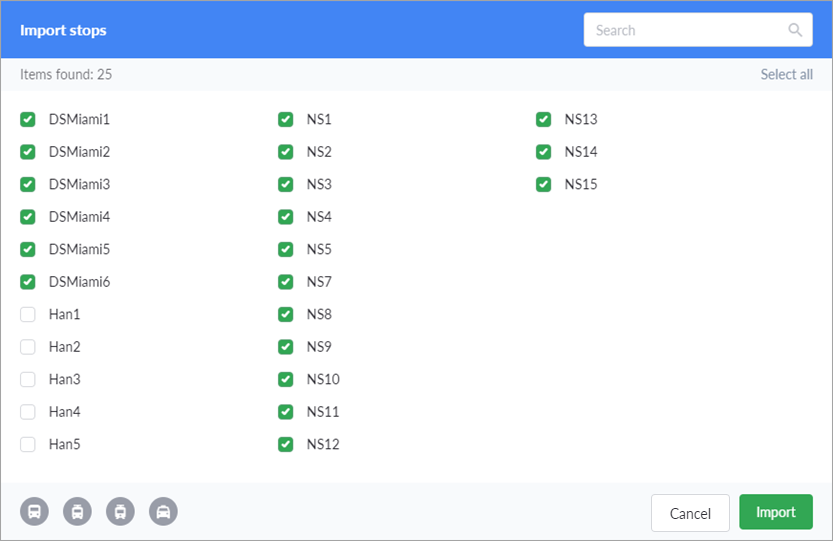
To import stops, click on the Import button ( ) and select a file of the supported format: KML or KMZ. After processing the file, the system displays its contents in a separate dialog. Only polygons and circles are taken into account; lines cannot be imported. In order to quickly find the required items, you can use the dynamic search in the upper-right part of the import dialog.

By default, all available stops are marked. However, you can select only the stops that you currently want to import. To select or reset all the elements at once, click on the Select all/Reset selection in the upper-right corner of the dialog.
In the import dialog, you can also specify the types of transport that should be assigned to the selected stops. To do this, use the buttons in the lower-left corner. If transport types are not assigned at this stage, you can later do it for each imported stop individually.
To finish, click on the Import button. The new content appears both in the list on the left and on the map. To close the import dialog without making changes, click on the Cancel button.
It is also possible to export public transport stops from the OpenStreetMap maps. To do this, follow the guide or contact technical support (support@wialon.com).