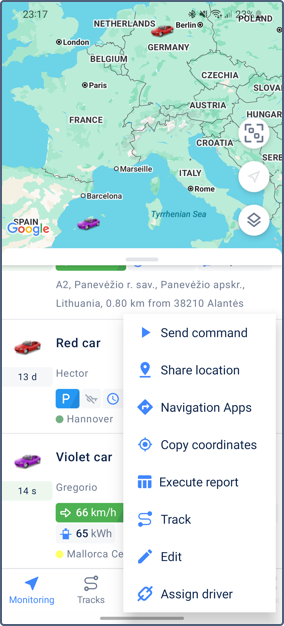
Actions with units from the unit menu
For prerequisites, see the Monitoring page.
From the unit menu, you can perform actions such as sending commands, generating reports, sharing location, changing unit name and icon, assigning drivers, and more.
Menu access
You can access the unit menu in two ways:
- Tap the icon
 in the unit section in the unit work list, detailed unit information, Video tab, and unit history.
 - Long-press on the unit.
Unit menu actions
The menu contains the following options:
| Option | Description |
|---|---|
| Send command | Sending the commands created in the web version of Wialon. |
| Share location | Sending the locator link which allows you to monitor a unit on the map during the selected validity period. The available intervals: 1 hour, 3 hours, day, week, or a custom interval. |
| Navigation apps | Planning a route using other navigation applications installed on a mobile device. |
| Copy coordinates | Copying the coordinates of the unit to the clipboard. |
| Execute report | Going to the Reports tab with the unit or group field already filled in. |
| Track | Going to the Tracks tab with the Unit field already filled in. |
| Edit | Changing the name and icon of the unit. |
| Assign driver | Assigning or separating one or multiple drivers to the unit. |
| Camera settings | Configuring the cameras of the unit. Available only if the prerequisites listed on the Video page are met. |
Configuring unit cameras
To configure the unit cameras, you should have the following access rights to the unit:
- View object and its basic properties. To view the settings.
- Edit not mentioned properties. To edit the settings.
If the list doesn’t contain all the required cameras or contains unnecessary ones, tap Set cameras and select the required ones. The maximum number of cameras for one unit is 16.
Each configured camera has its number and name (editable field). Below the name of each camera, the Automatic saving option is available. It allows saving videos from the unit cameras when a notification with the Save a video as a file action created in the web version of Wialon is triggered. Select the option or cancel the selection to enable or disable it for the camera respectively.
Unit menu in the group view
In the Groups mode, this menu contains only the Send command, Share location, and Execute report options. Tap the icon to open the menu.
Changing the unit name
To change the name, you should have the Rename object access right to the unit.
The name shouldn’t contain “(double quotes), {} (curly braces), \ (backslash). Permissible length: 4–50 characters.
Changing the unit icon
To change the unit icon, you should have the Change icon and Edit not mentioned properties right to the unit.
You can select one of the standard icons. For some of them, different colors are available. They are shown after clicking on the icon. The icons pointing upwards (for example, ![]() or
or ![]() ) are automatically rotated according to the unit direction.
) are automatically rotated according to the unit direction.
Sending commands
To work with commands, the View commands and Execute commands access rights are required.
You can send the command only to those units that have it configured in the unit properties. To see the list of the units that do not support the command, tap the icon  .
.
Assigning and separating drivers
The Assign driver option in the unit menu allows you to manage which drivers are assigned to your vehicles.
Driver list
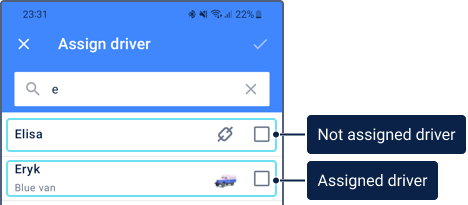
The Assign driver option opens a list of available drivers. Drivers already assigned to the selected unit are displayed at the top of the list.
You can create drivers only in the web version of Wialon.
If a driver is assigned to a unit, the name and icon of that unit are shown in the driver row.
If a driver is not assigned, this is indicated by the icon  in its row.
Assigning drivers
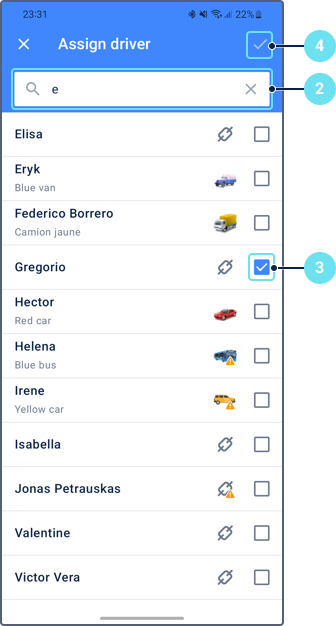
To assign a driver to a unit, follow these steps:
-
Open the unit menu by tapping the icon
and select Assign driver. -
Use the search bar to find a driver by name if needed.
-
Tap on a driver row to select him. You can select several drivers.
Drivers with the Exclusive option enabled are marked with the icon
 . Selecting a driver with this icon will automatically separate any other drivers from the unit.
 -
Tap the icon
 and confirm the changes.
Separating drivers
To separate a driver from a unit, follow the same steps as for assigning. The only difference is that in step 3, you need to tap on an assigned driver to remove the checkmark.
Displaying drivers’ names
You can show or hide the assigned drivers’ names in different parts of the application:
- in the unit section in the work list
- in the detailed unit information
- on the map