Results Panel
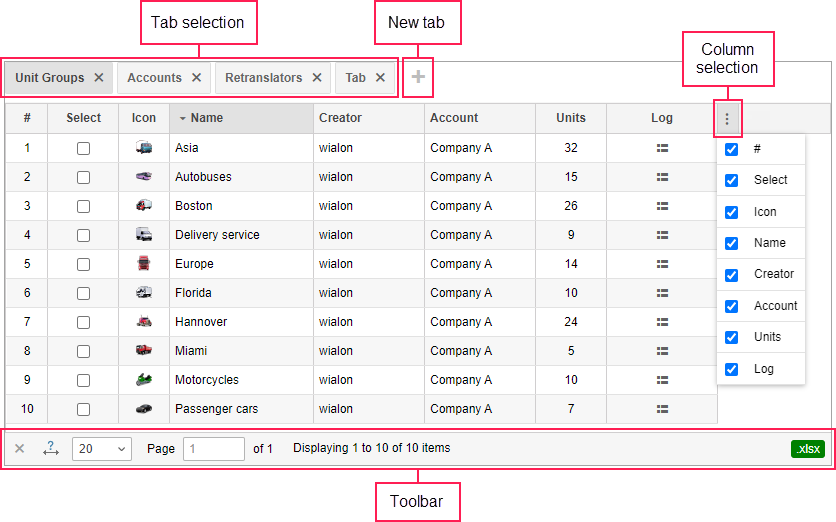
The results panel is located at the right top part of the window. Here the results of search are displayed.
It is possible to create up to five tabs in the results panel. To create a new tab, press on the inactive New tab that is on the right of all created tabs. To navigate between the tabs, just click on the required one. To close the tab, click on the button  next to its name.
The caption on the tab displays object type: users, units, accounts, retranslators, or unit groups. Also, when navigating through tabs, if they represent different object types, the navigation and search panel changes, too.
Your actions (such as search) are always applied to the active tab. If this tab already contains any records, they will be replaced.
Managing tables
The data is given in the form of a table. Records are sorted by name in the direct order that is from A to Z. To sort the data by any other criterion presented in the table, it is necessary to click on the corresponding name of the table. Note that if sorting by column is available, when you hover over its name, the arrow of the cursor changes to a pointer (hand).

Table contents and, correspondingly, the number of columns, depend on the type of objects displayed. For example, the accounts table contains the biggest number of columns.
A set of columns can be adjusted according to your needs. To do this, click on the last column in a table header ( ). Afterwards, in the appeared menu select the checkboxes for the required columns, or deselect them for the columns which are not needed at the moment.
At the bottom of the table, there is the Tools bar that can be used to perform several tasks such as deleting objects, moving to another page, etc. Moreover, when working with such system elements as accounts (resources), users, units, unit groups, and retranslators it is possible to save table data in Excel format. To do this, click on the corresponding icon in the right corner of the tools bar.
The width of the columns can be adjusted manually. To do this, click and drag the column edge in the required direction. To reset the settings, click on the Columns auto width button.
You can change the order of the columns. To do this, left-click on the heading of the desired column and drag it to a new position.
The adjusted set of columns, their width, and order are saved during the current session.
Also in the tools bar, you can set the number of objects displayed on the page. To do this, click on the drop-down list and select the required number (10, 20, 50, 100, 500, 1000).
To navigate between pages, use the arrow-shaped buttons. It is also possible to enter the page number manually and press Enter.
Log
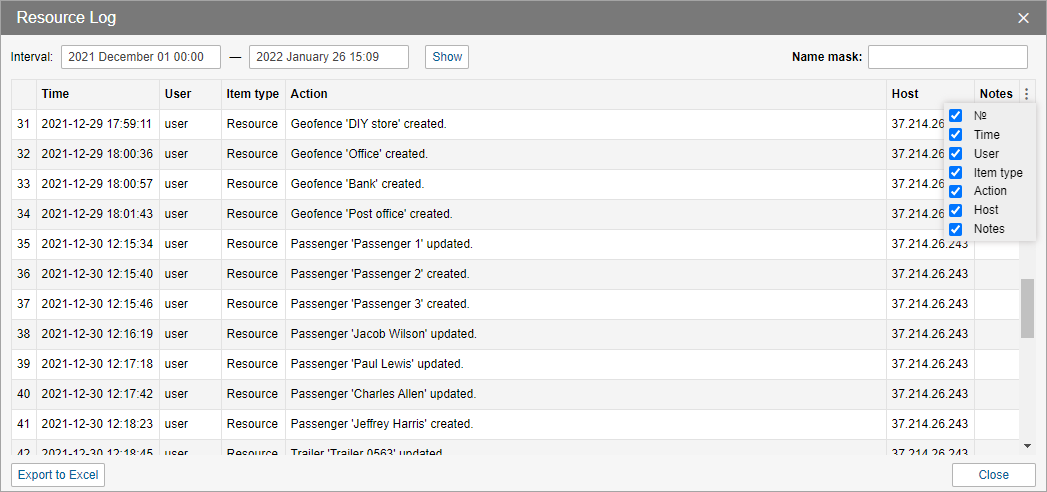
In all tables, except the Billing plans table, you can find the log ( ) for the selected objects. Its contents coincide with the contents of the report of the Log type in the monitoring system.

The log is presented as a table with the columns described below.
| Column | Description |
|---|---|
| Time | The date and time of the change. |
| User | The name of the user who made the changes. |
| Item type | The unit, unit group, user, resource, retranslator or route. |
| Action | The description of the change. |
| Host | The address of the computer (device) from where the user made changes or from where a job or notification that they set up was executed. |
| Units | The number of units in a group (applicable only to the Unit groups table). |
| Notes | An additional field where you can add your notes after exporting data to Excel. |
To hide or show the columns, select the required ones in the list. To open the list, click the icon  in the upper right corner of the table.
At the top of the dialog box, you can specify the required time interval. Also, here you can find the input field for name masks that filter the contents of the table by the User column.
At the bottom, there are buttons for exporting the log to Excel and closing the dialog box.
Standard operations
As a rule, you can apply a number of standard operations to any system object displayed in the table (accounts, billing plans, users, units, unit groups, or retranslators): create a new one of this kind (except billing plans), view or edit the properties of an object, copy or delete it.
Creating new objects
To create a new object, open the corresponding panel on the left and click on the Create button. The button is disabled if the current user does not have enough rights.
Fill in the required fields and tabs of the dialog and click OK. The OK button remains disabled until there is enough information in the dialog and it is correct. Any macro-object must have a name from 4 to 50 characters, and the text fields of the dialog should not contain any prohibited characters.
The new object does not immediately appear in the table. To display it, you need to apply the search parameters.
Copying
Copying is applied to units, users, groups of units, retranslators, and billing plans (accounts and resources cannot be copied). Copying is an alternative way of creating new objects. This method is especially useful if you want to create an object with properties similar to the existing one.
To make a copy of an object, hold the Ctrl key and click on the required object in the table. This opens the object properties dialog, all fields and tabs of which are identical to the properties of the object being copied (at least those properties which can be shown according to your access level). You can alter any properties if needed, e.g. individual information such as name, phone number, etc. Then press OK to complete the creation.
In many situations, instead of copying, you can use the Import/Export tool.
Viewing and editing
To view or change the properties of an object, click on it in the table. The properties dialog will open. If you do not have enough access rights to the object, the OK button is not available and you cannot save any changes. Besides, some properties and even the entire tabs can be hidden.
If you made any changes and want to save them, press OK. To quit dialog without saving changes, press Cancel or click on the cross icon in the right-hand corner of the dialog.
Deleting objects
To delete an object, check it in the Select column. To select all the objects at once, press Ctrl on the keyboard and check any box in the corresponding column. Then click on the icon  at the bottom of the table. After receiving a warning message, click OK to delete, or Cancel to take no action. Several objects can be selected, too. The result of the action is displayed in the log.
Remember that a certain access right is required to delete objects (Delete object). Objects that are not allowed to be deleted cannot be checked.
Below are some peculiarities of deleting different types of objects.
Deleting a unit group or retranslator does not delete units that are included in them.
To delete a user, use the red Delete button that is displayed next to each user in the table. However, you can only delete a user who is not the creator of any single object of the system. Read more about deleting users.
An account can be deleted only with all its contents and dependent objects, that is why deleting accounts is different from deleting other system objects. Read more about deleting accounts.
Top users have an opportunity to restore deleted objects.