Assigning and Separating Drivers
To assign and separate drivers, you should have the following access rights:
- Create, edit and delete drivers. To the resource that contains the drivers.
- View object and its basic properties. To the units that should be used when assigning and separating the drivers manually.
- Use unit in jobs, notifications, routes, retranslators. To the units that should be used when assigning and the separating drivers automatically.
Drivers can be assigned to units manually or automatically. After that, you can work with the assignment history.
Manual assignment and separation
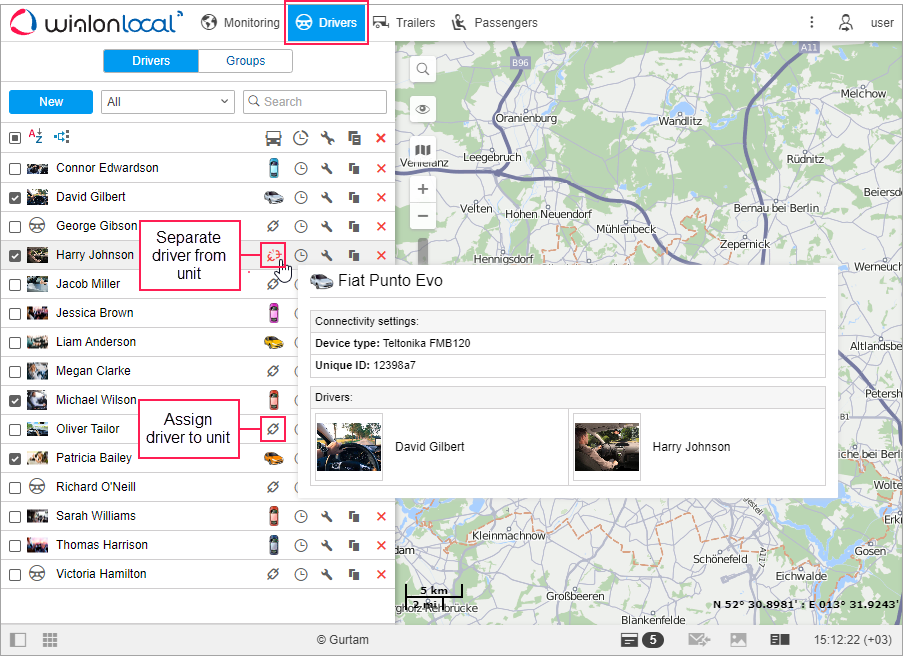
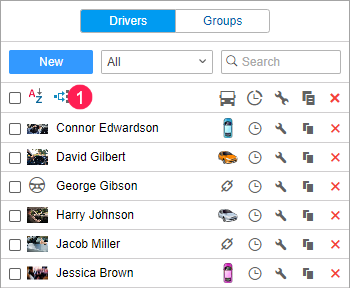
You can assign or separate a driver from a unit manually in the Drivers or Groups mode on the Drivers tab using the icons  and
and  respectively.
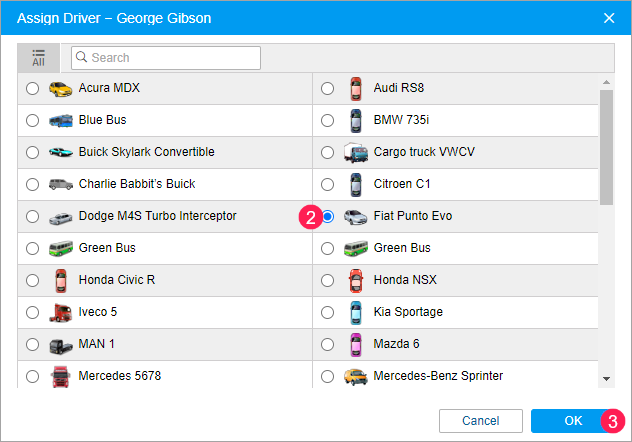
To assign a driver to a unit manually, follow these steps:
- Click on the icon opposite to the required driver in the list of drivers or their groups. If you don’t have the Create, edit and delete drivers access right to the resource, the icon is inactive (
 ).
).

- In the open window, select the unit to which you want to assign the driver. Here you can see the units from the work list on the Monitoring tab. To see all units to which you have the View object and its basic properties access right, click on the icon
 to the left of the search.
 - Click OK.
After that, the icon of the selected unit is shown in the driver row.
To separate the driver from the unit, point to the unit icon in the driver row and click on the icon . You can also separate the drivers by registering new shifts for them or deleting their assignment (see more).
Automatic assignment and separation
Automatic assignment and separation of drivers requires special equipment, for example, digital electronic keys with RFID tags. When entering a vehicle, the driver should present the electronic key to the reader, which is connected to the device installed on the unit. If the parameter received from the device contains the electronic key code, the driver is assigned to the unit automatically. The key code should correspond to the driver’s code and the parameter value of the Driver assignment sensor.
In order for the drivers to be assigned and separated automatically, you should:
- create a sensor of the Driver assignment type in the properties of all units that should be used for automatic assignment and separation;
- create an automatic assignment list.
Read about automatic separation below.
Sensor of the “Driver assignment” type
To create a sensor, follow these steps:
- Click Create (
 ) on the Sensors tab in the properties of the required unit.
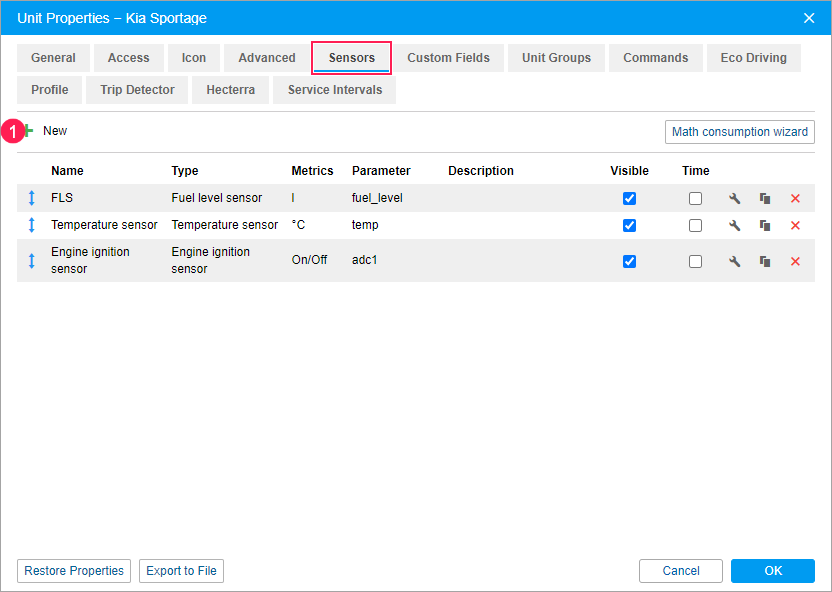
- Specify the sensor name.
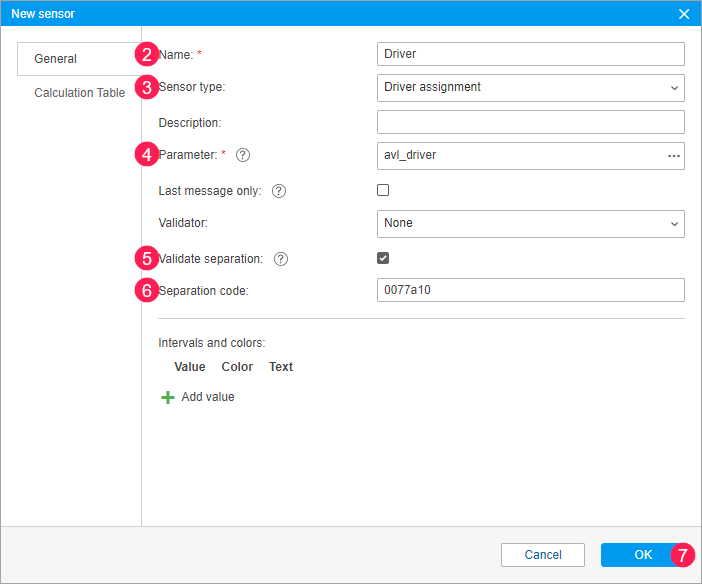
- Select the Driver assignment type.
- Specify the sensor parameter according to the settings of the equipment. For example, avl_driver.
- If necessary, enable the Validate separation option. It may be useful if you want to create several sensors of the Driver assignment type with different parameters in properties of one unit. If the option is enabled, then the driver is separated from the unit by the same parameter which was used when assigning this driver. If the option is disabled, the driver separation by any parameter leads to the separation of all drivers assigned to this unit.
- If necessary, specify the separation code.
- Click OK.
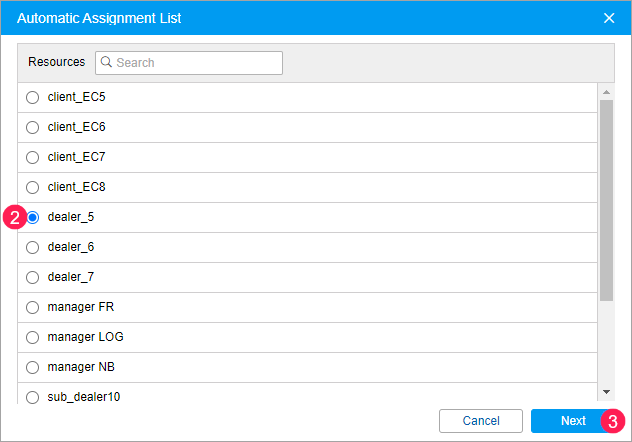
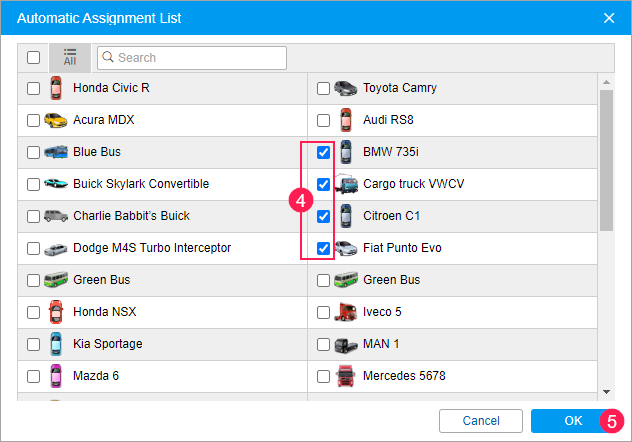
Automatic assignment list
To create an automatic assignment list, follow these steps:
- Click on the icon
 above the list of drivers.
- Select the resource for the drivers of which you want to configure automatic assignment. To find out which drivers belong to a certain resource, apply filtering by resource to the driver list (displayed to the right of the Create button). If only one resource is available to you, it is selected automatically.
- Click Next.
- Select the units to which the drivers of the selected resource should be assigned automatically.
- Click OK.
The automatic separation of drivers is carried out:
- after receiving the parameter with the separation code specified in the properties of the Driver assignment sensor;
- after receiving the parameter with an empty value;
- as a result of the notification with the Separate driver action (for example, when turning the ignition off);
- after assigning another driver to the unit, provided that the Exclusive option is enabled in the driver properties.
To disable the automatic assignment and separation of drivers, click on the icon , select the resource, clear the selection of the required units, and save the changes.
To obtain correct information about the drivers’ shifts, messages with assignments and separations should be sent in chronological order in real time. If the device sends multiple messages from the black box at the same time, the information may be distorted.
Working with assignment history
To view the assignment history of the driver and register shifts, you should have the Request reports and messages access right to the resource.
The Assignment history feature allows you to view the history of assignments, add records of assignments manually (register work shifts), and delete them if necessary. To perform these actions, click on the icon  to the right of the driver’s name.
To view the assignment history, specify the required interval and click Show. In the list of assignments, you can see the name of the unit, the date and time of the driver assignment and separation from it.
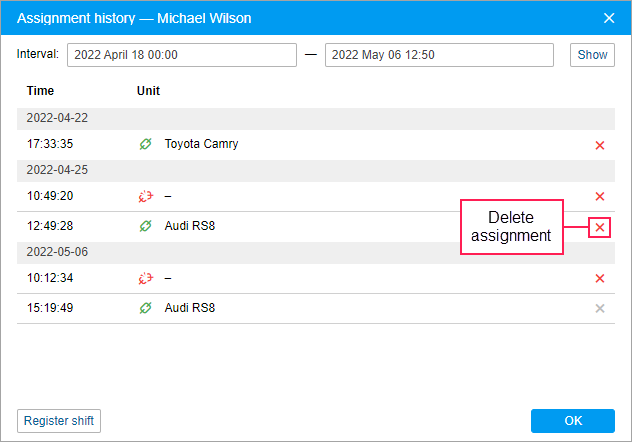
You can delete an incorrect assignment or separation by clicking on the icon  at the end of the row. If an assignment is deleted from the history, it is not shown in reports either.
You can’t delete the last registered assignment or separation.
Registering shifts
To create a record of the driver assignment in the past, follow these steps:
- Click Register shift.
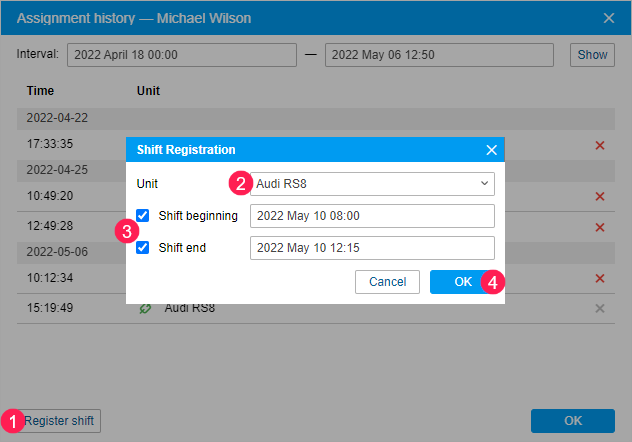
- Select a unit in the drop-down list.
- Specify the time of the shift beginning and/or end. To enable the Shift end field, put a check mark near it.
The date and time indicated as the shift beginning and end should be in the past or present. If you specify the beginning and end in the future, the shift is registered with the current date and time.
- Click OK.
Simultaneous assignments
In some cases, several drivers can be assigned to the same unit simultaneously. However, one driver cannot be assigned to several units simultaneously. If you assign a driver to another unit (for example, by registering shifts), this assignment cancels the previous one.
To avoid simultaneous assignment of several drivers to one unit, enable the Exclusive option in the properties of all required drivers.