Schedules
A schedule is a list of check points with the estimated time of their visit. One route can have an unlimited number of schedules. Different schedules can be applied to odd and even days, to weekends and weekdays, to different months, etc.
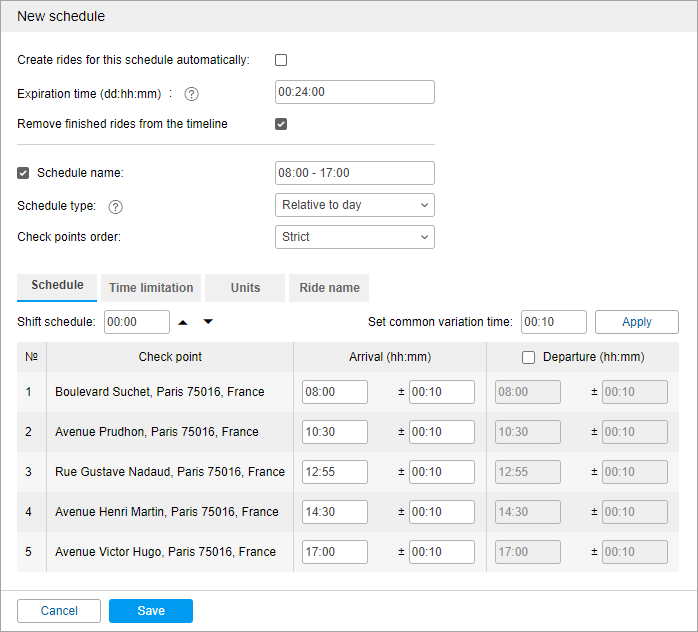
To create a schedule for a route, click on the Add schedule button ( ) next to the route name and adjust the required parameters.

General parameters
The tables below show all the available parameters and options.
| Option | Description |
|---|---|
| Create rides for this schedule automatically | Rides can be created automatically without any assistance of a dispatcher. When it is time for a unit to visit the first point, the ride is activated (taking the variation time into account) and the system starts to track it. This option can only be applied to the Relative to day schedule type. Besides, to activate this option, select one or more units that should be assigned to the route in the Units tab of the same dialog. |
| Expiration time | This is the time (days:hours:minutes) after which the ride is finished forcibly and obtains the Aborted status. This time is counted from the moment the ride begins to be tracked. |
| Schedule name | You can use the automatically generated name for the schedule. It includes the time of the first and the last point or it can be Copy of ..., if the new schedule is created as a copy of the existing one. However, you can give the schedule a different name manually, if you check the box before its name. |
| Remove finished rides from the timeline | It is advisable to leave this option checked. Otherwise, finished rides remain on the timeline and it is difficult to navigate through them. However, you can delete rides from the timeline in the list of rides. |
Schedule type
There are three schedule types.
| Type | Description |
|---|---|
| Relative to activation | The time indicated for a check point denotes the time from the moment of ride activation. The activation time is specified when creating a ride manually. |
| Relative to day | The time indicated for a check point denotes the time of day. Therefore, such a schedule can be used on different days. Automatic rides can be created only for this type of schedule. If a part of the route should be executed at night and overlaps the next day, you should add 24 hours to the time value when specifying time after midnight. For example, to specify 01:45 of the next day, enter 25:45. |
| Absolute | Absolute time includes a date. This type of schedule also supposes manual creation of rides. |
Check points order
This parameter is extremely important for route control.
| Order | Description |
|---|---|
| Strict | All check points are supposed to be visited in the order established in the route. No skipping is allowed. It means that if a unit has to arrive at Point #3, any visits to other points are ignored. The ride is considered finished when the unit enters the last check point after visiting all points in the established order. There are two possible results of such a ride: all the points have been visited or all of them have been skipped (if the ride has been aborted due to timeout). |
| Skipping possible | Check points are supposed to be visited in the indicated order, however, it is possible to skip some of them. If a unit visits Point #4 immediately after Point #2, Point #3 is considered to be skipped (even if visited later). The ride is considered finished when the unit enters the last check point, and it does not matter how many points have been visited. |
| Arbitrary | Check points can be visited in any order. The ride is considered finished when all the points have been visited. |
Schedule grid
Here you can see the list of all the check points of the route and their visiting time. You can indicate the time of arrival or the time of arrival and departure for every check point. Besides, you can set the variation time which will not be regarded as a violation of the schedule (for example, +/- 5 minutes).
- Time of arrival to a check point. The time format is hh:mm.
- Arrival variation (hh:mm) corresponds to a time interval within which a unit is allowed to arrive at a check point. For example, if the variation time is 5 minutes and the arrival time is 16:30, the unit should come to the check point between 16:25 and 16:35.
- Time of departure from a check point.
- Departure variation corresponds to a time interval within which a unit is allowed to leave a check point.
The same variation time of arrival and departure can be set for all check points simultaneously. To do so, fill in the Set common variation time field and click Apply.
If a check point has the arrival time only, it is considered visited on arrival. If both the arrival and departure times are indicated, the check point is considered visited only when the unit leaves it.
It is important to set the arrival variation of the first check point, because in this case, a ride is created (appears on the timeline and begins to be tracked) in advance. If the arrival variation of the first check point equals zero or has a small value, it may happen that a unit visits the point before the ride is created. In this case, the visit will not be detected. Therefore, it is recommended to set a larger arrival variation for the first check point.
Time limitation
You can apply time limitations to the schedule to restrict its operation to certain time intervals, days of the week, days of the month or months. For example, you can select only even or odd days, or the working hours of the weekdays, and so on. Note that this option does not work with the Absolute schedule type.
Units
Here you can assign units to the schedule. It is obligatory if rides are created automatically. If you create a ride manually, you can assign a unit immediately at the moment of ride creation.
The Use unit in retranslators, jobs, and notifications access right is required for unit assignment.
On the Units tab, you can see two lists. The units to be assigned are displayed in the left one and those already selected go to the right one. The left list does not contain all the units available to you, but only those included in the work list on the Monitoring tab. In case the work list is empty (when the dynamic work list is used or when the units have been deleted from the work list manually), it displays the units available to you according to the access rights.
If several units are indicated, the unit that first leaves the geofence of the starting point of the route is assigned to the ride, regardless of the check points order.
Ride name
Here you can set a name mask that will be applied to rides created on the basis of this schedule to differentiate them from those related to other schedules. This is useful when you enable the automatic creation of rides. You can use special tags to set the name mask.
| Tag | Definition |
|---|---|
| %ROUTE% | The name of the route. |
| %SCHEDULE% | The name of the schedule. |
| %FIRSTPOINT% | The name of the first check point. |
| %LASTPOINT% | The name of the last check point. |
| %DATE% | The date of the ride creation. |
| %TIME% | The time of the ride creation. |
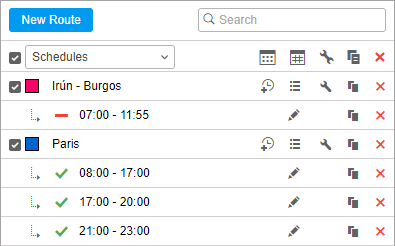
When all the parameters are set, press Save. You can see the result in the Routes panel if you select the Schedules filter. To edit the schedule, click on its name. Here you can also delete and copy schedules, as well as create rides manually. To the left of the schedule name, there is a button to enable or disable the automatic creation of rides.

Having configured the first schedule, you can easily create more by copying and shifting. Click on the Copy schedule button ( ) next to the schedule and alter the necessary parameters. Enter the shifting time (hh:mm) and click Apply. All arrivals and departures will be shifted by the indicated interval. If needed, change the schedule name.