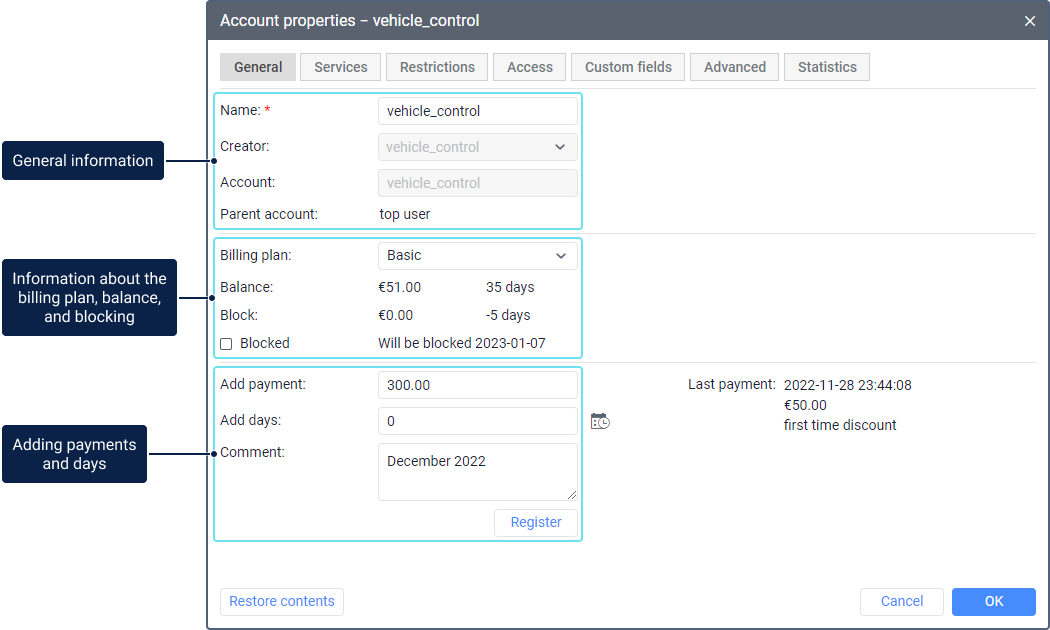
General Properties
To view information on the General tab, it is mandatory to have the Read Only access preset assigned to the account. To make and save changes to the tab, the user must have full access.
This tab is divided into three sections.

In the first section, you can see general information about the account.
Property | Description |
Name | The name of the account. Editable field. When editing the name, consider the input rules. |
Creator | The user on behalf of which the account was created. You cannot change the creator of the account. |
Account | The name of the account to which the resource belongs. Non-editable field. |
Parent account | The name of the parent account. You cannot change the parent account. |
The second section of the General tab contains information about the billing plan, balance and blocking.
Property | Description |
Billing plan | The billing plan selected for the account. You can change it by selecting another billing plan from those available in the list (if any). |
Balance | The remaining balance and days added for the account. |
Block | The balance and number of days upon reaching which the account is blocked. Displayed if blocking by balance and days is configured on the Restrictions tab, respectively. |
Blocked | The status of the account. The account can be active or blocked. In the first case, this option is disabled and the estimated blocking date is indicated next to it (if blocking by days is configured). In the second case, the option is enabled and the date when the account was blocked is specified next to it. You can change the account status manually, for example, disable this option to unblock the account quickly when a payment is received. You can also use the option to block the account manually when its balance is zero or negative, or the remaining number of days is less than 0. You can also change the account status using the icons / in the Status column in the table of accounts. |
The third section of the General tab is used for adding payments and days. You can add payments and days only for subordinate accounts.
To add a payment and/or days, follow these steps:
- Enter the payment amount in the Add payment field, or leave the value 0.0 if you want to add only days.
- Enter the number of days in the Add days field, or select the date until which you want to add days from the calendar (the icon
 ). Leave the value 0 in the field if you want to add only a payment.
 - Enter a comment (required).
- Click Register.
After that, the registered payment is added to the balance, and the registered days are added to the remaining number of days. The next time you open the window, the information about the last payment is displayed in the right part of the section.
The system checks the balance once an hour, therefore, automatic unblocking may not occur immediately. In this case, to unblock the account quickly, you can change its status manually.
Payment information is saved on the Statistics tab of the account properties.