Managing tracks
You can add tracks on any unit for any time interval. The list of tracks created will be displayed in the work area at the left. To prevent tracks merging, select different colours for them.
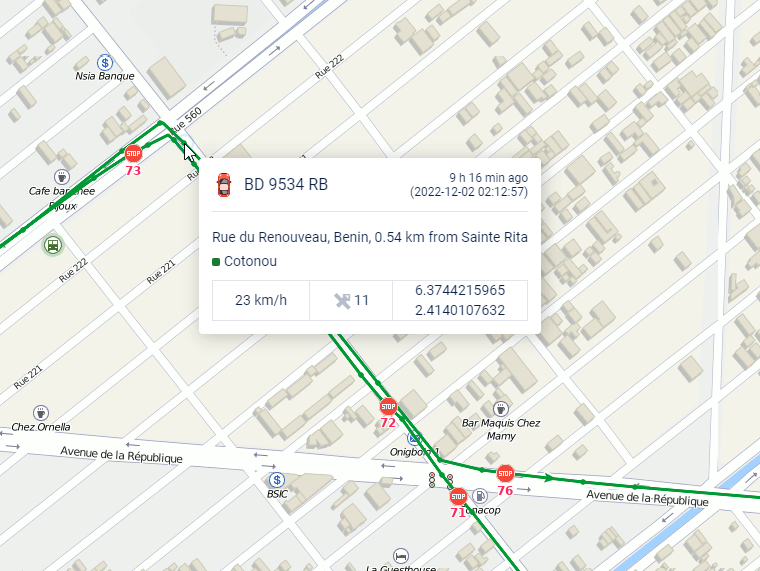
Hover the cursor over a track to get accurate information about a specific point of the track (points where messages were received). Messages are searched in the radius of 50 pixels from the cursor. Points found are highlighted by a pulsating circle, and a tooltip appears with the following information: time, address, speed, altitude, coordinates, satellites, and sensor values. Messages with zero speed are marked with bigger points. Measurements used in the tooltip are borrowed from the unit properties (speed in kilometers or miles per hour, altitude in meters or feet), as well as mileage in the list of tracks. The information from the tooltip can be copied to the clipboard.
You can manage tracks in the left part of the window under the Show track button. The name of a unit is displayed on the list, as well as the time interval and travelled mileage. Mileage in tracks can sometimes differ from mileage in reports (if there are invalid messages within the interval). In such cases, more accurate mileage is provided in reports.
It is possible to view all created tracks on the map simultaneously or select just some of them. The tracks with marked checkboxes are displayed. Unmark a checkbox to hide the track. Using the checkbox in the header, you can select/unselect all tracks at once. You can temporarily hide all tracks by disabling the corresponding layer in the top panel.
If there are several tracks available, you can sort them by length or name. To do this, click in the header of the list above mileage or name columns. Click again to sort the list in reverse order.
Use the arrows 
 to quickly locate the initial/final point of the track. To see the whole track and focus the map on it, just click on its name in the list.
To delete a track, click on the button  next to it. Using this button in the header of the list, you can delete all tracks at once.
Moreover, a built track can be saved as a line geofence. To do this, click on the button  . Note that if the number of points of a track is more than 10000, it is saved in several geofences with the same name and a digital index in brackets. For example, Geofence (1), Geofence (2), etc.
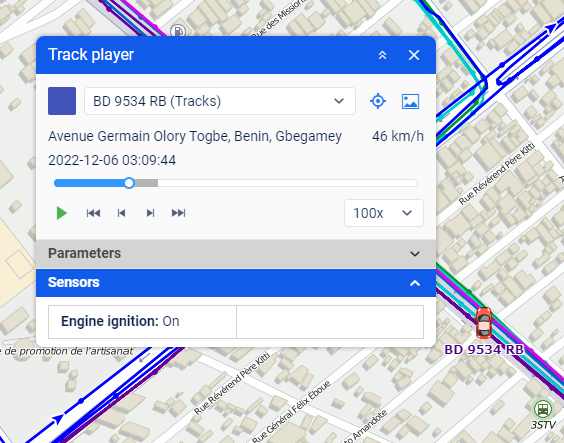
Track player
To play the track, click on the button  . It opens Track player and launches the playback. The unit icon moves along the track line at the selected speed.
Player settings
The map can be moved manually or automatically. This setting is adjusted with the icon  . If this option is disabled, you can only move the map manually. If it is active, the map moves automatically in the following cases:
- along with the unit during playback;
- when using the buttons of initial and final positions;
- when using the buttons for point-by-point movement on the track;
- when navigating the track by clicking on different places of the timeline;
- when choosing a new track in the drop-down list (the map moves to the first point of the track).
If messages from the unit contain pictures, you can show or hide them during playback using the icon  .
.
Select an appropriate playback speed from the drop-down list. It can vary from real-time speed (1x) to accelerated 1000 times (1000x, that is about 16 minutes of messages played in one second). Regardless of the selected value, messages with zero speed and no movement are played as fast as possible. If you change the playback speed while playing the track, a new value will be applied after you press Pause and then Play again.
Playback speed is rather conditional. Playback performance depends on the type of browser in use, computer processing power, number of messages in the track, and time intervals between the messages. In any case, all messages are played even if it takes more time.
Playback
You can play tracks both in the Tracks panel and Track Player.
To start playing, click on the button  . Press the button
  to stop. When the playback is completed, the unit stays in the point of its last location.
When playing a track on the map, a unit icon and/or an arrow of the movement direction (depending on the selected unit presentation method) are shown. It is convenient to use rotating icons. The name of the unit whose track is being played is coloured in purple. While playback is performed, the real unit temporarily disappears from the map.
During playback, the address and speed for each message are displayed under the unit name, and the date and time are displayed above the timeline.
In two lower sections, you can see the changing values of parameters and sensors (visible sensors only). Expand these sections to see the full list. To track only certain parameters and sensors, move them to the main section of the player. To do this, double-click on necessary items.
As the track is played, all data in these sections is updated according to the message being played at the moment. If there are images in messages, they appear in the pop-up window.
To navigate through the track, click on any place of the timeline or track itself. In addition, you can use the following buttons:
 : go to the first point (accompanied by the marker
  on the map),
 : go to the last point (accompanied by the marker
  on the map),
 : move to the next point of the track,
 : move to the previous point of the track.