Configuring notification actions
While configuring a notification, on the 3 step, you can select one or several actions that should be performed automatically when the notification is triggered.
Each notification action requires a corresponding service to be enabled in the billing plan or account properties. For general prerequisites (access rights, unit availability), see Creating notifications.
All the available actions are described in detail below.
Display online notification in a popup window
This notification action allows you to display notifications in a pop-up window in Wialon (see more).
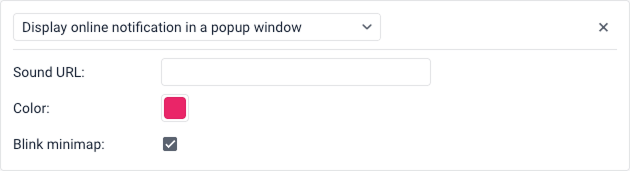
Sound URL
If the Play sound for events option is enabled in the user settings, the notifications are accompanied by an audio signal. In the Sound URL field, you can specify a direct link to the sound file, which must end with .mp3, .wav or .ogg depending on the file format. The recommended file size is up to 0.5 MB. If the field is not filled in, the default audio signal is used.
When using different browsers, take the following restrictions into account:
| Browser | Supported format |
|---|---|
| Google Chrome 11+ | MP3, WAV, Ogg |
| Mozilla Firefox 12+ | WAV, Ogg |
| Safari 5+ | MP3, WAV, AAC |
| Opera 10+ | WAV, Ogg |
Color
If necessary, you can select the notification indicator and background color. The default color is white.
Blink minimap
If the Blink minimap option is enabled, once the notification is triggered, a mini-window opens in which you can track the movement of the unit.
Notify by email
This action allows you to configure sending email notifications.
Some types of devices allow you to attach an image to the email sent by the unit in the message after which the notification was triggered. To do this, enable the Attach image from triggered message option.
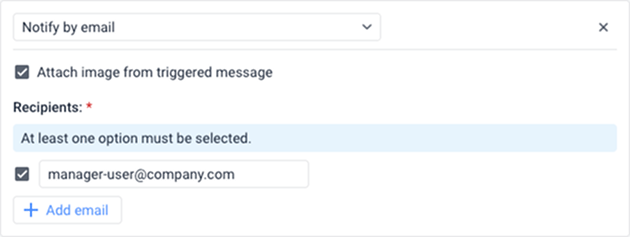
In the Emails section, you must specify the addresses to which notifications should be sent. To do this:
- Click the Add email button to add a new input field.
- Check the box to the left of the field and enter the required email address.
- To cancel sending notifications to any of the specified addresses, simply uncheck the box to the left of that address.
At least one email option must be selected to save the action.
Email structure
The notification name is specified in the header of the received email, and the unit name is shown in brackets. The main body of the email contains the notification text.
Unsubscription from email notifications
If the Unsubscribe feature is enabled in the properties of the account or resource where the notification is stored, an Unsubscribe link is shown at the bottom of the email.
If a recipient unsubscribes, the box to the left of their email is automatically unchecked in the notification settings. If all the specified recipients unsubscribe, and only this action is specified in the notification settings, the notification is automatically disabled.
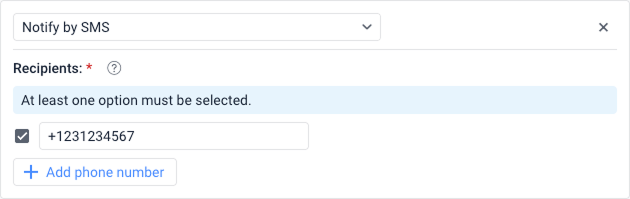
Notify by SMS
This action allows you to configure sending notifications as SMS messages.
In the Recipients section, specify the phone number in the international format (for example, +37060123456) and ensure the checkbox next to it is selected. To enter multiple numbers, click the Add phone number button.
Register event for unit
This action allows you to register events in the unit history.
The registered events are displayed in the Events report table. In order for events to be registered as violations and to be available in the Violations table, check the Register as violation box.

Send a command
This action allows you to send a certain command to the unit(s). The list contains all the available commands created in the properties of all the selected units. Select the command you want to execute using the radio buttons.
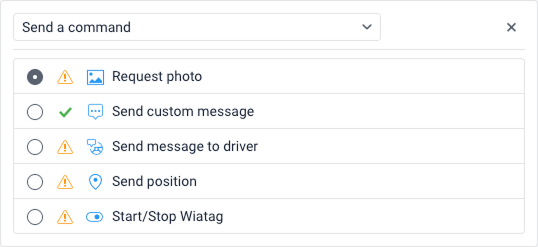
Next to the name of each command, you can see the following icons:
 : means that all the selected units support this command;
 : means that not all the selected units support this command (more information in the tooltip).
In the case of sending commands that involve entering text or a message (for example, Send custom message or Send message to driver), additional settings become available:
-
Message: Enter the required text. To save the message for future use, click the icon
 . You can use the same tags as for the notification text. When executing the command, the specified tags are converted to the values that correspond to them.
Tags in a command message are converted to values only when you use the Send a command notification action. When you send a command manually from the Monitoring tab, the tags are not converted.
-
Group: You can organize saved messages into categories. Select an existing group from the drop-down list, or click Add group to create a new one. You can also remove a selected group using the icon
 .
. -
Saved messages: Displays messages that have been saved previously. You can click a message to use it, or delete it from the list using the icon
.
Here you can find frequently asked questions about sending commands and answers to them. For more information about commands, see the Commands section.
Send mobile notification
This action allows you to configure sending mobile notifications.
To configure sending mobile notifications, follow these steps:
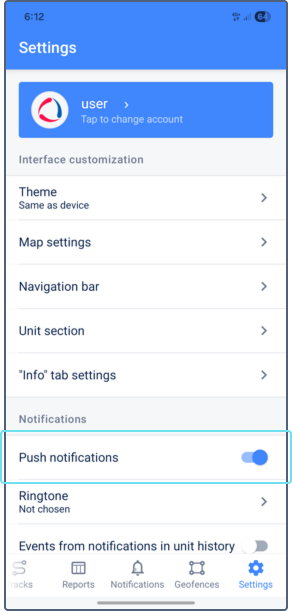
- Make sure that the users who should receive notifications are authorized in the mobile application and have the option allowing them to receive notifications enabled. In the case of the Wialon mobile app, the Push notifications option should be enabled in the settings.
- Select the mobile application to which the notification should be sent from the Applications drop-down list.
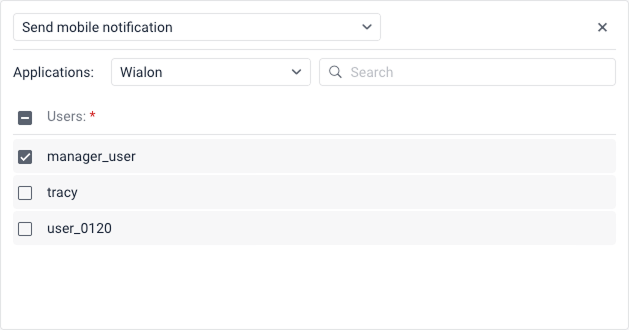
- Select the users who should receive the notification by checking the boxes next to their names. You can use the search bar above the list to find them quickly. To select all the users at once, check the box next to the Users title.