Configuring notification conditions
Conditions are configured in the first step of the notification creation process.
Below are all possible notification conditions and their settings.
Each notification condition requires a corresponding service to be enabled in the billing plan or account properties. For general prerequisites (access rights, unit availability), see Creating notifications.
Geofence entry
- In the left list, select the geofences or groups of geofences (displayed in square brackets) for which the notification should be triggered. They are grouped by resource to which you have access. You can use the dynamic filter above the list to search. For bulk selection, use the Select all checkbox to mark all geofences, or click the checkbox next to the resource name to select all geofences within that specific resource.
- Using the icon
 , move the items from the left list to the right one.
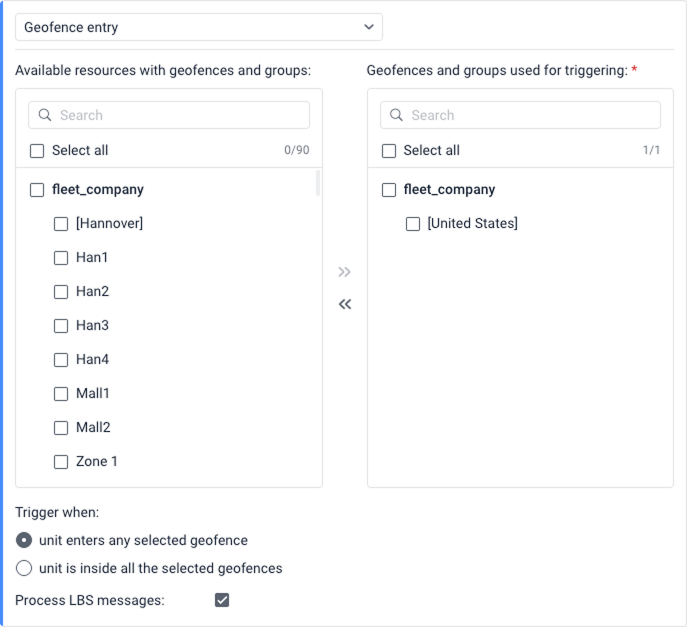
- In case you select several geofences, select when to trigger:
- when the unit enters any of geofences
- when the unit enters all of geofences
See examples for details of triggering in each case.
- Select Process LBS messages if you want to use LBS data for triggering notification. LBS data are less accurate, but allow to determine a unit approximate location where GPS signals might be weak or absent.
In order to receive LBS data from a unit, this function must be supported for the device type and the option Allow positioning by cellular base stations must be enabled in the unit properties.
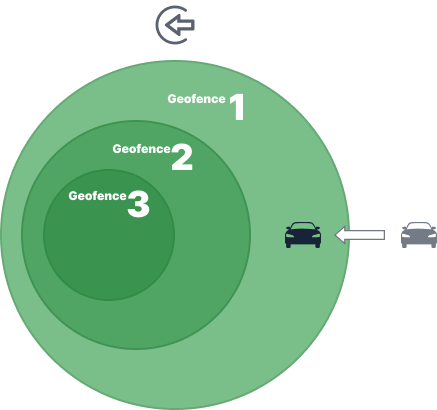
When the unit enters any of geofences
The notification is triggered when the unit enters any of the selected geofences.
Example. Geofence 1, Geofence 2 and Geofence 3 are selected in the notification settings. When the unit enters Geofence 1, the notification is triggered. It will also be triggered if the unit enters Geofence 2 or Geofence 3. In addition, the notification will be triggered if the geofences don’t overlap and the unit enters any of them.
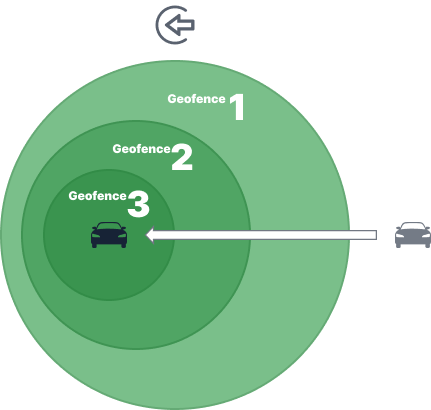
When the unit enters all of geofences
The notification is triggered when the unit is in all the selected geofences at the same time.
Example. Geofence 1, Geofence 2 and Geofence 3 are selected in the notification settings. Geofence 3 is inside Geofence 2 and Geofence 1. When the unit is in Geofence 3 and therefore in all the other geofences at the same time, the notification is triggered.
Geofence exit
- In the left list, select the geofences or groups of geofences (displayed in square brackets) for which the notification should be triggered. They are grouped by resource to which you have access. You can use the dynamic filter above the list to search. For bulk selection, you can select all geofences and all geofences from a resource.

- Using the icon , move the items from the left list to the right one.
- In case you select several geofences, select when to trigger:
- when unit leaves any selected geofence after being in all of them
- when unit leaves all the selected geofences
See examples for details of triggering in each case.
- Select Process LBS messages if you want to use LBS data for triggering notification. LBS data are less accurate, but allow to determine a unit approximate location where GPS signals might be weak or absent. The GPS data still is used if available.
In order to receive LBS data from a unit, this function must be supported for the device type and the option Allow positioning by cellular base stations must be enabled in the unit properties.
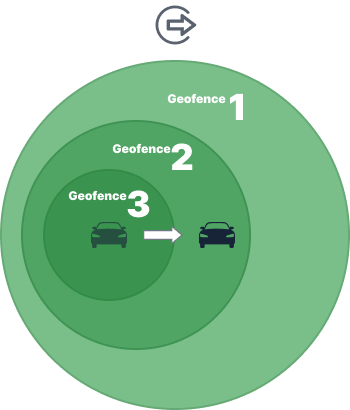
Unit leaves any selected geofence after being in all of them
The notification is triggered when the unit leaves any of the selected geofences if it previously has been in all of them at the same time.
Example. Geofence 1, Geofence 2 and Geofence 3 are selected in the notification settings. Geofence 3 is inside Geofence 2 and Geofence 1. The unit is in Geofence 3 and therefore in all the three geofences at the same time. When it leaves Geofence 3 but still remains in Geofence 2 and Geofence 1, the notification is triggered. The notification is also triggered if the unit moves from Geofence 3 to Geofence 1 or leaves all the geofences at once. If the unit was in Geofence 2 or Geofence 1 and has left them, the notification won’t be triggered.
Unit leaves all the selected geofences
The notification is triggered when the unit leaves all the selected geofences.
Example. Geofence 1, Geofence 2 and Geofence 3 are selected in the notification settings. Geofence 3 is inside Geofence 2 and Geofence 1. The unit is in Geofence 1. After the unit leaves Geofence 1, it is not in any of the three geofences, so the notification is triggered. In addition, the notification is triggered if the geofences don’t overlap and the unit leaves any of them.

Custom speed range
The notification with this condition is triggered if the speed value is above or below the permitted range.
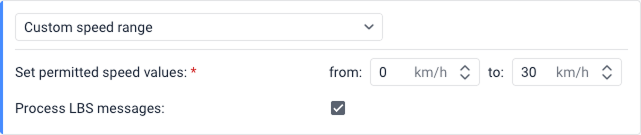
Select Process LBS messages if you want to use LBS data for triggering notification. LBS data are less accurate, but allow to determine a unit approximate location where GPS signals might be weak or absent. The GPS data still is used if available.
In order to receive LBS data from a unit, this function must be supported for the device type and the option Allow positioning by cellular base stations must be enabled in the unit properties.
Road speed limits
The condition is triggered if the speed limits from maps are violated. Road speed limits are taken from Gurtam Maps. See Road limits section for more details.
For this control type, you can specify the number of kilometers per hour by which the limits from maps can be exceeded (the Tolerance on speeding field).
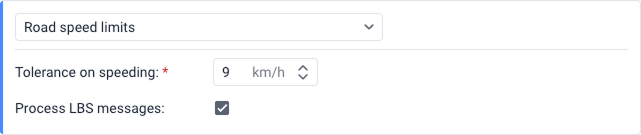
Select Process LBS messages if you want to use LBS data for triggering notification. LBS data are less accurate, but allow to determine a unit approximate location where GPS signals might be weak or absent. The GPS data still is used if available.
In order to receive LBS data from a unit, this function must be supported for the device type and the option Allow positioning by cellular base stations must be enabled in the unit properties.
Sensor range
This condition allows you to specify a range of sensor values to control whether the received values fall inside or outside of it.
The Sensor range condition will not trigger in the following cases:
- The notification is used to control the values of sensors that use parameters from previous messages.
- The received sensor value doesn’t fall within the interval set in the Upper bound and Lower bound fields in the calculation table. Such values are considered invalid and are not treated as equal to 0.
To configure this condition, follow these steps:
- In the Sensor type drop-down list, select the required sensor type, and/or in the Sensor name field, specify the name mask using special characters (
*and?).
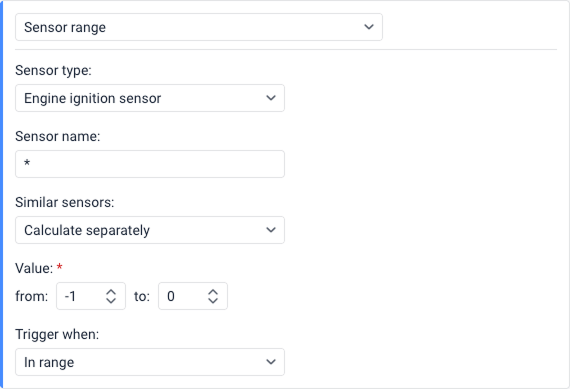
- In the Similar sensors drop-down list, select one of the available options:
- Sum up values: The values of all sensors of the selected type and/or sensors with the same name mask are summed up. Thus, the sum of all values is taken into account before the notification is activated.
- Calculate separately: The values of all sensors of the selected type and/or sensors with the same specified name mask are controlled separately.
- In the Value fields, specify the minimum (from) and maximum (to) values of the sensor. If you need to control a specific value, enter the same number in both fields (for example, from 1 to 1).
- In the Trigger when drop-down list, select the activation type:
- In range: The notification is triggered when receiving values that fall in the specified range, including the minimum and maximum values.
- Out of range: The notification is triggered when receiving values that don’t fall in the specified range.
Sensor value
This condition allows you to specify a value change (delta) to control whether the fluctuation in received values exceeds your set limit or not.
The Sensor value condition will not trigger in the following cases:
- The notification is used to control the values of sensors that use parameters from previous messages.
- The received sensor value doesn’t fall within the interval set in the Upper bound and Lower bound fields in the calculation table. Such values are considered invalid and are not treated as equal to 0.
To configure this condition, follow these steps:
- In the Sensor type drop-down list, select the required sensor type, and/or in the Sensor name field, specify the name mask using special characters (
*and?).
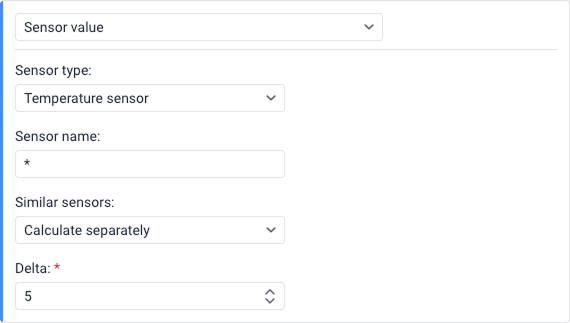
- In the Similar sensors drop-down list, select one of the available options:
- Sum up values: The values of all sensors of the selected type and/or sensors with the same name mask are summed up.
- Calculate separately: The values of all sensors of the selected type and/or sensors with the same specified name mask are controlled separately.
- In the Delta field, specify a threshold value. The notification will trigger when the absolute change between sensor values exceeds (is greater than) this threshold. The change is calculated using the absolute difference (modulo), which means the direction of change doesn’t matter: sensor values can increase or decrease. For example,
|12 − 10| = 2and|10 − 12| = 2. The notification triggers when this absolute change is greater than the Delta value, not when it equals the Delta value.
Setting the delta value correctly
Because the notification triggers when the change exceeds (is greater than) the Delta value, you need to set the Delta slightly below your desired threshold.
Example: If you want the notification to trigger when the value changes by exactly 1, you must specify 0.9 in the Delta field (because a change of 1 is greater than 0.9). If you specify 1.0, the notification will only trigger when the change exceeds 1.0 (such as 1.1, 1.5, 2.0, and so on ), but not when the change equals exactly 1.0.
Connection status
To configure this condition, follow the steps below:
- In the Notification field, select the event that triggers the condition: Connection loss or Connection restore. You must select at least one option, but you can select both.
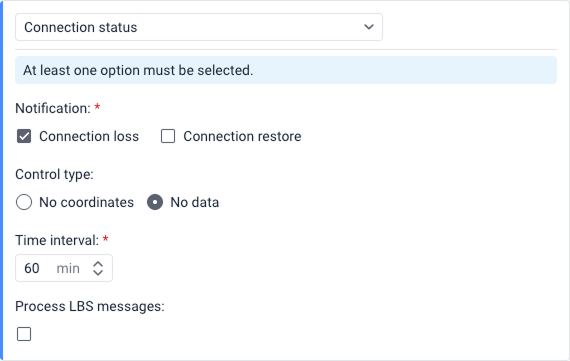
- In the Control type section, select how the connection status should be detected:
- No coordinates: If this option is selected, the connection loss refers to the absence of coordinates in the unit messages or the absence of the messages themselves. It may happen that messages with sensor data are sent but they don’t contain data on the unit location (for example, if the GPS antenna is closed).
- No data: If this option is selected, the connection loss refers to the absence of any messages from the unit.
- In the Time interval field, specify how long the connection loss should last (in minutes) for the condition to be met. The maximum allowed value is 999,999 minutes.
- Select Process LBS messages if you want to use LBS data for triggering notification. LBS data are less accurate, but allow to determine a unit approximate location where GPS signals might be weak or absent. The GPS data still is used if available.