Notice Board
You can send information messages (notices) to the users of the system. To send them, you should have the Edit not mentioned properties and View detailed item properties access rights towards the user. The billing plan of the user must also have the service Notices to users and the account must be active (not blocked). Otherwise, they do not appear in this window.
To open the Notice board window, click on the button of the same name in the Users section.
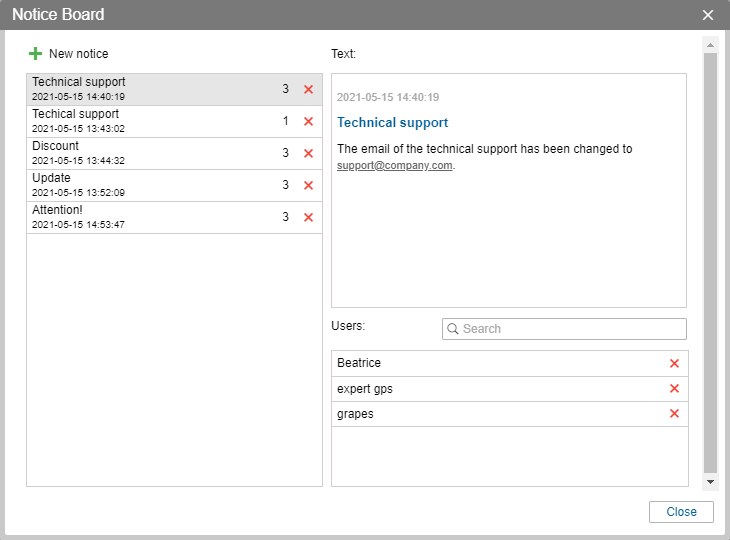
If there are some sent notices, the list of their subjects is shown in the left part of the window.

If you click on the subject of the notice, its text is shown in the field on the right. To delete a notice, click on the button in the form of the red cross in front of its name.
Apart from being deleted from the list, the sending to the recipients is cancelled as well.
Under the field with the text, there is the list of the users to whom the selected notice has been sent to. To quickly find necessary users, use the dynamic search. It is possible to delete users (the notice will stop being shown to them) by clicking the red cross in front of their names.
Creating notices
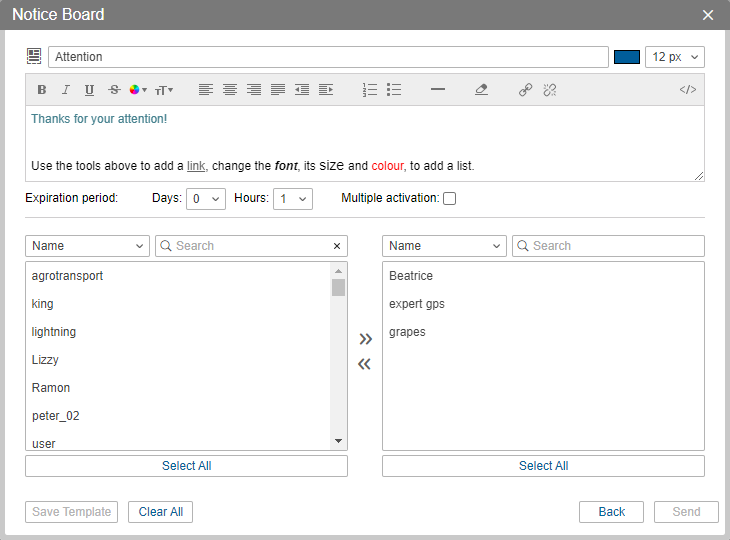
To create a new notice click on the New notice button in the upper left corner of the dialogue box.

Introduce the topic of the notice in the field Subject and the text of any length below. Above the field with the text there are the tools that can be used for changing the font and its colour, aligning the text, adding lists (numbered o bulleted) or a horizontal line, add an outdent or an indent. You can also add hyperlinks in the text of your message. To do so, enter the text you need to be shown as a hyperlink, click on the Add link button, type or paste the required link in the appeared field and click on the green flag on its right. In the left part of the tools panel, there is the Show code button by pressing which you can see the text in the form of a code.
Once you have entered and configured the text, adjust the expiration period (from 1 hour to 30 days) and enable the Multiple activation option if you need the notice to be shown to the recipient during his every login in the system during the specified validity period. If the option is disabled, the notice will only be shown once (till the user closes it).
Continue with choosing one or several addresses in the lower part of the window. The selection is done on the list on the left. Transfer the required users to the right list (by double click or using the Add button).
To quickly find the necessary users, use the dynamic filter above the list. Users can be searched by different criteria: name, creator, account, billing plan, custom fields, and admin fields. To select all the users at once, click on the Select all button.
Sent notices are shown to the corresponding users in a popup window (both in the management and monitoring systems).
Notice templates
The system provides a possibility to save the created notices as templates, which can be used later for creating new information messages. To do this, use the Save template button at the bottom of the dialogue box. Please note that the minimum input information required to save a template is its subject.
To open the list of available notice templates, click on the Templates button ( ) in the upper right corner of the dialogue box of creating a notice. If you want to use a created template, click on its name. You can also copy and delete templates using the buttons
  and
and  correspondingly.