Creating a Geofence
Here are three steps to create a geofence.
1. Map a geofence
Start working with geofences by choosing the corresponding mode.
Click on the New button. In the help window, you can see the instructions on how to create a geofence. Choose a geofence type on the left: line, polygon or circle.
Then map a geofence. Below are the basic rules for mapping a geofence.
Double-click on any place on the map to put the first point. Then add more points using the same method. Put the points as close or as far from each other as you want.
To insert a point between two other points, double-click on a segment between them.
To move a point to another place, click on it and holding the left mouse button drag to another place on the map. Then release the mouse button.
To delete a point, just double-click on it. Note that points cannot be deleted if there are only two points for lines or three for polygons.
You can quickly map a geofence by using the Routing tool (create lines) or the Address tool (create circles).
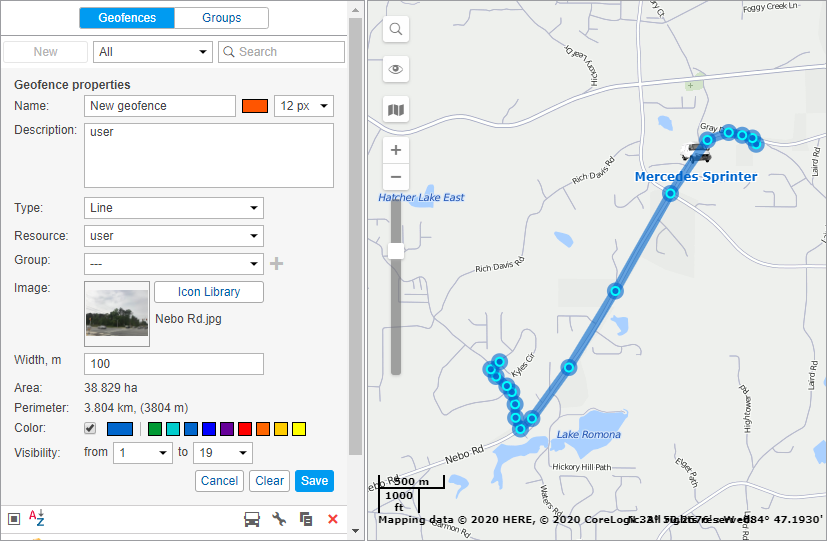
2. Set the geofence properties
Name
Geofence’s name is used while tracking units as well as in reports and notifications. It is a required parameter. It can consist of one or more symbols. Besides, you can specify caption color and size. It has sense if the option Display names of geofences on map is enabled in the user settings.
Description
This field is optional. The description is displayed in the geofence tooltip. It can also be added to the geofence name if the geofence is used as the address source in reports. When you create a geofence, the description is filled in automatically with the address information taken from the first point that you map. However, you can edit or simply delete it. The text should not contain more than 10,000 characters. You can use html (including iframe) tags in descriptions in order to format text or get images from other sites. For example, you can embed videos from web cameras, get photos of crossroads, load information about the weather or exchange rates, and so on.
Type
Geofence can be of the shape of the line, polygon, or circle. For line, you also can indicate its thickness, for circle — radius (in meters or feet, depending on resource settings).
Resource
This option is shown if the current user has access to more than one resource. The resource chosen while creating a geofence defines the measurement system used to calculate its area, length, radius, thickness, etc. (metric, U.S. or imperial system).
Group
While creating a geofence you can include it in one or several existing geofence groups. To do this, choose the necessary geofence in the drop-down list. Use the button  to add lines and the button
  to delete a geofence from a group.
Image
You can attach any image to a geofence. An image can be chosen from the standard icons (the Icon library button) or loaded from your computer by pressing the corresponding area and choosing the file you need. Supported formats are PNG, JPG, GIF, and SVG. Moreover, you can use the Icon Library application (for top accounts only) which enables uploading individual icons for geofences. The icons uploaded to the system using this application will be available for you in the standard Icon library. To facilitate the work with the library, the uploaded icons are placed in the same list, but separately from the standard ones (at the top). All loaded images are automatically resized by 64×64 pixels to display the geofences on the map and on the list. However, in the tooltip for a geofence, you can see an enlarged image (up to 256х256 px). In the geofence’s editing dialog you can delete the image used. To do so, point to it and click on the Delete button. Click OK to save changes or Cancel to dismiss them.
Area and perimeter
These fields are not editable, they are calculated automatically.
Area and perimeter values also depend on resource settings and can be given in hectares and kilometers or square miles, square feet and miles (feet), respectively.
Color
This color is used to render a geofence on the map and to display it in a unit’s tooltip and in extended unit information as well as some other places where next to the geofence’s name where a unit is located, is shown a square of the same color. The color is chosen using the palette or manually (by entering its RGB code). You can also choose if geofence’s shape should be shown on the map. For this purpose the corresponding flag to the left of the color palette is used.
Visibility
Here you specify map zooms at which geofences will be displayed or not. For example, if a geofence is a city, it has sense to see it on remote scales, whereas if it is a building it is more logical to see it on more detailed scales. Different map types can have different graduation of map scales. However, all possible values fall into the range from 1 to 19, where 1 is the most detailed scale (small streets and houses are displayed) and 19 is an overview (the whole world).
3. Save the geofence
When finished, press Save. In case of a mistake, press Clear and try again. To close the create mode without saving results, press Cancel.
Geofences can be saved to a file and easily transferred from one resource to another.