Working with Messages
When working with messages you can query, view, filter, and delete them.
Requesting messages from server
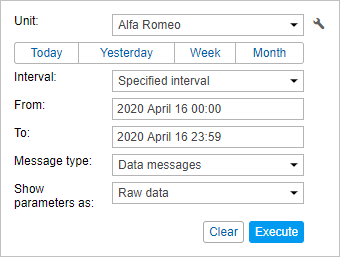
The request is formulated in the top left corner of the window on the Messages tab. Specify the following parameters:
- Select a unit. The dropdown list contains not all the units available to you, but only the units from the work list of the monitoring panel. In case the work list is empty (when the dynamic work list is used or when units were deleted from the work list manually), the units to which you possess the corresponding rights are displayed. A button in the shape of a spanner located to the right of the dropdown list serves to open the unit properties.
- Specify the time interval to show messages for. The principle of interval adjustment is the same as in the reports (see the Executing and viewing reports section). The second and fourth steps can be combined if you choose one of the quick intervals (the Today, Yesterday, Week, and Month buttons).
- Select the message type from the dropdown list (each type is described in detail below):
- Click Execute. The table will be generated in the right part of the window. To clear the table (and the map), press Clear.
There are alternative ways to query messages:
- from the Monitoring tab;
- from the table or chart of the online report.
To display the messages track on the map, you should check if the corresponding layer is active.
Viewing messages
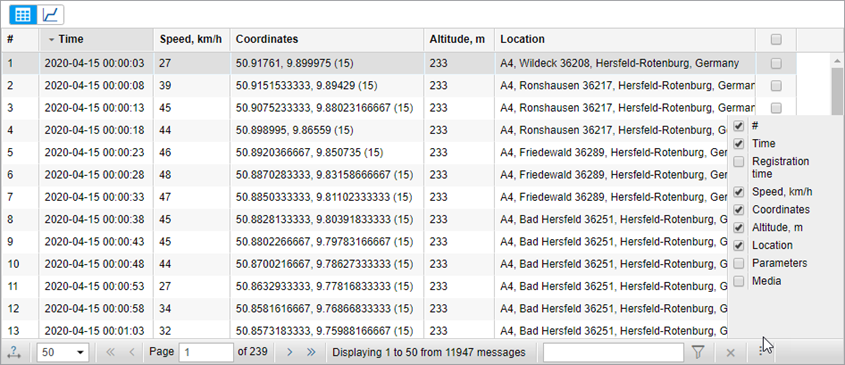
Messages of any type are displayed in the form of a table.
If a long time interval is selected, there can be many messages. In this case, they are presented on several pages. Use the navigation panel (blue arrows) to move from page to page, or enter the page number manually and press Enter to display a certain page. Apart from that, in the dropdown list, you can set the number of messages to be displayed on one page: 25, 50, 100, 500, 1000.
To change the chronological order of the messages, click on the heading of the Time column. The current sorting direction is shown by the arrows: ![]() — for the direct order;
— for the direct order; ![]() — for the reverse one. This setting is remembered by the system and used until you change it manually.
— for the reverse one. This setting is remembered by the system and used until you change it manually.
The width of the columns can be adjusted. To do this, move the cursor to the border of the column, click the left mouse button and while holding it, drag the border to the desired direction. If you want to expand the table, click on the Set column auto width button so that the letter A  is displayed there. In this case, the column width will be set according to contents in the cells. To save the column width when moving through the pages, make the button inactive (
  ). Note that when loading many messages (500, 1000 per page), it is better to disable the column auto width because it can considerably slow down the loading process especially if the number of parameters differs from one message to another.
The contents of the table are adjustable. It is possible to hide and display any column. To display the columns, click on the button  in the right bottom corner of the window. Then select the columns you need in the dropdown list. Note that all the columns cannot be hidden simultaneously. If sensors are displayed, each of them has its own column that can be enabled or disabled. By default, only visible sensors are displayed (the rest can be enabled manually).
Messages filter
To quickly find a necessary message, use a special filter.
Data messages (with parameters displayed as raw data) can be filtered by parameter names and parameter values, SMS messages and registered events — by message/event text, sent commands — by values of additional parameters, log — by the description of the action. The filter is disabled for data messages with the parameters shown as sensor values.
The rules for setting the filter were given above. You can use wildcard characters (* or ?) or input your query without them. For example, to find all messages with images enter ‘image’. Other available parameters depend on the type of equipment used.
To search for several parameters at once, enter their masks separated by commas. In this case, the results are highlighted in different colors and moved to the beginning of the line. Their order corresponds to the entered masks.
For parameter values, the usage of the the * and ? signs is supported if string values are compared. That is, the search can be specified as: adc? = 0.5 *. Only the = (equal) and <> (not equal) operators are used in this case.
In addition, the filter supports the following operations: =, >, <, >=, <= <>. For instance, a search can be specified as follows:
- param = 3.1415 (equal);
- param > 3.14 (more);
- param < 3.14 (less);
- param >= 3.14 (more o equal);
- param <= 3.14 (less or equal);
- param <> 3.1415926535 (not equal);
- 2.71 < param < 3.15 (more …, but less …).
The * and ? characters can be used for parameter names. Therefore, a search can be specified as: adc? > 0.5.
The search of input/output values is carried out according to the principle if any of the values is equal, greater or less, that is, the query I / O <2 will include I/O = 0/2 among the results since there is a value 0, which is less than 2.
To apply the filter, press Enter or click on the Apply button to the right of the filer. After this, messages that contain the requested parameters or text will be displayed in the table. To remove the filter and show all available messages again, clear the query text field and apply the filter again. If the filter is applied, the number of found (filtered) messages is displayed on the left.
The filter only works on the current page with messages. However, when you go through the pages, the filter is applied to each new page automatically.
Deleting messages
You can delete a message if you think it is invalid. To do this, you should have the Delete messages right to the unit.
In the last column of the table, mark the messages that should be deleted (one or more). Then click on the Delete button ( ) and confirm your intentions. If the checkbox in the header of the table is ticked, all messages on the current page will be selected.
After the operation, the newly deleted messages still remain in the table but become inactive. The next time when you load messages, the deleted messages will be completely removed from the database.
It is impossible to delete the last incoming message as well as the last message with the position (valid coordinates). That is why the delete checkbox for these messages is always dimmed.