Work List Management
To monitor units, you need to place them in the work list. Only units presented in the work list can be used to display on the map, as well as to apply various control elements: jobs and notifications execution, reports generating, drivers and trailers assigning, messages or tracks viewing, finding nearest units, etc.
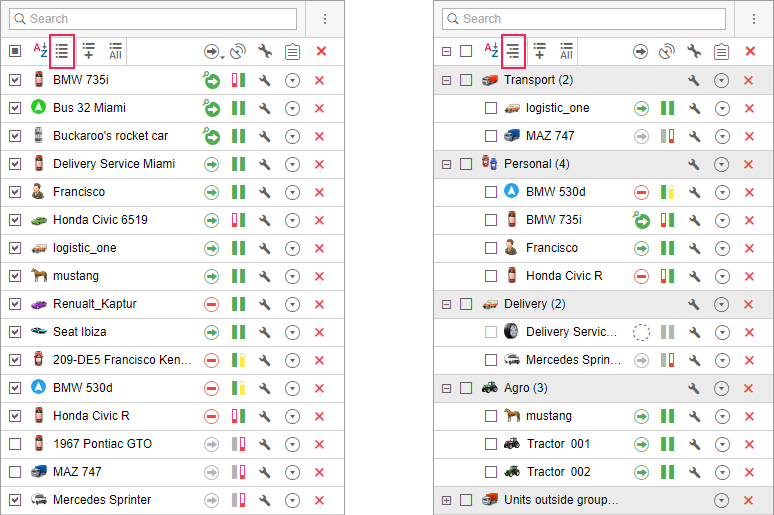
The work list has several display modes:

Each of these lists is independent, and their settings are stored separately. When you switch between them, all settings that were last applied to this type of list are restored.
To search for the required units in the list, use the dynamic search above it. The search is carried out by unit name, group name, unique ID, device type, phone number, and such profile properties of the unit as VIN, vehicle type, registration plate, brand, model, year, and color.
Simple list mode
Adding units to the work list
To add units to the work list, use the following buttons in the header of a list:
 : add all units available;
 : add particular unit(s). The search tool is used.
Moreover, there are alternative ways of adding units to the work list:
- from the Online notifications window (adding a unit that triggered the notification);
- dynamic formation of the list depending on the relevance of the data.
Units created in the monitoring system or CMS Manager are automatically added to the work list of the monitoring panel of the user-creator (you may need to refresh the page or log in again). If the group view monitoring mode is activated in the work list, the new unit automatically gets in the group it was added to at creation, or to the Units outside groups (if it does not belong to any).
If the filtration on the basis of data accuracy is used and the created unit does not meet the specified conditions, automatic addition to the list does not happen.
Removing units from the work list
Units can be removed from the work list individually or all at once:
 : the button next to each unit to remove this particular unit from the list;
 : the button in the header of the list to clear the work list (to remove all units).
Note that deleting units from the work list does not lead to their deleting from the system. They can be added back to the work list using the ways described above. Units can be deleted from the system on the Units tab.
Sorting
By default, the work list is sorted by names arranged in direct alphabetical order. The order can be reversed. To do this, use the switch button  or
or  in the header.
Besides, it is possible to sort units by other attributes such as motion state, connection quality, etc. To do this, use the buttons in the header:
 : sensor state;
 : commands;
 : motion state;
 : last message time;
 : online connection state;
 : media files;
 : quick track;
 : driver information;
 : trailer information.
For instance, to sort units by the motion state, use the button  . The list is rearranged in such a way that all the moving units appear at the top of the list, and those that are not moving appear at the bottom. To reverse the motion state order of units, click on the button again.
The presence or absence of certain columns is adjustable in the monitoring panel customizer.
Tree-like mode
In this mode, work list units are displayed in groups. Next to the name of the group in parenthesis you can find the number of units included in it. To view the units in the group or the current information on them, expand the group (+ in front of the group name). Any group unit can be removed from the work list (though it is not removed from the group itself).
To add all groups currently not presented in the work list, click on the Add all available button ( ). At the same time, if the list was empty, the groups are added with all the units included in them. If the group has already been present in the work list, the list of its units remains unchanged.
When you add units that are not included in any group, they are automatically placed in the Units outside groups  group. Such a group cannot be edited, although it has many characteristics typical of an ordinary unit group.
To expand/collapse a unit group (i.e. show/hide its units), use the +/- button in front of a group name. To display group units on the map, check a corresponding box. To display a particular unit from a group, expand the group and mark the checkbox with this unit.
If at the end of the list when the group is expanded there is the ellipsis (…), this means that not all the group units have been added to the list at the moment. When you hover the cursor over the ellipsis, you can see how many units are not displayed, and add them if necessary.
A tooltip shows the list of all units included in the group.
The following actions can be performed over a unit group from the Monitoring tab:
 : command sending;
 or
or  : unit group properties viewing/editing.
Searching and adding units
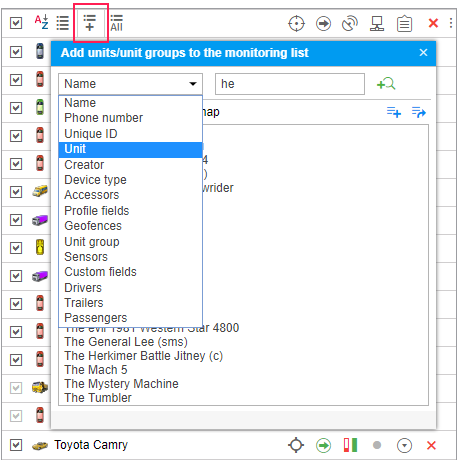
There is a convenient tool for finding units and adding them to the work list. To open the unit search dialog, click on the Add to the list button ( ) in the work list header.
Unit search dialog displays all the available groups (in square brackets) and units in alphabetical order. To add units or unit groups, double-click on them. If the simple list mode has been activated, then single units (one or more) are added to the work list even if you double-click on a group.
If the tree-like mode has been activated, a group is added to the work list in a collapsed form. To add a unit group with a complete set of units, double-click on a group. To add a unit group with some particular unit, click on this unit then. When you add units that do not belong to any of the groups, they are automatically placed in the Units outside groups group  .
.
In order for the added units to be instantly displayed on the map, activate the Show added units on map checkbox in the unit search dialog.
Search by criteria
If you have a large number of units/groups, you can use special filters to quickly find the item. The dropdown list contains the following search criteria: name, creator, custom fields, profile fields, phone number, unique ID, device type, access from the user, geofences, sensor, drivers, trailers, passengers, etc.

Select a search parameter and then type a keyword into the next field. For instance, to find all MANs, select search by name, and in the template field type man. All units and groups which names contain the combination of characters man (both at the beginning and at the end of the name) will be found and displayed immediately. The comma sign (,) can be applied to string together several requests. For example, to find all MANs and all Ivecos, type *man*, *iveco*.
If you leave the search field empty, all the units that have the selected property (sensors, ID, etc.) will be displayed, for example, all units that have a driver assigned to them. Then you can type a driver’s name or code to narrow the search.
Most of the search parameters (except for geofences, drivers, and trailers) are taken from and can be viewed and changed in the unit properties. When using a search by a sensor, not only the name of a sensor can be entered in the template field, but also a part of its description, parameter type or parameter name.
After the first search is complete, you can continue the search on the second (third, etc.) level: search among the results of the previous search. To do this, click Add to the search list  . The principles of inquiry formation remain the same.
If your search is successful and you want to include the results in the work list, you can do this with a double click or using the buttons:
 : add a search result to the work list;
 : replace the existing work list with the search results.
Dynamic work list
The work list on the Monitoring tab can be formed dynamically according to the time when the last message with coordinates from a unit is received. Units are removed and added to the list and map automatically. The work list is updated every 10 seconds.
The function can be enabled in the monitoring panel customizer. Change the Without filtration option to Monitoring panel or Panel + Map and specify the filtration interval in minutes. Then only those units from which data was received during the specified interval will be displayed on the Monitoring tab. If the Panel + Map option is selected, the units are added not only to the work list but also to the map.
With this mode enabled, some functions of the system become unavailable or operate differently:
- Manipulations with the work list (such as searching, adding, and removing units) are impossible.
- The filtration by the time of the last message does not affect the work list if the treelike view is selected.
 :
:  :
: