Area of Search Results
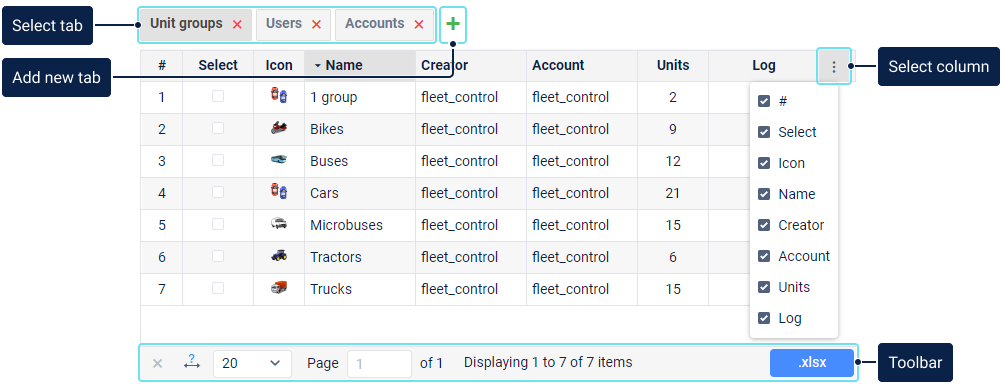
The area of search results occupies most of the work area. Here you can see a table with the search results of the section selected in the navigation and search panel.
The area can contain up to five tabs, that is, the results of five search requests can be displayed simultaneously. To add a tab, click on the icon  . The name of the tab depends on the section in which the search was carried out: units, unit groups, accounts, etc. When you navigate through the tabs, the sections in the navigation and search panel are automatically switched.
Search results are always displayed on the active tab, regardless of whether it is empty or not.

Working with tables
The data on the tabs is displayed in the form of a table. By default, the data is sorted by the Name column in direct alphabetical order (first numbers, then Latin and Cyrillic letters). To sort the data by any other column, click on its heading. Click on it again to change to the reverse alphabetical order.
To change the set of columns, click on the icon  and check the required items. To change the order of columns, click on the column heading and move it to the required place holding down the left mouse button.
The following actions are available in the toolbar below the table:
| Icon | Action |
|---|---|
| Delete the items selected in the table. | |
() | Align the column width automatically. To change the width manually, drag the column border to the right or left. |
| Select the number of items on the page. | |
/ | Go to the previous/following page. |
/ | Go to the first/last page. To go to a page, you can also type its number in the Page field and press Enter. |
Save the data from the table as an XLSX file. Available for the Accounts, Resources, Users, Units, Unit groups and Retranslators sections. |

Log
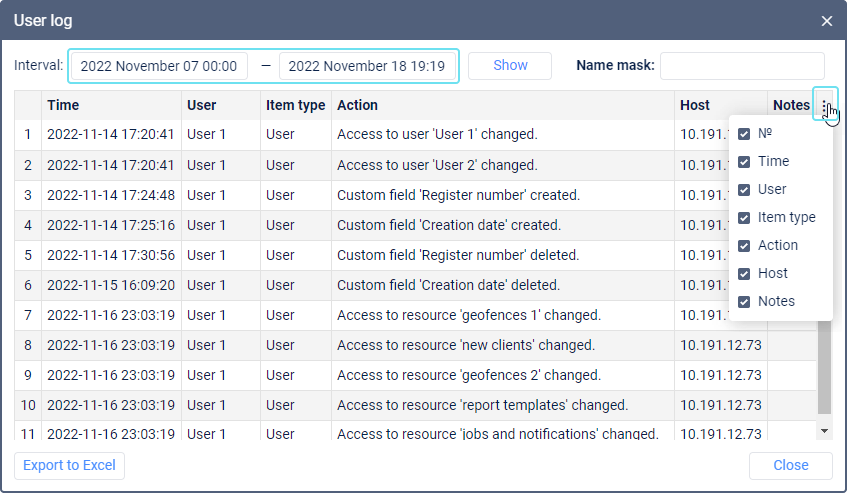
In most of the tables, you can see the log of the selected object. To do this, click on the icon  opposite the object name. The log contents coincide with the contents of the Log report in the monitoring system.
At the top of the dialog box, you can specify the time interval for which you want to see the data. Also, here you can find the input field for name masks which filter the table contents by the User column.

The log is displayed as a table with the following columns:
| Column | Description |
|---|---|
| Time | The date and time of making the change. |
| User | The name of the user who made the change. |
| Item type | The unit, unit group, user, resource, retranslator or route. |
| Action | The description of the change. |
| Host | The address of the computer (mobile device) from which the user made changes or from which a job or notification that they set up was executed. |
| Units | The number of units in a group (only for the Unit groups table). |
| Notes | An additional field where you can add your notes after exporting data to Excel. |
To hide or show the columns, select the required ones in the list which opens after clicking on the icon  in the upper-right corner of the table.
At the bottom, there are buttons for exporting the log to Excel and closing the dialog box.
Standard operations
For most system objects (accounts, billing plans, users, units, unit groups, and retranslators), the following standard operations are available:
- creating a new object;
- viewing or editing the properties;
- copying;
- deleting.
Creating system objects
To create a system object, follow the steps below.
- Open the required section in the navigation and search panel and click on the Create button. The button is inactive if you don’t have enough access rights.
- Fill in the required fields and click ОК. The ОК button is inactive if you haven’t filled in the required fields or have entered invalid data. The name of any macro-object can be from 4 to 50 characters long. There should be no forbidden characters in the text fields. See the input rules here.
- Refresh the page or apply the search to see the new object in the table.
Copying system objects
Copying is available for users, units, unit groups, retranslators, and billing plans. You can’t copy accounts and resources.
Copying allows you to create new system objects on the basis of those already created. This is useful if you want to create an object with similar properties.
To copy a system object, follow the steps below.
- Click on it holding down the Ctrl key.
- In the properties of this object, edit its name and other fields, if necessary.
If you don’t have enough access rights to certain data, it remains hidden and is not copied to the new object, or the system suggests replacing it with the default settings.
- Save the changes.
In many cases, you can use import and export instead of copying.
Viewing and editing system objects
To view or edit the properties of a system object, follow the steps below.
- Click on the row of the object in the table.
- Make changes to the object properties if you have enough access rights. Depending on your access rights, certain fields or tabs may be unavailable.
- Click ОК to save the changes.
Deleting system objects
The Delete object access right is required for this action. If you don’t have this right to certain objects, you can’t select them in the table.
To delete system objects, follow the steps below.
- In the Select column, mark the objects you want to delete. To select all the objects, hold down the Ctrl key and check any box in the Select row.
- Click on the icon
 in the toolbar below the table.
In the Accounts and Users sections, the icon for deleting the object () is displayed in the table itself.
- Click ОК to confirm the action.
As a result, a record of deleting the object is shown in the log.
Peculiarities of deleting system objects:
- Deleting unit groups and retranslators doesn’t lead to the deletion of the units included in them.
- You can delete only those users that are not creators of any objects in the system (see more).
- You can delete an account only with all its content and dependent objects, therefore, this procedure is different from deleting other system objects (see more).
- The top user can restore the deleted objects from trash.
