Work List Management
To monitor units, you need to place them in the work list. Only units presented in the work list can be used to display on the map, as well as to apply various control elements: jobs and notifications execution, reports generating, drivers and trailers assigning, messages or tracks viewing, finding nearest units, etc.
The work list has two display modes:
 : unit list;
 : unit group list.
Each of these lists is independent, and their settings are stored separately. When you switch between them, all settings that were last applied to this type of list are restored.
To search for the required units in the list, use the dynamic search above it. The search is carried out by unit name, group name, unique ID, device type, phone number, and such profile properties of the unit as VIN, vehicle type, registration plate, brand, model, year, and colour.
Unit list
In addition to the search described above, you can perform the following actions in this mode:
- add units to the work list and delete them from it;
- sort units by various parameters.
Adding units to the work list
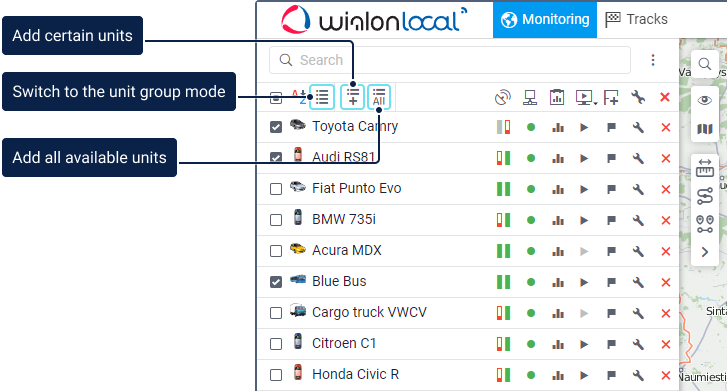
To add units to the work list, use the following buttons in the header of a list:
 : add all units available;
 : add particular unit(s). The search tool is used.
Moreover, there are alternative ways of adding units to the work list:
- from the Online notifications window (adding a unit that triggered the notification);
- dynamic formation of the list depending on data recency
Units created in the monitoring system or CMS Manager are automatically added to the work list of the monitoring panel of the user-creator (you may need to refresh the page or log in again). If the group view monitoring mode is activated in the work list, the new unit automatically gets in the group it was added to at creation, or to the Units outside groups (if it does not belong to any).
If the filtration on the basis of data recency is used and the created unit does not meet the specified conditions, automatic addition to the list does not happen.
Removing units from the work list
Units can be removed from the work list individually or all at once:
 : the button next to each unit to remove this particular unit from the list;
 : the button in the header of the list to clear the work list (to remove all units).
Note that deleting units from the work list does not lead to their deleting from the system. They can be added back to the work list using the ways described above. Units can be deleted from the system on the Units tab.
Sorting
By default, the work list is sorted by names arranged in direct alphabetical order. The order can be reversed. To do this, use the switch button  or
or  in the header.
Besides, it is possible to sort units by other attributes such as motion state, connection quality, etc. To do this, use the buttons in the header:
 : sensor state;
 : commands;
 : motion state;
 : last message time;
 : online connection state;
 : media files;
 : quick track;
 : driver information;
 : trailer information.
For instance, to sort units by the motion state, use the button  . The list is rearranged in such a way that all the moving units appear at the top of the list, and those that are not moving appear at the bottom. To reverse the motion state order of units, click on the button again.
The presence or absence of certain columns is adjustable in the customizer of monitoring options.
Unit group list
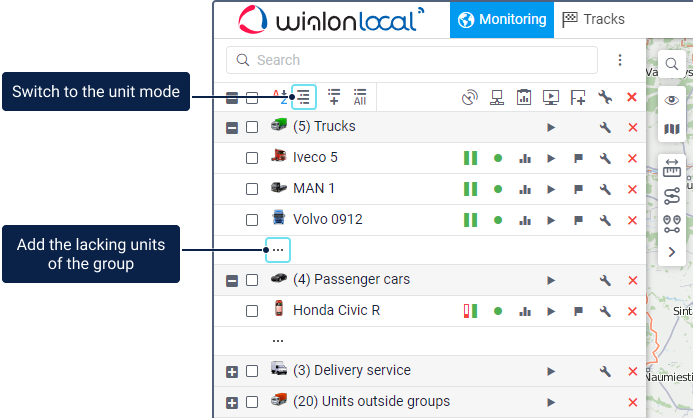
In this mode, the units from the work list are shown by groups. Next to the group name, you can see the number of units in it. The group tooltip displays the list of the units that belong to this group.
The groups and units selected in the list are shown on the map.

In the list, you can perform the following actions with group:
| Icon | Action |
|---|---|
| Expand the group to see the units belonging to it and information about them. | |
| Collapse the list of units for the group. | |
/ | Sort groups by name in direct or reverse alphabetical order. |
Add a certain group or unit to the work list. Read more here. If you add a unit that doesn’t belong to any group, it gets into the Units outside groups group with the icon . Unlike standard groups, this group doesn’t have the feature of editing properties. | |
Add all the lacking groups and units to the work list. If there are no units in the group, it is not added to the work list using this icon. | |
| Add the remaining units of the group to the list. This icon is shown at the end of the expanded group list only if some units belonging to the group are not shown in the list. You can see the number of the lacking units in the tooltip of this icon. | |
| Send a command to all the units of the group at once. | |
/ | View or edit the unit group properties. |
/ | Clear the list/Delete the group or the unit from the list. Like in the mode described above, this action doesn’t lead to the deletion of units from the group and from the system. |
Searching and adding units
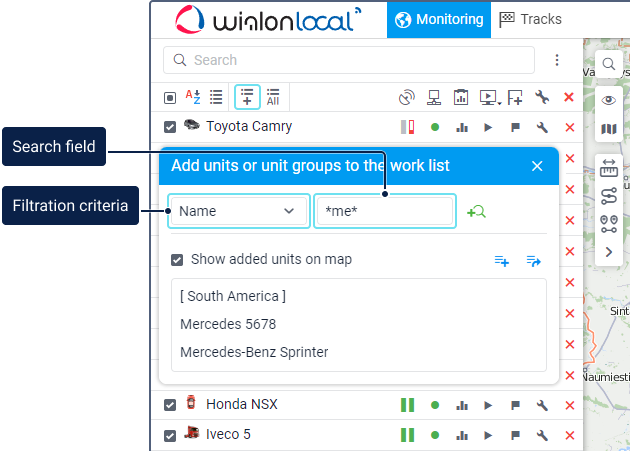
There is a convenient tool for finding units and adding them to the work list. To open the tool, click on the icon  in the work list header.
In the window that opens, all the unit groups (in square brackets) and units available to the user are displayed in alphabetical order.
Adding units
If you want the added object to be shown on the map immediately, enable the Show added units on map option.

You can add a unit or a group with its units to the work list in one of the following ways:
- double-click on the object in the work list;
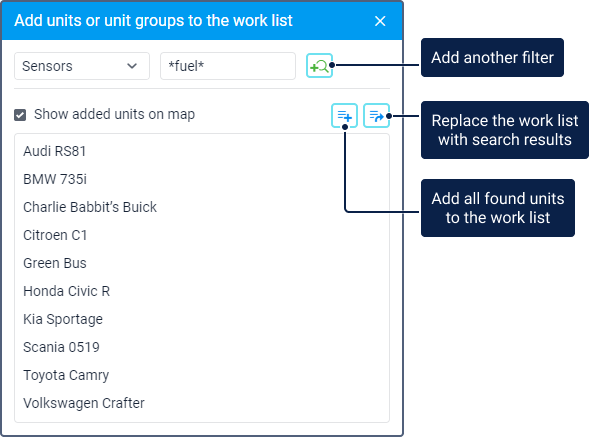
- add all the found (filtered) objects using the icon
 ;
; - replace the existing work list with all the found (filtered) objects using the icon
 .
.
If the added unit belongs to a certain group, then this group is also added to the list but without the rest of its units. If the unit doesn’t belong to any group, then it is automatically added to the Units outside groups group with the icon  .
.

Searching by criteria
If you have a lot of units and groups, you can use filters to search for the required object. Below you can find information about filtration in the window for adding objects.
The following filtration criteria are available:
| Filter | Description |
|---|---|
| Name | Search by the unit or group name. |
| Creator | Search by the user on whose behalf the unit was created. Specified on the General tab of the unit properties. |
| Unique ID | Search by the unique unit ID specified on the General tab of the unit properties. |
| Phone number | Search by the phone number specified on the General tab of the unit properties. |
| Device type | Search by the device type installed on the unit. Specified on the General tab of the unit properties. |
| Unit group | Search for units by their belonging to a certain group. After selecting the filter, the list shows only those units that belong to a certain group. If you specify the group name in the search field, the list shows only those units that belong to this group. |
| Unit | Search for unit groups by the unit name. After selecting the filter, the list shows only those groups that contain certain units. If you specify the unit name in the search field, the list shows only those groups to which this unit belongs. |
| Custom fields | Search by name or value of custom fields added on the same-name tab of the unit properties. |
| Profile fields | Search by the characteristics specified on the Profile tab of the unit properties. |
| Accessors | Search by the name of the user who has access to the units. After selecting the filter, specify the user name or the name mask in the search field so that the list shows all the units to which this user has access. |
| Geofences | Search by the name of the geofence in which the unit is currently located. |
| Sensors | Search by the name, type, or parameter of the sensor created in the unit properties. |
| Drivers | Search by the name or code of the driver assigned to the unit. |
| Trailers | Search by the name or code of the trailer assigned to the unit. |
| Passengers | Search by the name or code of the passenger assigned to the unit. |
The filters can work on several levels:
- at the first level, you select a filtration criterion and the list shows only those units which have the selected property. For example, if you select the Sensors filter, the list shows only those units for which they are created;
- at the second level, in the search field next to the filter, you specify one or several keywords (their masks) separated by commas. For example, to find all units with ignition sensors and/or fuel sensors, you can select the Sensors filter and specify *ign*,*fuel*;
- at the third level, you can add one more filtration criterion by clicking on the icon
 and search among previously filtered units, etc.
Dynamic work list
The work list on the Monitoring tab can be formed dynamically according to the time when the last message with coordinates from a unit is received. Units are removed and added to the list and map automatically. The work list is updated every 10 seconds.
The function can be enabled in the customizer of monitoring options. Change the Without filtration option to Work list or Work list and map and specify the filtration interval in minutes. Then only those units from which data was received during the specified interval will be displayed on the Monitoring tab. If the Work list and map option is selected, the units are added not only to the work list but also to the map.
Filtering is applied to all the units available to the user. Therefore, the units with recent data are shown in the work list and/or on the map, even if they were not added to the Monitoring tab previously.
When using this function, take the following peculiarities into account:
- Actions in the work list (searching, adding, and removing units) are impossible if the data recency filtration mode is activated.
- This function doesn’t work simultaneously with the Unit group list mode.


