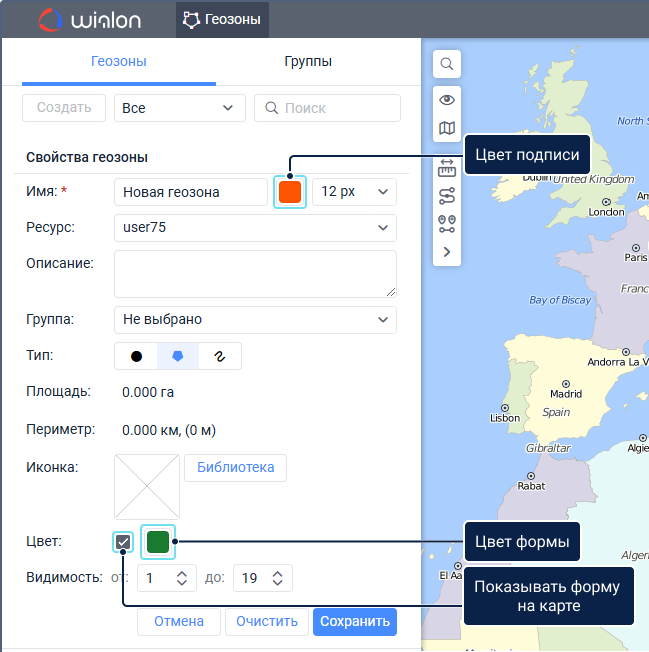
Свойства геозон
Чтобы редактировать свойства геозон, необходимо право доступа Создание, редактирование и удаление геозон на ресурс.
Свойства геозон указываются во время их создания. Впоследствии их можно редактировать. Чтобы открыть свойства геозоны, можно использовать два способа:
- нажать на иконку
 в списке геозон;
 - щелкнуть по геозоне на карте, удерживая клавишу Ctrl.

Обязательные свойства отмечены звездочкой (*).
Свойство | Описание |
Имя* | Имя геозоны. Оно должно содержать как минимум один символ. См. правила ввода данных. Для имени можно указать цвет и размер шрифта, если в настройках пользователя активирована опция Отображать имена геозон на карте. По умолчанию используется красный цвет. Чтобы изменить его, щелкните по иконке цвета подписи рядом с названием геозоны. Выберите нужный цвет в палитре, спектре или укажите его в формате Hex. |
Описание | Описание, которое должно показываться во всплывающей подсказке к геозоне. При создании геозоны в поле описания автоматически вносится адрес ее первой точки. Впоследствии поле можно отредактировать или очистить. Длина текста не должна превышать 10 000 символов. В описании можно использовать HTML-теги, включая iframe, что позволяет показывать данные с других сайтов во всплывающей подсказке. Это может потребоваться, например, для получения изображений с веб-камер, данных о курсах валют, прогноза погоды и др. |
Тип* | Форма геозоны. Геозоны могут быть трех типов: полигоны, линии, круги. Чтобы выбрать форму, нажмите на кнопку с ее изображением:
|
Ресурс* | Ресурс, в котором должна храниться геозона. Этот выпадающий список показывается, если пользователю доступно более одного ресурса. По умолчанию геозона создается в ресурсе учетной записи пользователя. После создания геозоны это свойство редактировать нельзя. |
| Группа | Группа или группы, в которые должна входить геозона. Чтобы добавить геозону в группу, выберите нужную группу в выпадающем списке. Геозону можно добавить в несколько групп. Чтобы отменить выбор группы, щелкните по иконке . Чтобы очистить все поле Группа, щелкните по иконке в этом поле. При экспорте геозоны в файл формата KML или KMZ, данные из поля Группа не экспортируются. |
Изображение | Изображение, которое должно использоваться в качестве иконки геозоны. Его можно выбрать из библиотеки стандартных иконок (кнопка Библиотека) или загрузить с вашего устройства, нажав на квадратную область и выбрав необходимый файл. Поддерживаемые форматы — PNG, JPG, GIF и SVG. Добавленные изображения автоматически пропорционально уменьшаются до размеров 64×64 пикселя для обозначения геозон в списке и на карте. Однако во всплывающей подсказке к геозоне можно увидеть изображение в увеличенном размере (до 256×256 пикселей). Чтобы удалить используемое изображение, наведите на него курсор и щелкните по иконке удаления. |
Ширина* | Ширина линии. Это свойство показывается только для геозон типа Линия. В зависимости от системы мер ресурса, ширина линии указывается в метрической (метры), американской (футы) или имперской (футы) системе мер. Значение по умолчанию — 50 м. |
Радиус* | Радиус круга. Это свойство показывается только для геозон типа Круг . В зависимости от системы мер ресурса, радиус указывается в метрической (метры), американской (футы) или имперской (футы) системе мер. Значение по умолчанию — 100 м. |
Координаты* | Координаты центра круга. Это свойство показывается только для геозон типа Круг . Поля заполняются автоматически при создании геозоны первым способом или вручную, если используется второй способ. Координаты можно редактировать, чтобы переместить геозону. |
Площадь | Площадь геозоны. Вычисляется автоматически. Значение площади зависит от системы мер ресурса и может указываться в га или ми² (фт²). |
Периметр | Периметр геозоны. Вычисляется автоматически. Значение периметра зависит от системы мер ресурса и может указываться в км (м) или ми (фт). |
Цвет* | Цвет геозоны. Он используется для отображения геозоны на карте, во всплывающих подсказках к объектам и некоторых других местах. По умолчанию используется зеленый цвет. Чтобы изменить его, щелкните по иконке Цвет формы. Выберите необходимый цвет в палитре, спектре или укажите цвет в формате Hex. Чтобы форма геозоны не показывалась на карте, уберите галочку слева от иконки Цвет формы. Это может понадобиться, например, в случае геозон-кругов, если вам достаточно видеть только иконку в центре геозоны и необязательно видеть сам круг. |
Видимость* | Масштаб карты, при котором на ней показывается геозона. Например, если геозона — это город, то целесообразно показывать ее на удаленных масштабах; а если это здание, — на более детализированных. Разные типы карт могут иметь разное количество градаций масштабов. Все они условно укладываются в диапазон значений от 1 до 19, где 1 — это наиболее детализированный масштаб (мелкие улицы, дома), 19 — общий план (карта мира). |