How to configure sending tachograph data to Wialon using flespi
This guide describes how to configure sending tachograph data from a tracker to Wialon using flespi. This integration is possible for the following tracker models (device types):
The configuration process consists of the following stages:
- Preparing basic infrastructure.
- Setting up company cards.
- Configuring the tracker.
- Configuring data streaming to Wialon.
- Configuring a unit and security settings in Wialon.
Each of these stages is described below.
Before you get started with the configuration process, register at https://flespi.io if you don’t have a flespi account yet.
Preparing basic infrastructure
The preparation of basic infrastructure includes:
- Creating a channel on flespi
- Installing and configuring the Tacho Bridge application
- Creating the Tacho Bridge App device on flespi
Creating a channel on flespi
To create a channel on flespi, follow these steps:
- In the Telematics Hub, select Channels.

- Click the button
 .
. - Enter the channel name.
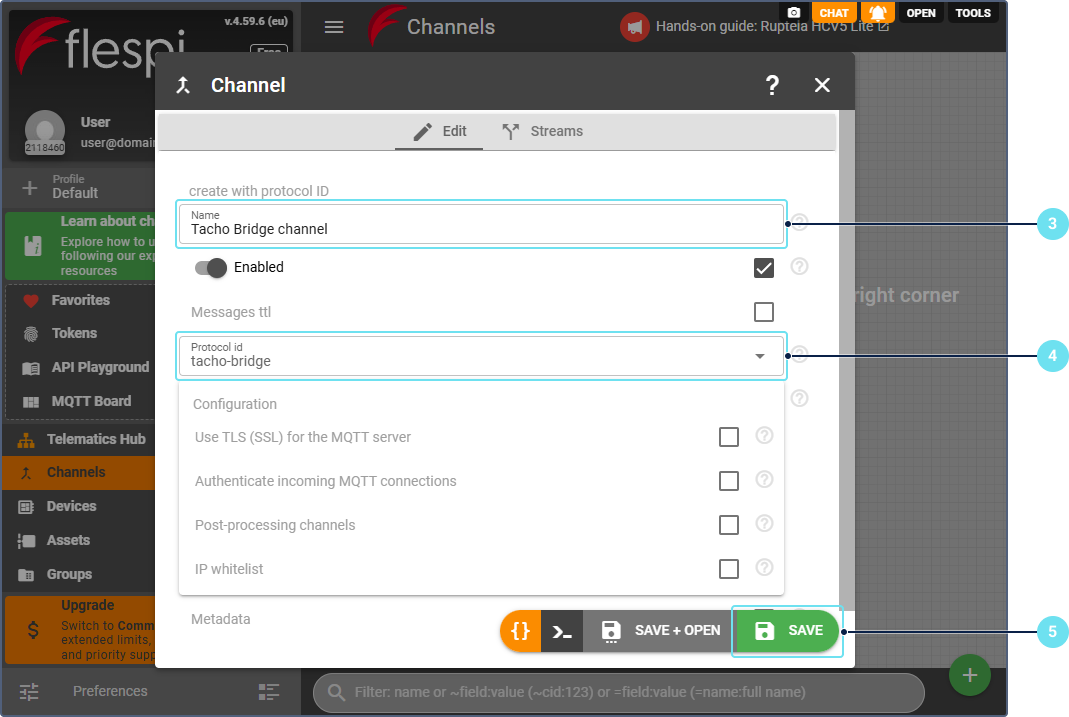
- Select the tacho-bridge protocol.
- Click Save.
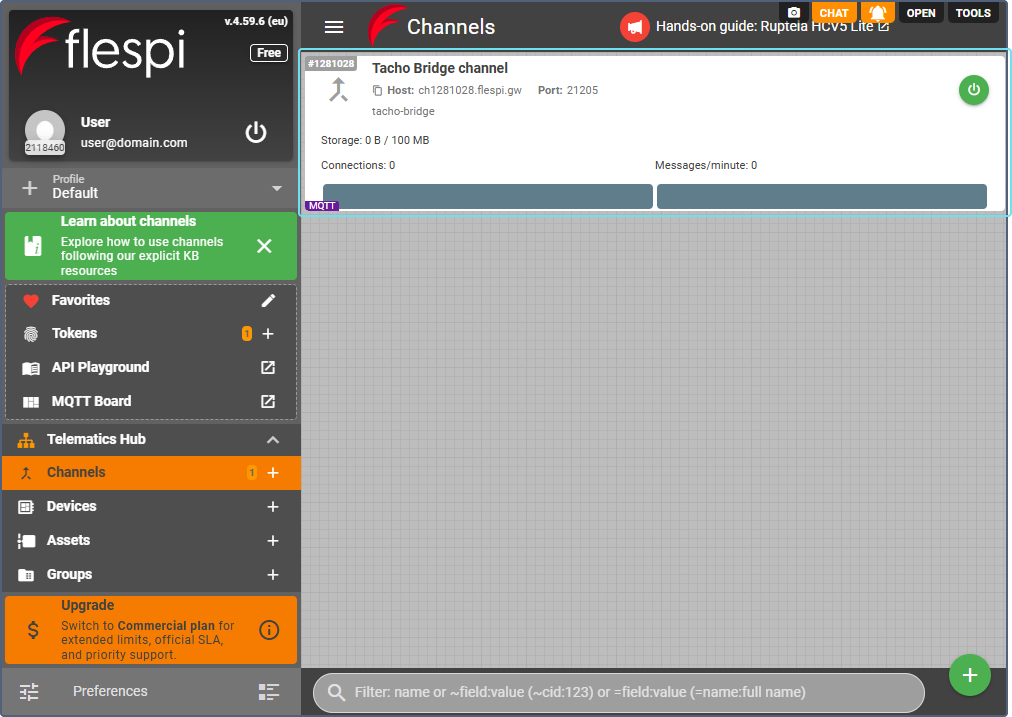
The created channel is displayed in the Channels section.
Installing and configuring Tacho Bridge application
To install and configure the Tacho Bridge application, follow these steps:
- Download the Tacho Bridge application at https://github.com/flespi-software/Tacho-Bridge-App/releases/
- Install it on your computer with a connected card reader.
- Click the button
 to open the application settings.
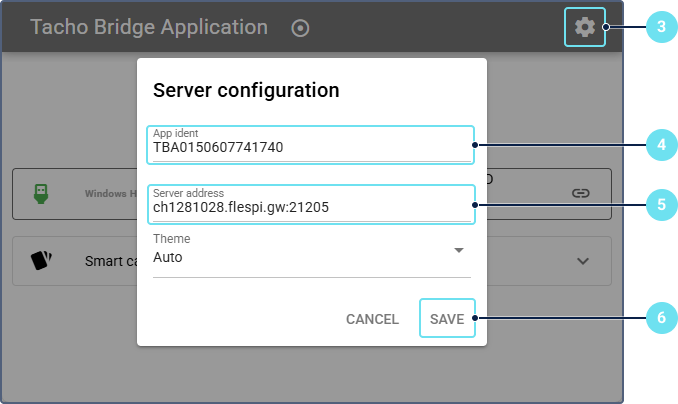
- In the App ident field, specify the application identifier. You can enter any value of 13 characters, but make sure it is unique within your account. You will need to specify the same value when creating a device on flespi.
- In the Server address field, specify the address of the created channel in the host:port format.
- Click Save.
The application is now configured.
Creating the Tacho Bridge App device on flespi
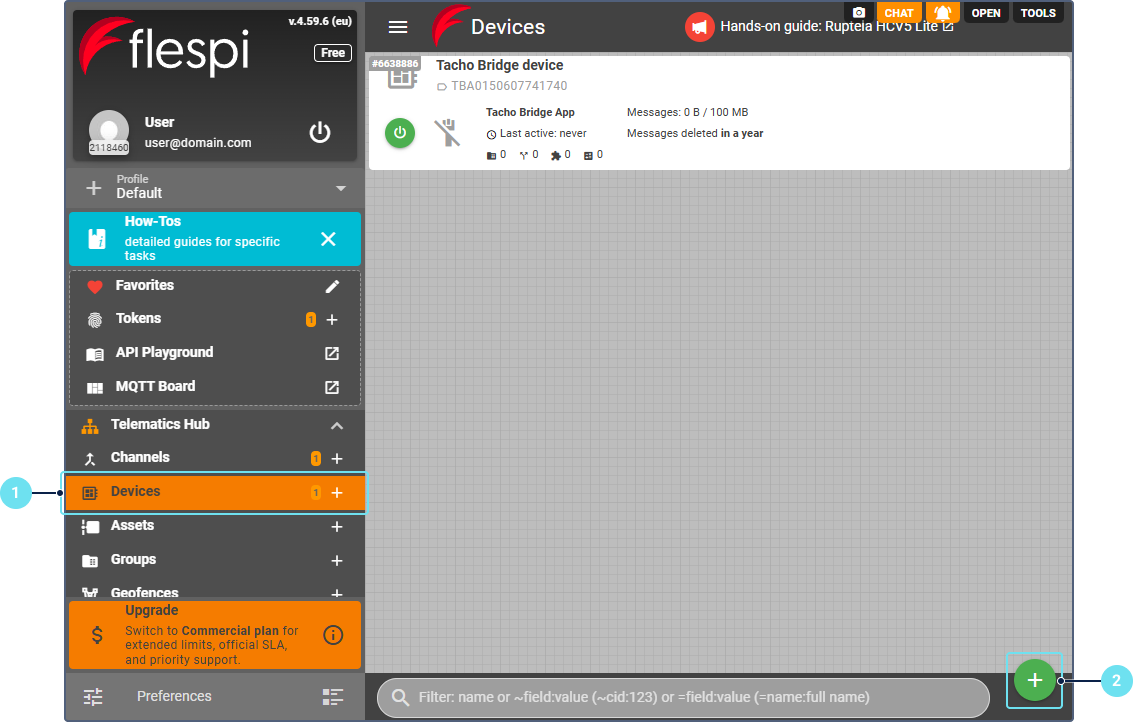
To create the Tacho Bridge App device on flespi, follow these steps:
- In the Telematics Hub, select Devices.
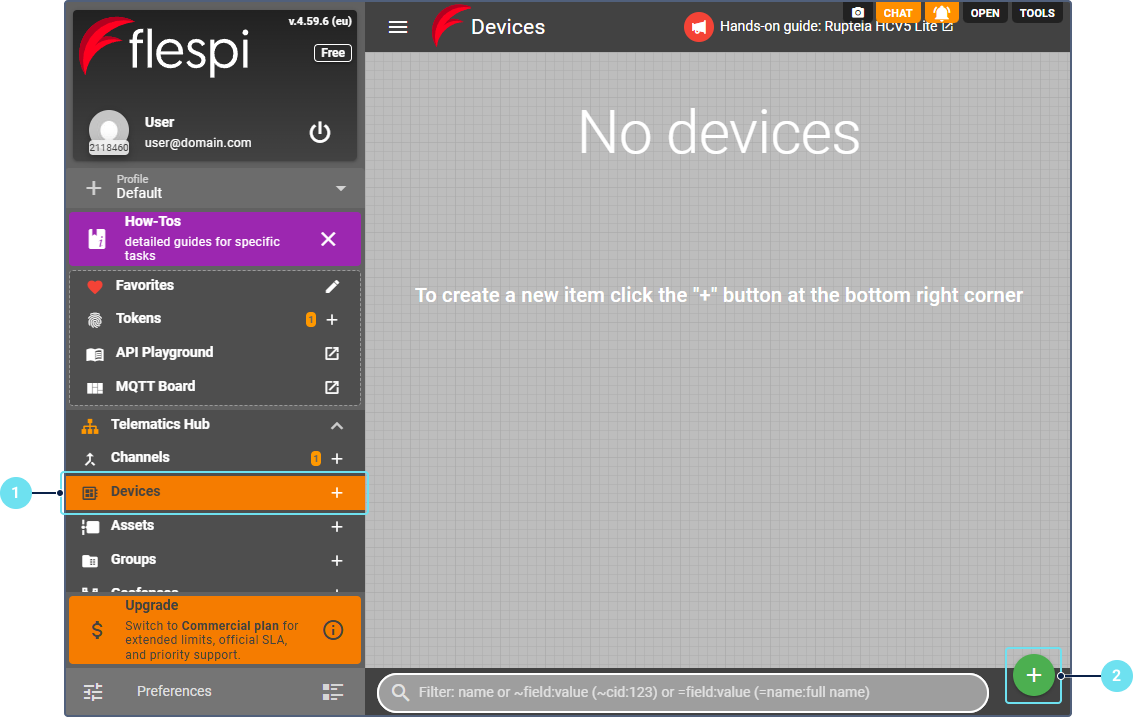
- Click the button .
- Enable the Device name option and specify the device name.
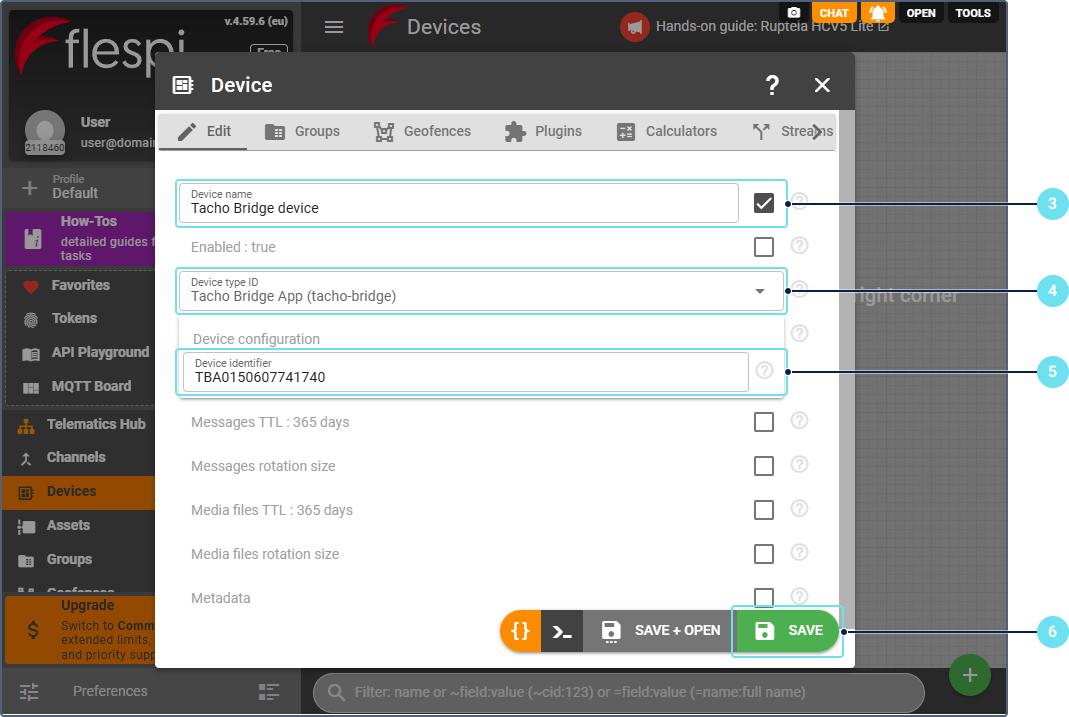
- In the Device type ID field, select Tacho Bridge App.
- In the Device identifier field, specify the same value as in the App ident field in the Tacho Bridge application settings.
- Click Save.
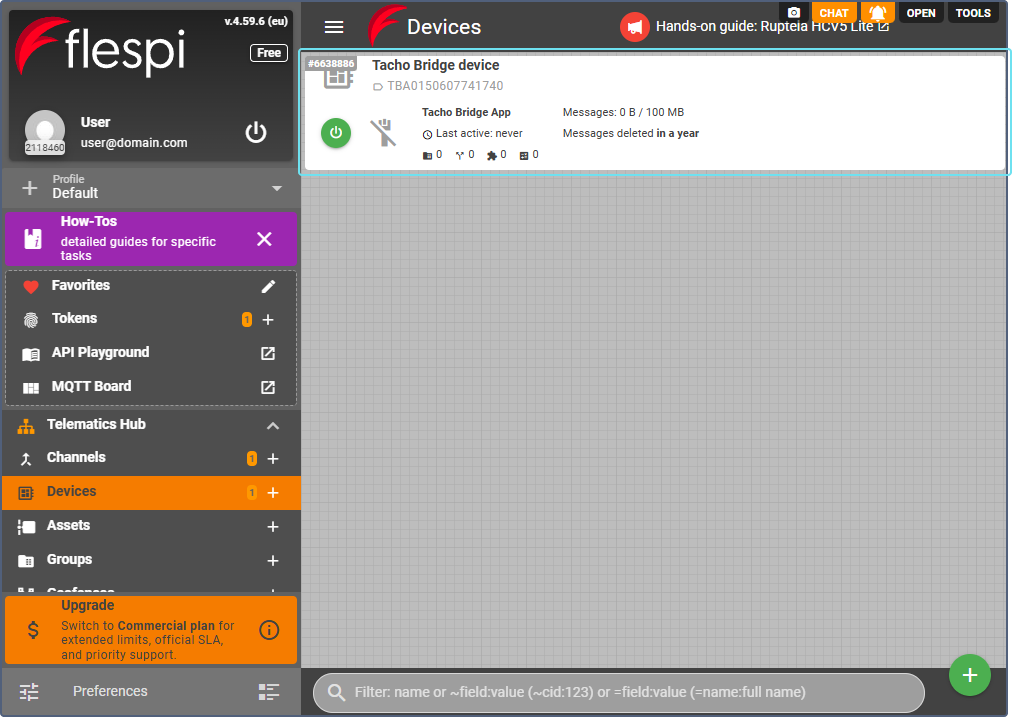
The created device is displayed in the Devices section.
Setting up company cards
Setting up company cards includes:
- Adding the cards to the Tacho Bridge application
- Creating Tacho Bridge Card devices on flespi
Adding company cards to Tacho Bridge application
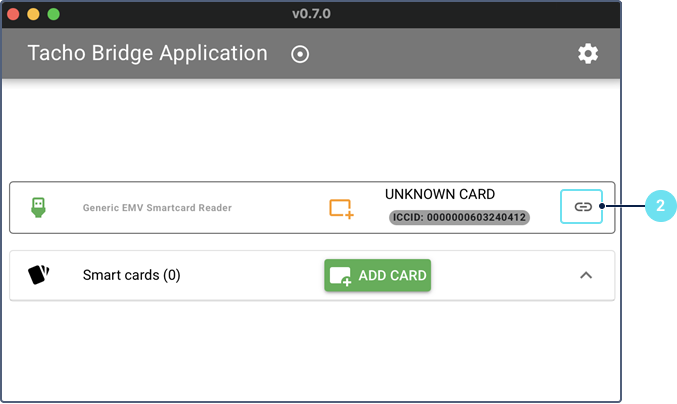
To add a company card to the Tacho Bridge application, follow these steps:
- Insert a company card into the card reader.
- In the Tacho Bridge application, click the icon
 in the detected card section.
- Take out the card and find the company card number printed on it.
- Specify the company card number in the application.
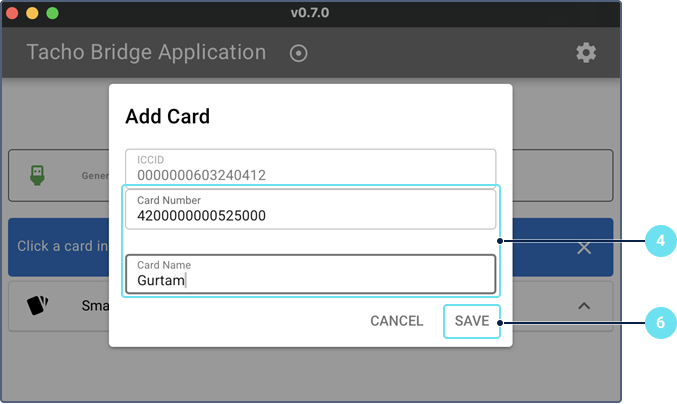
- Insert the card into the card reader.
- Click Save.
The card is now added to the application.

Creating Tacho Bridge Card devices on flespi
To create a Tacho Bridge Card device on flespi, follow these steps:
- In the Telematics Hub, select Devices.
- Click the button .
- Enable the Device name option and specify the device name.
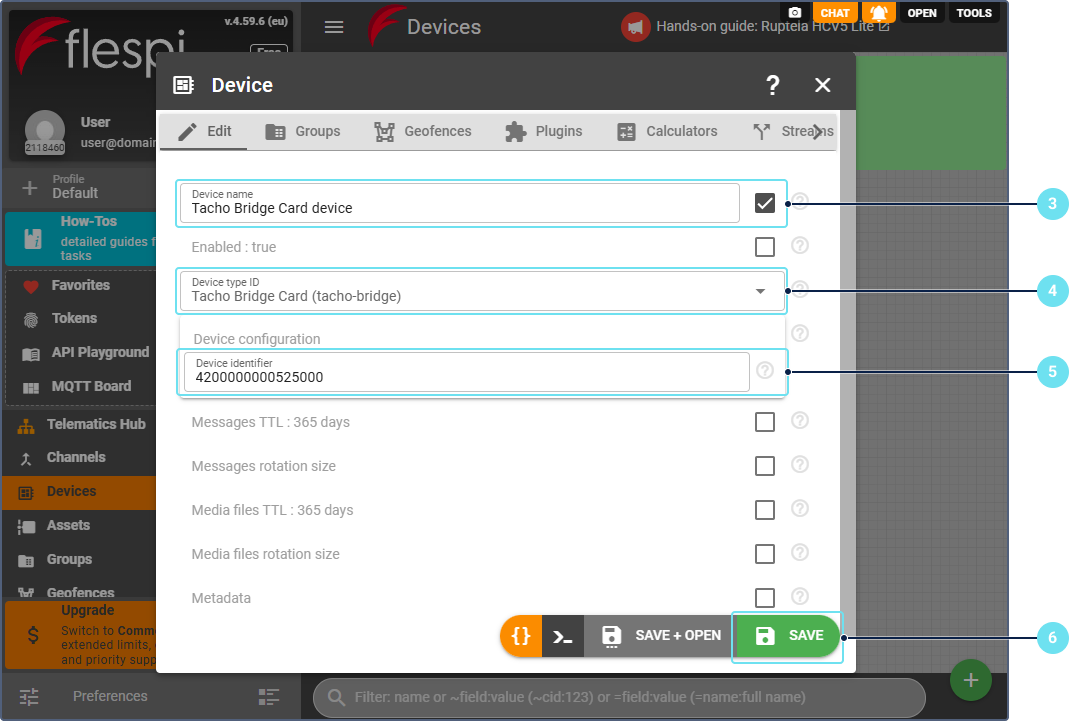
- In the Device type ID field, select Tacho Bridge Card.
- In the Device identifier field, specify the company card number, as in the Tacho Bridge application.
- Click Save.
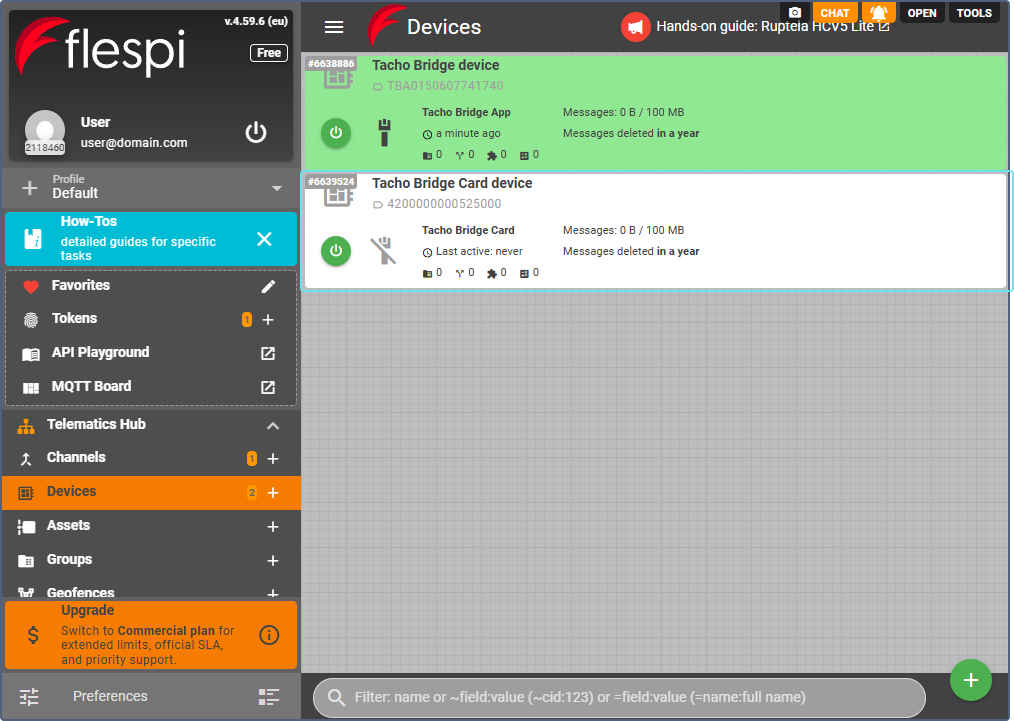
The created device is displayed in the Devices section.
Configuring the tracker
The configuration of the tracker includes the following procedures on flespi:
- Creating a channel to connect the tracker
- Creating a device that corresponds to the tracker model
Creating a channel to connect the tracker
To create a channel and connect your tracker to it, follow these steps:
- Create a channel with the tracker protocol. To do this, follow the instructions above for creating a channel, but in step 4, select the protocol of your tracker.
- Configure your physical tracker to connect to the created channel.
Creating a device that corresponds to the tracker model
To create a device that corresponds to the tracker model, follow these steps:
- In the Telematics Hub, select Devices.
![]()
- Click the button .
- Enable the Device name option and specify the device name.
![]()
- In the Device type ID field, select your tracker model.
- Specify the tracker IMEI as the device identifier.
- Enable the Tachograph option.
- Specify the company card number.
- Click Save.
The created device is displayed in the Devices section.
![]()
Configuring data streaming to Wialon
To configure data streaming from flespi to Wialon, follow these steps:
- In the Telematics Hub, select Streams.
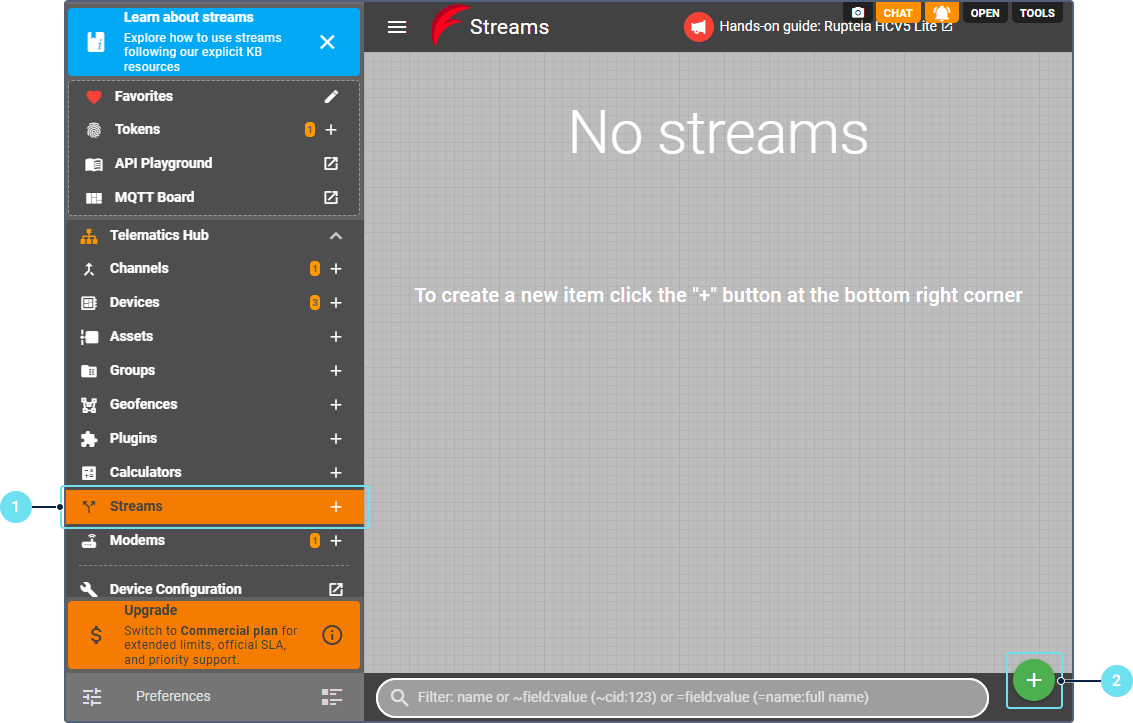
- Click the button .
- Enable the Name option and enter the stream name.
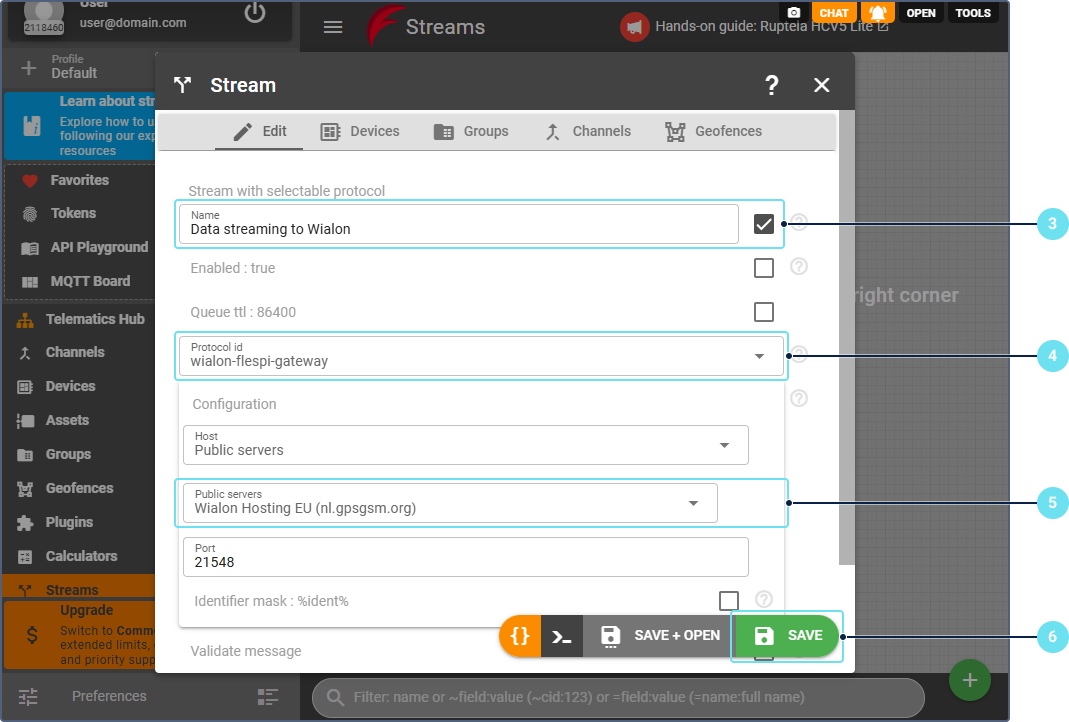
- In the Protocol id field, select wialon-flespi-gateway.
- In the Configuration section, select the appropriate datacenter. It corresponds to the server address you can see in unit properties in Wialon.
- Click Save.
- Select the created stream.
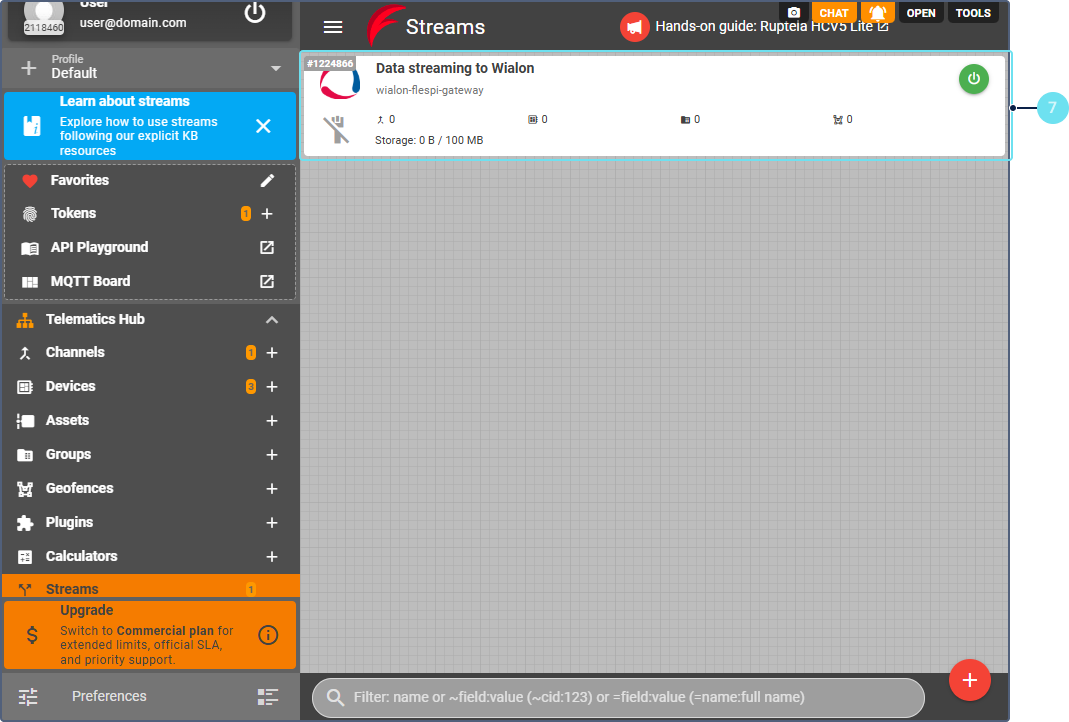
- Open the Devices tab.
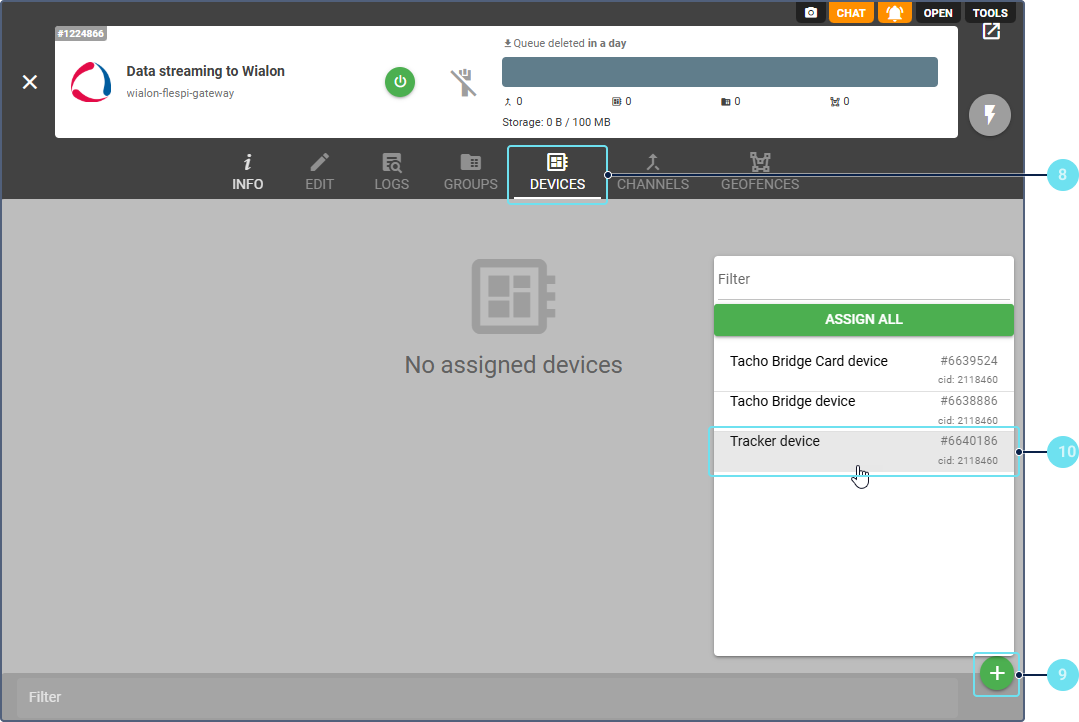
- Click the button .
- Select your tracker device.
The stream is now configured to send your tracker data to Wialon.
Configuring a unit and security settings in Wialon
To configure a unit in Wialon, follow the steps below.
- Create a unit using this guide and considering the following details:
- When selecting the device type, select the one that matches your tracker model, followed by the (flespi) mark. For example, if you use Ruptela HCV5, select Ruptela HCV5 (flespi) as the device type.
- When specifying the unique ID, make sure that it matches the device identifier of the tracker device created on flespi.
- On the Commands tab of the unit properties, configure the Request tachograph file command. See the Creating commands page and the Creating commands for flespi devices section.
To configure the security settings in Wialon, follow the steps below.
- Sign in to your top account.
- Click on your username to open the user menu.
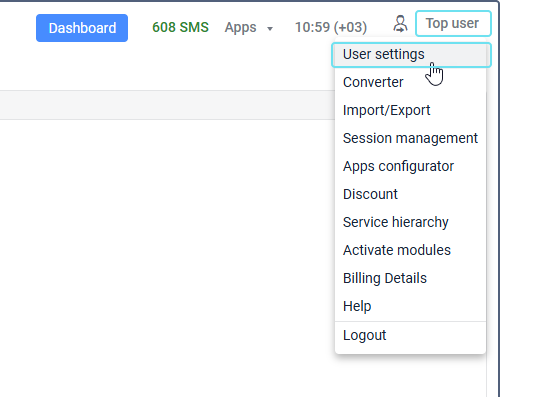
- Select User settings.
- Go to the Security tab.
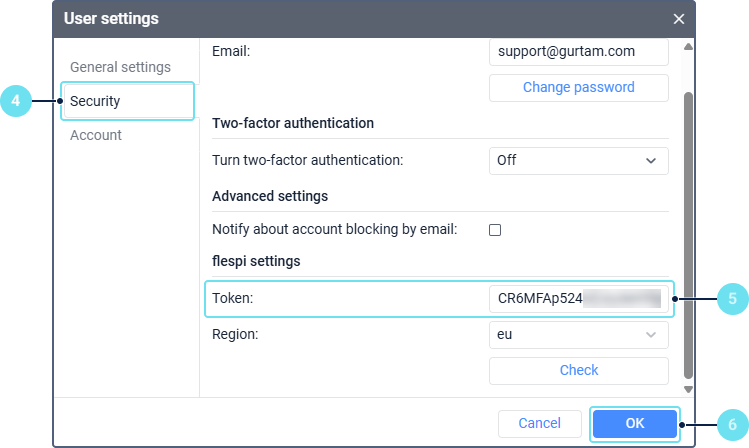
- In the flespi settings section, click Login and sign in to flespi to obtain a token.
- Click OK.
The configuration is finished. Wialon can now receive tachograph data from your vehicle.
Verifying the configuration
To make sure that everything is configured correctly and Wialon can receive tachograph data from your vehicle, follow these steps:
- In Tacho Bridge, check the connection state of the card device. It should be indicated by a green icon.
- In Wialon, send the Request tachograph file command to the unit.
- On flespi, select the tracker device and check its logs for a successful command execution record.
If the command is executed successfully, the tachograph file is stored on the Media tab of the device on flespi and in the Disketta app that you can access from the Apps menu in Wialon.
If the command execution fails, and you can see error records on flespi, contact flespi technical support via the built-in chat.
If you can see the received tachograph file on flespi, but not in Disketta, contact Wialon technical support at support@wialon.com.
To check that your vehicle data is transmitted from flespi to Wialon, follow these steps:
- On flespi, select the created stream in the Streams section and check its logs for records of sending messages.
- In Wialon, request data messages from the created unit on the Messages tab.
If Wialon receives messages from flespi, you can see them in the table of data messages.
Useful articles and links
For more details on how to configure sending tachograph data, see the following articles from the flespi knowledge base: