Restrictions
To work with the Restrictions tab, you should have the following access rights to the account:
- View detailed object properties. To see the tab.
- Manage account. To set the restrictions.
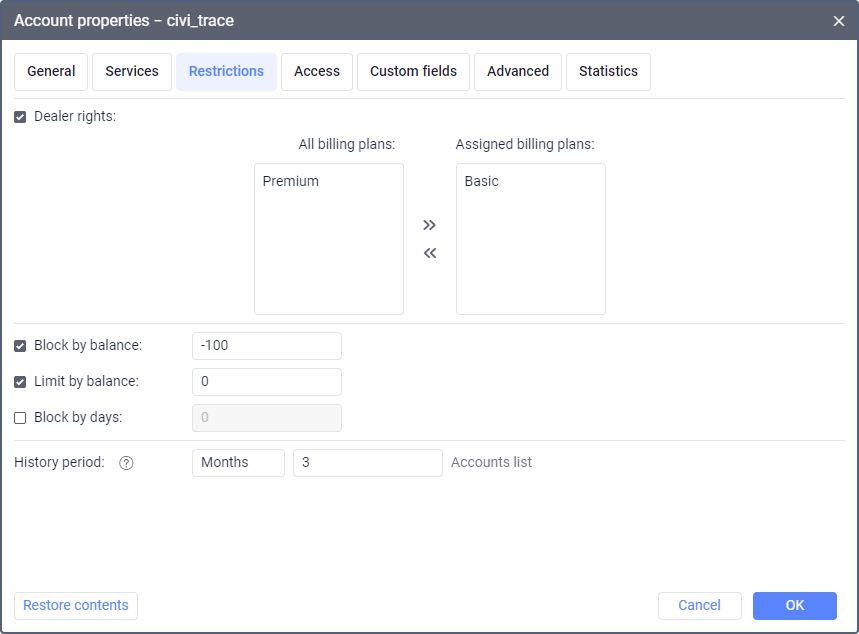
On this tab, you can give dealer rights to the user of the account, adjust the blocking settings, and specify the history period for the account.

Dealer rights
Dealer rights are granted to users so that they can create subordinate accounts. To give dealer rights to the user, follow these steps:
- Enable the Dealer rights option in the properties of the user’s account.
- In the All billing plans section which displays all the plans available to you, select the ones the user can assign to the subordinate accounts and move them to the Assigned billing plans section.
The Dealer rights option cannot be deactivated as long as it is a parent account.
Blocking settings
The blocking settings allow you to restrict or prohibit user activity automatically in case of non-payment. They include the following options: block by balance, limit by balance, block by days. As a rule, zero or negative values are indicated for these options so that the user can access the satellite monitoring system for some time after the balance or days expire. If these options are disabled, the restrictions are taken from the billing plan or parent account.
Block by balance
In this field, you should specify the balance (the amount of money in the account) upon reaching which the users of this account shouldn’t have access to the system.
Limit by balance
In this field, you should specify the balance upon reaching which the following services should be disabled for the account:
- access to CMS Manager;
- access to the Dashboard tab;
- create units;
- create unit groups;
- create resources;
- create users;
- messages;
- apps;
- import and export;
- locator;
- SMS messages (if the cost is specified);
- email notifications (if the cost is specified);
- email reports (if the cost is specified);
- Google services (if the cost is specified).
Block by days
Here you can specify the number of days upon reaching which the account should be blocked. This setting works independently of the Block by balance option. If you configure both blocking by balance and blocking by days, the account is blocked when any of these values is reached. Blocking by days can be used to control the payment of subscription fees, demo access, and so on.
If blocking by days is configured, the remaining days are shown on the General tab and the field for adding them becomes active. Days decrease automatically when a new day starts according to UTC +3.
Five days before zero, each time the user logs in to the system, the following warning message is displayed: “Your account will be blocked soon. … days left”. If the remaining number of days is negative, the user receives the message “Your account will be blocked soon”.
The account is unblocked automatically after adding a payment or days on the General tab. However, as the system checks the balance once an hour, automatic unblocking may not occur immediately. In this case, to unblock the account quickly, you can change its status manually. You can also block or unblock the account manually from the General tab.
If you want to block the account manually before the specified number of days is left, disable the Block by days option. Otherwise, the account will be activated automatically.
History period
This setting allows you to specify the period during which the data should be stored on the server. You can specify it in months or days. All the messages older than the history period are automatically removed from the database.
Read about the particularities of storing video files on the Files page.
By default, the history period is taken from the billing plan settings. If the history period specified in the account settings exceeds the one in the billing plan settings, the latter is applied. If the history period specified in the account settings is less than that of the billing plan, the former is applied. To reset the default value, enter 0.
By default, unit history can be stored for a maximum period of 400 days. You can extend this period by sending a request to your Partner Success Manager.
A subordinate account cannot have a longer history period than a parent account. When you reduce the history period of a parent account, it automatically changes in the subordinate ones if their initial history period exceeds the new value.