Managing drivers
By default, drivers are listed in alphabetical order. To switch between the forward and reverse alphabetical order, use the icon  /
/ .
.
To quickly find the required driver, use the following filters:
- filter by property (assigned or not assigned drivers) or by resource,
- dynamic filter by driver name, phone or code.
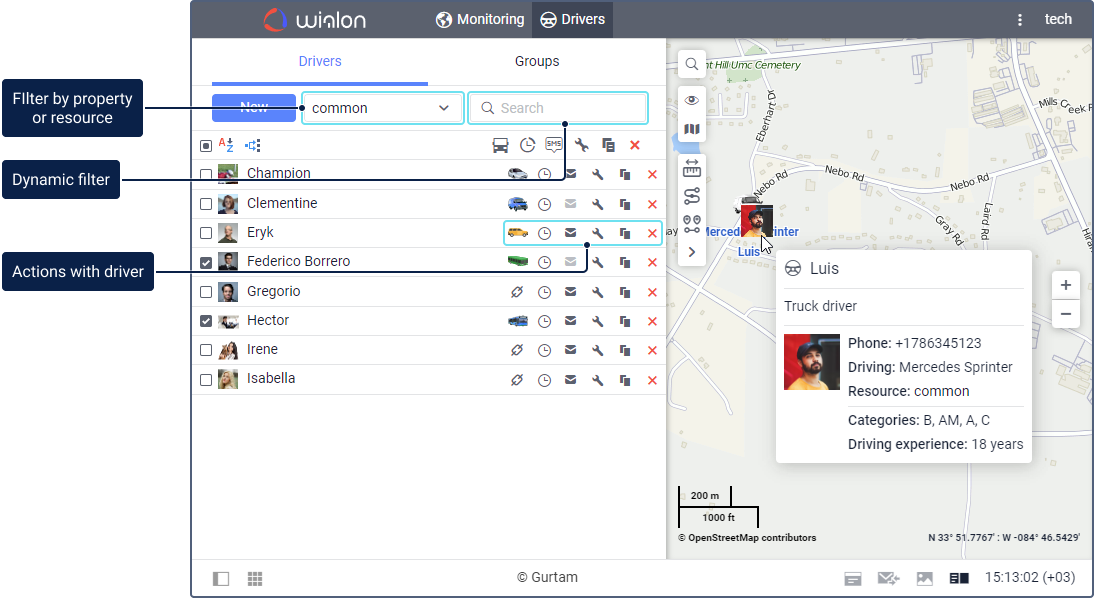
Tooltip content
In a driver tooltip, you can see the driver name, description, enlarged photo, phone number, custom fields (if specified), the name of the unit to which the driver is assigned, and the resource to which the driver belongs.
Here you can also see data on the driver’s activity which is based on the driver’s assignments or on the parameters from the tachograph, depending on the selected online data source. To see such information, enable the Driver activity by online data option in the user settings. The received information on the driver’s activity helps to control whether a driver follows the AETR standards or not. In the tooltip, you can see the following data:
- current state (driving, work, availability, rest) and its duration;
- start time of daily work (shift);
- driving information for the current shift (time left for driving/exceeded driving time/delayed beginning of rest, and the required duration of rest);
- driving information for the week (time left for driving/exceeded driving time/delayed beginning of rest, and the required duration of rest);
- driving information for two weeks (time left for driving/exceeded driving time/delayed beginning of rest, and the required duration of rest).
If a driver has less than 1 hour to drive for the current shift or less than 3 hours to drive for one or two weeks, then a warning is shown in the tooltip, and the driver icon turns red (if the photo is not loaded) or an exclamation mark is shown to the right of the driver’s photo.
Actions with drivers
You can perform the following actions with drivers:
| Icon | Action |
|---|---|
 |
Assign the driver to a unit. If you don’t have the Create, edit, and delete drivers access right, the icon is inactive ( ). When the driver is assigned to the unit, the unit icon is displayed instead of this one. When you point to the unit icon, you can see the unit tooltip and the icon ). When the driver is assigned to the unit, the unit icon is displayed instead of this one. When you point to the unit icon, you can see the unit tooltip and the icon  for separating the driver from the unit. for separating the driver from the unit. |
 |
View the assignment history, add or delete records from it. |
 |
Send the driver an SMS message to the phone number specified in the driver properties. The icon is inactive if the requirements for sending SMS from the monitoring system are not met or the phone number is not specified in the driver properties. |
 / / |
View or edit the driver properties. |
 |
Copy, that is, create a new driver using this one as a template. |
 |
Delete the driver. The icon is inactive if you don’t have the Create, edit, and delete drivers access right. |
Drivers on the map
To display a driver on the map, follow these steps:
- Click the icon
 on the map to open the visible layer menu.
 - Enable the Drivers option.
- Select the required driver from the list on the Drivers tab.
Driver location
Drivers don’t have their own coordinates. Their location is determined by the location of the units they are assigned to.
| Driver status | Location source | Representation on map |
|---|---|---|
| Assigned | The current location of the unit the driver is assigned to. | A small driver icon attached to the lower-right corner of the unit icon. |
| Not assigned | The last known location from the previous assignment. | A standalone driver icon. |
| No data | No location history (for example, the driver has never been assigned to a unit). | Not displayed on the map. |
To center the map on the driver’s location, click the driver’s name in the list.
Driver names
If a driver is assigned to a unit, you can show or hide their name on the unit label using the Driver name option in the visible layer menu. You can set the unit caption color on the Advanced tab of the unit properties.
If a driver is not assigned to a unit, their name is always displayed on the map with the default blue color. This color can’t be changed.