How to configure sending OEM data to Wialon using flespi
This guide describes how to configure sending data from the original equipment manufacturer (OEM) devices to Wialon using dedicated protocols on flespi. This integration is possible for the devices of the following OEM:
- Fleetboard (Daimler)
- Scania FMS
- General Motors OnStar
- Invers CloudBoxx
The configuration process consists of the following stages:
- Preparing OEM devices for streaming. This process varies depending on OEM:
- Creating devices on flespi
- Configuring data streaming to Wialon
- Configuring a unit and security settings in Wialon
- Verifying data reception in Wialon
Before you get started with the configuration process, register at https://flespi.io if you don’t have a flespi account yet.
Preparing Fleetboard devices for streaming
For Fleetboard devices, you need to create a channel on flespi and follow the general workflow for other OEM devices.
Creating a channel with Fleetboard protocol
-
Go to https://flespi.io/#/ and log in to your account.
-
In the Telematics Hub, select Channels.

-
Click the button
 .
. -
Enter the channel name. For example, Fleetboard devices.
-
From the Protocol id dropdown list, select fleetboard.

-
In the configuration section, specify the Fleet Name, User Name, and Password that you use within Fleetboard.
-
Click Save.
After you create the channel, it will have a unique URI (host:port) that you can use to send data from your Fleetboard platform.
Preparing Scania FMS devices for streaming
The configuration process consists of the following stages:
- Getting credentials from Scania Developer Portal
- Creating a channel with scania-fms protocol
These stages are described below.
Getting credentials from Scania Developer Portal
Before you can integrate Scania vehicles with flespi, you need to obtain API credentials:
- Open Scania Developer Portal.
- In the Login As dropdown, select Scania Data Access User.
- Enter your User ID and Password, then log in.
- Open the My Application tab.
- Click the Create Application button.
- Enter an application name and description (for example, flespi integration).
- Click Save.
- Copy the generated Client ID and Secret Key strings. You will need these for your flespi channel configuration.
- Scania vehicles only send data to their servers when the engine is running or ignition is ON.
- The frequency of position updates depends on your service package: 1, 5, or 10 minutes.
Creating a channel with scania-fms protocol
-
On flespi, go to the Telematics Hub and select Channels.
-
Click the button
. -
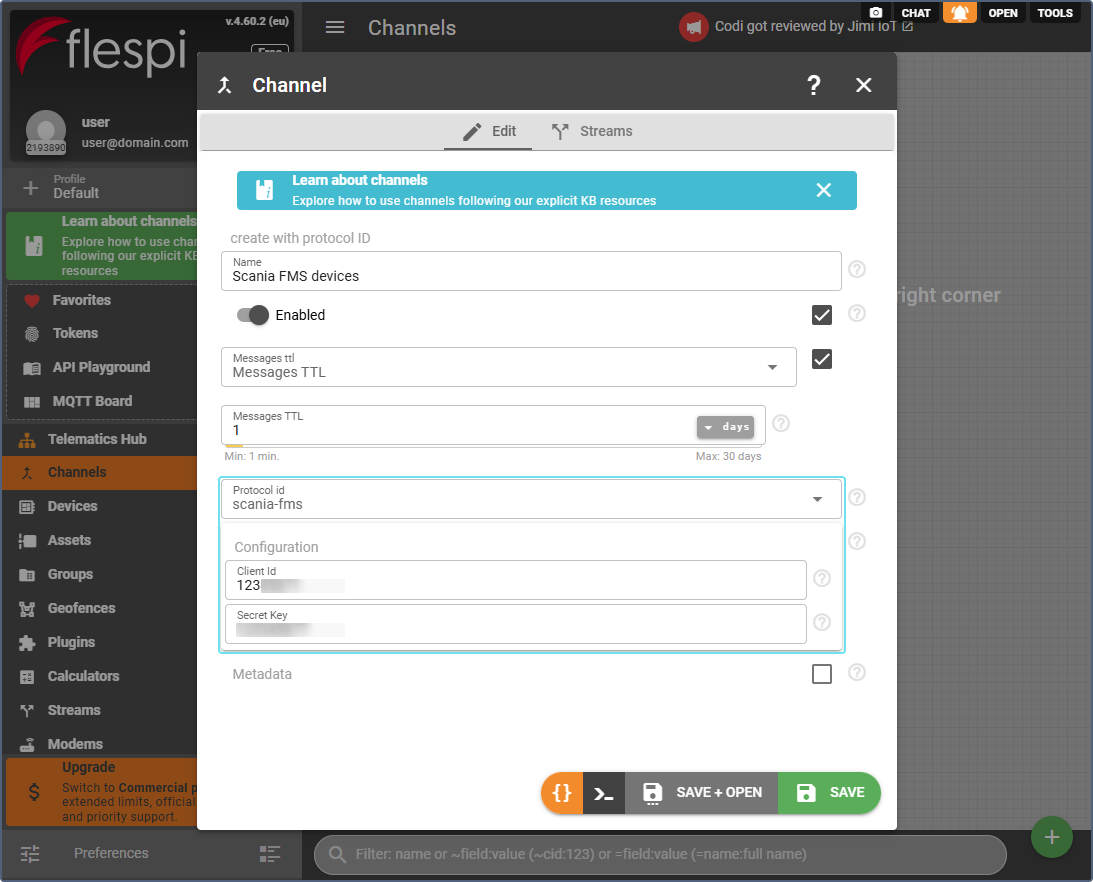
Enter the channel name (for example, Scania FMS devices).
-
From the Protocol id dropdown list, select scania-fms.
-
In the configuration section, paste the Client ID and Secret Key you obtained from the Scania Developer Portal.
-
Click Save.
After creating the channel, check the Logs & Messages tab to verify that messages are arriving from the Scania API. If you see any errors, refer to the Scania API documentation for error code explanations.
Preparing General Motors OnStar devices for streaming
The configuration process consists of the following stages:
- Getting credentials from General Motors
- Whitelisting flespi IP addresses with General Motors
- Creating a channel with general-motors-onstar protocol
- Provisioning devices for data services
These stages are described below.
Getting credentials from General Motors
Before you can integrate GM OnStar vehicles with flespi, you need to obtain the following credentials:
- Contact your GM manager and request credentials for:
- Pulsar client connection (to consume data)
- API access for sending commands
- You will receive the following credentials:
- Owner Client ID
- Owner Secret
- Application Client ID
- Application Secret
- (Optional): FAN (Fleet Account Number)
- Pulsar broker configuration (topic, subscription, client credentials, CA certificate)
Whitelisting flespi IP addresses with GM
Before your channel can communicate with GM OnStar API:
- Provide GM with the flespi outbound IP addresses: 185.213.2.0/24
- Request that GM whitelist these IP addresses for inbound requests from flespi to GM. This step is essential for the integration to work properly.
Creating a channel with general-motors-onstar protocol
-
In the Telematics Hub, select Channels.
-
Click the button
. -
Enter the channel name (for example, GM OnStar devices).

-
From the Protocol id drop-down list, select general-motors-onstar.
-
Check the box in the Credentials section and enter the following information:
- Owner Client ID
- Owner Secret
- Application Client ID
- Application Secret
- FAN (if provided)
-
Check the box in the Pulsar section and configure:
- Topic (provided by GM)
- Subscription (provided by GM)
- Client ID (for Pulsar)
- Client Secret (for Pulsar)
- CA certificate (paste the certificate content)
- SSL hostname (if required)
-
Click Save+Open to proceed with configuration.
After configuration, check the Logs & Messages tab to verify that the channel is connecting to GM’s Pulsar broker successfully.
For commands to General Motors OnStar devices to work correctly, there must be only one general-motors-onstar channel in your flespi account.
Provisioning devices for data services
After creating devices, you need to provision each device to opt in for data services:
- Open the device you just created.
- Go to the Commands & Settings tab.
- Find the Provision device command.
- In the Services field, select the services you want to enable. Default services include:
- TELEMETRY - vehicle position and telemetry data
- DTC_NOTIFICATION - diagnostic trouble code notifications
- HARD_BRAKE - hard braking event alerts
- HARD_ACCELERATION - hard acceleration event alerts
- Click Add to queue to execute the command.
You can also add other available services such as EMER_NOTFN, RECALL_NOTFN, THEFT_NOTFN, INCAB_ALERTS, DRIVERSIGNIN_ALERTS, or EV_PHEV_DATA.
Once the command is executed successfully, the GM platform will start sending vehicle telemetry data to your flespi channel. You can verify this in the Logs & Messages tab of the device.
Preparing Invers CloudBoxx devices for streaming
The configuration process consists of the following stages:
- Getting credentials from Invers
- Creating a channel with invers-oneapi protocol
These stages are described below.
Getting credentials from Invers
Before you can integrate Invers CloudBoxx with flespi, you need to obtain the necessary credentials:
- Contact the CloudBoxx support team at support@invers.com to request:
- Username for AMQP broker connection
- Password for AMQP broker connection
- Virtual host (if required for your setup)
- To create an API key for commands and settings management:
- Visit https://api.cloudboxx.invers.com/logins
- Log in with your CloudBoxx credentials
- Generate a new API key
- Copy and save the API key securely
Creating a channel with invers-oneapi protocol
-
In the Telematics Hub, select Channels.
-
Click the the button
. -
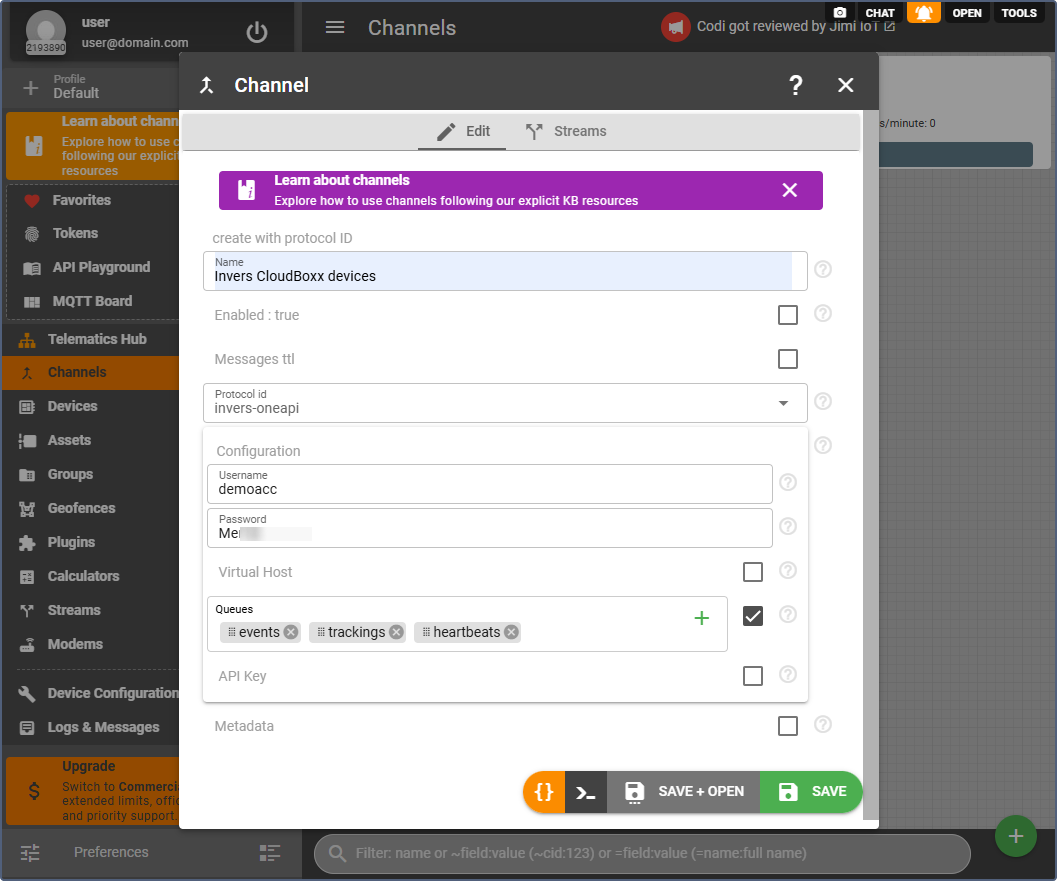
Enter the channel name (for example, Invers CloudBoxx devices).
-
From the Protocol id drop-down list, select invers-oneapi.
-
In the Configuration tab, enter the following information:
- Username: Your AMQP broker username (provided by Invers)
- Password: Your AMQP broker password (provided by Invers)
- Virtual host: Your virtual host identifier (if provided by Invers)
- Queues: Select the event types you want to receive. Default options include:
- events - vehicle events and notifications
- trackings - position and tracking data
- heartbeats - device status updates
- API Key: Paste the API key you generated from the CloudBoxx portal (required for commands and settings)
-
Click Save+Open to proceed with configuration.
After configuration, check the Logs & Messages tab to verify that the channel is successfully connecting to the Invers AMQP broker and receiving data.
Creating devices on flespi
To create a device on flespi:
- In the Telematics Hub, select Devices.
- Click the button .
- Give the device a name (for example, your vehicle name or VIN)
- In the Device type ID field, select the corresponding OEM name from the dropdown list. For example, Fleetboard, Scania FMS, General Motors OnStar or Invers CloudBoxx.
- In the ident field, enter the vehicle identifier. Depending on the OEM, it can be VIN, vehicle ID from Fleetboard or QNR (CloudBoxx identification number).
- Click Save.
Repeat this process for each device you want to monitor in Wialon.
Devices collect messages from the moment they are created. Historical data before device creation on flespi isn’t stored.
Configuring data streaming to Wialon
To create a stream that forwards data from flespi to Wialon:
-
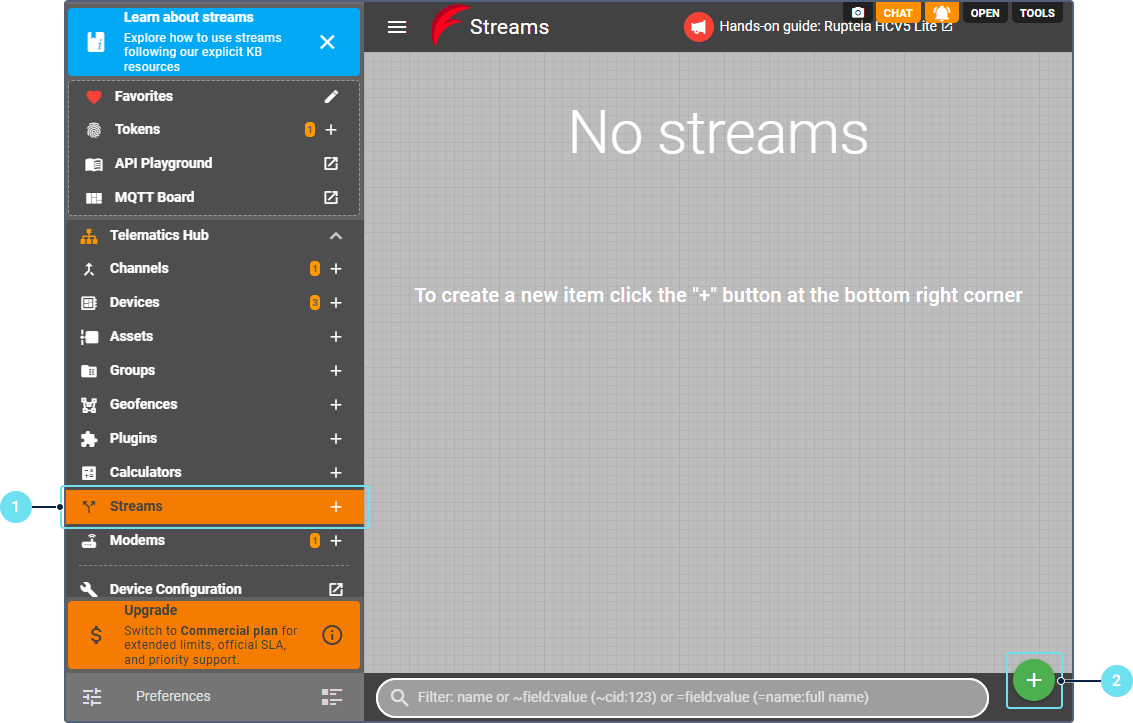
In the Telematics hub, select Streams.
-
Click the button
. -
Give your stream a name. For example, Fleetboard to Wialon. Use the corresponding name for other OEM devices.
-
For Protocol id, select flespi_gateway.
-
In the configuration:
- If using Wialon Hosting: Select your datacenter from the dropdown.
- If using Wialon Local: Manually enter your server address and port (typically port 21548).
-
Click Save+Open.
-
Go to the Devices tab to connect your devices to the stream.
-
In the stream settings, click the button
. -
Select the OEM devices you created earlier.
-
Click Save.
For proper device matching in Wialon, subscribe the stream to individual devices, not to the channel.
Configuring a unit and security settings in Wialon
For each flespi device, create a corresponding unit in Wialon. To configure a unit in Wialon, follow the steps below.
- Log in to your Wialon Hosting account.
- Create a unit using this guide and considering the following details:
- For Device type, select flespi gateway.
- When specifying the unique ID, make sure that it matches the device identifier of the tracker device created on flespi (VIN or vehicle ID from Fleetboard).
- If you need to send commands to devices from Wialon, select the device type with the
(flespi)suffix instead (for example,Fleetboard (flespi)).
To configure the security settings in Wialon, follow the steps below.
-
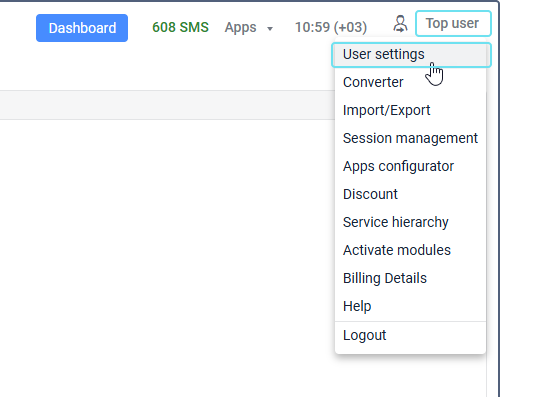
Sign in to your top account.
-
Click on your username to open the user menu.
-
Select User settings.
-
Go to the Security tab.
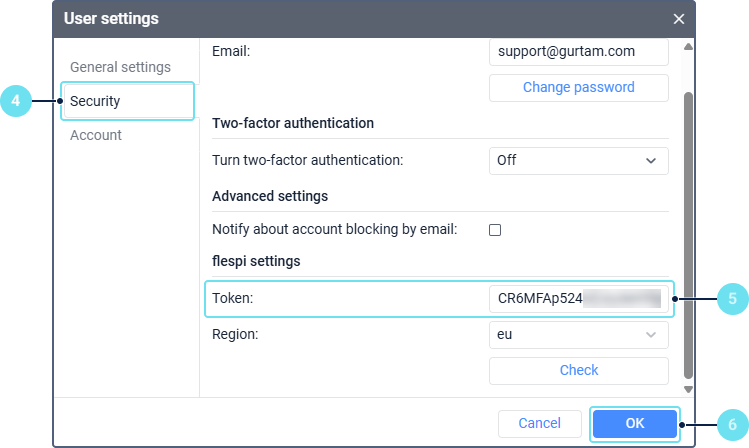
- In the flespi settings section, click Login and sign in to flespi to obtain a token.
- Click OK.
The configuration is finished. Wialon can now receive data from your device.
Verifying data reception in Wialon
To verify that everything is configured correctly and Wialon can receive data from flespi:
- On flespi, open your stream and go to the Logs & Messages tab.
- Look for log entries that say
stream has sent messages. This indicates that flespi is successfully forwarding data to Wialon. - In Wialon, go to the Monitoring tab.
- Check that your units are receiving data and showing on the map.
- Click on a unit to view its messages and verify that telemetry data (for example, coordinates or speed) are being received.
This completes the configuration process. Your data from OEM devices should now be flowing from flespi to Wialon.