Playback
On this tab, you can receive videos for the past period (playbacks) from the unit cameras and save the required excerpts as files.
Requesting a playback
To request a playback, follow the steps below.
-
Select the unit from which you want to request the playback. The list shows units for which cameras are configured. The number of cameras is specified opposite the unit name.
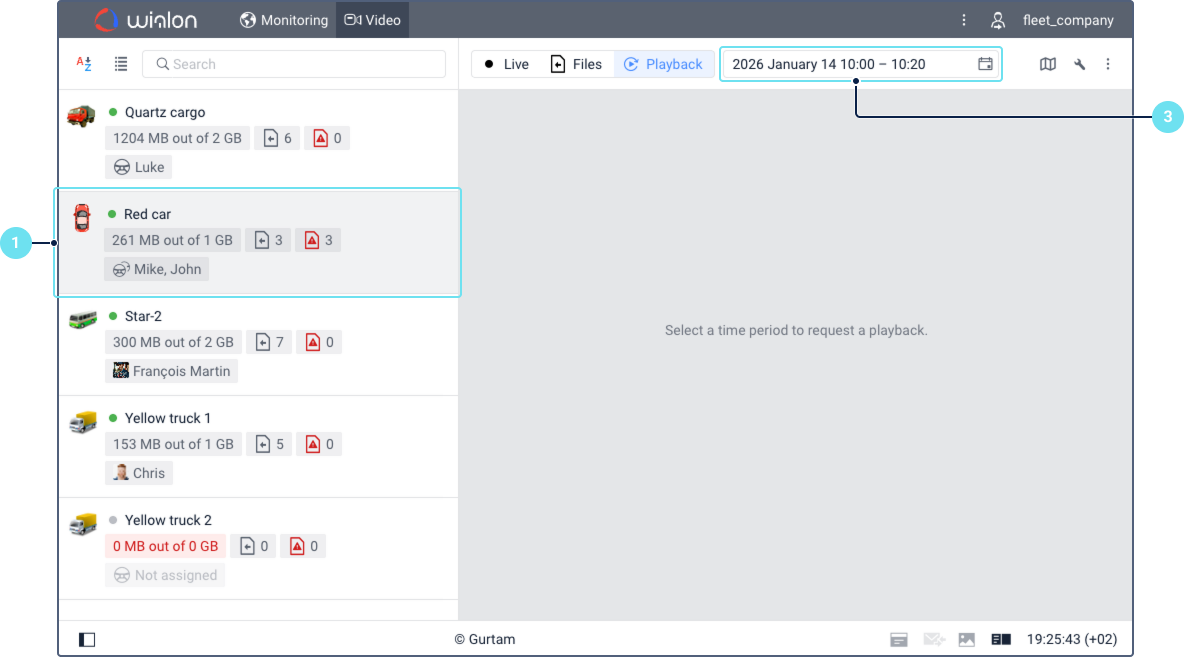
If a playback has already been requested for the selected unit, you can see it on the right side of the screen. Such a playback can’t be saved to files. To save it, you must request the playback again.
-
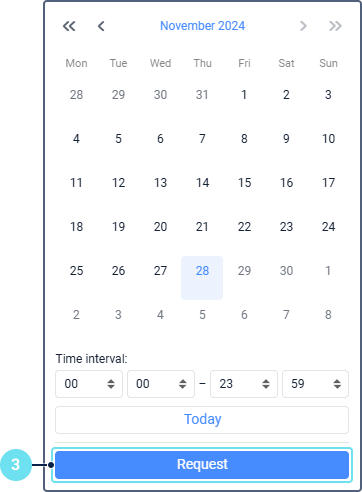
Specify the date and the time period for which you want to request the playback. You can do this manually or using the calendar. In the calendar, the days on which fuel fillings and drains were detected are marked with the icon
 . The tooltip of the icon shows the first four events of the day and the time at which they were detected. If there were more than four, you can also the number of other fillings and drains.
When specifying the period, consider the following:- You can specify a present or a past date. By default, the current date is selected.
- The end time should not be earlier than the start time.
- If the current date is specified, and the end time has not come yet, the playback is requested up to now.
-
Click Request.
When switching from the Video tab to another one before the playback is loaded, the system notifies you by means of a pop-up message as soon as it is loaded.
Requesting a playback does not influence the traffic consumption because you request only a list of files stored in the device memory. The traffic is consumed when watching the playback.
Watching a playback
The requested playback is displayed in the right part of the window. To watch it, click on the play icon or move the slider on the timeline.
The timeline can be completely white or grey, or it can consist of white and grey segments. White means that no data is available for the time period, and grey means that a playback is available from at least one of the selected cameras.
On the timeline, you can see the fuel fillings and drains detected within this period. They are indicated with the markers  and
and  , respectively. The tooltip of the marker shows the name of the event and the time at which it was detected. Click on the marker to watch the playback starting 10 seconds before the event.
On the timeline, you can see only the fuel fillings and drains detected by the system. The events registered manually are not displayed.
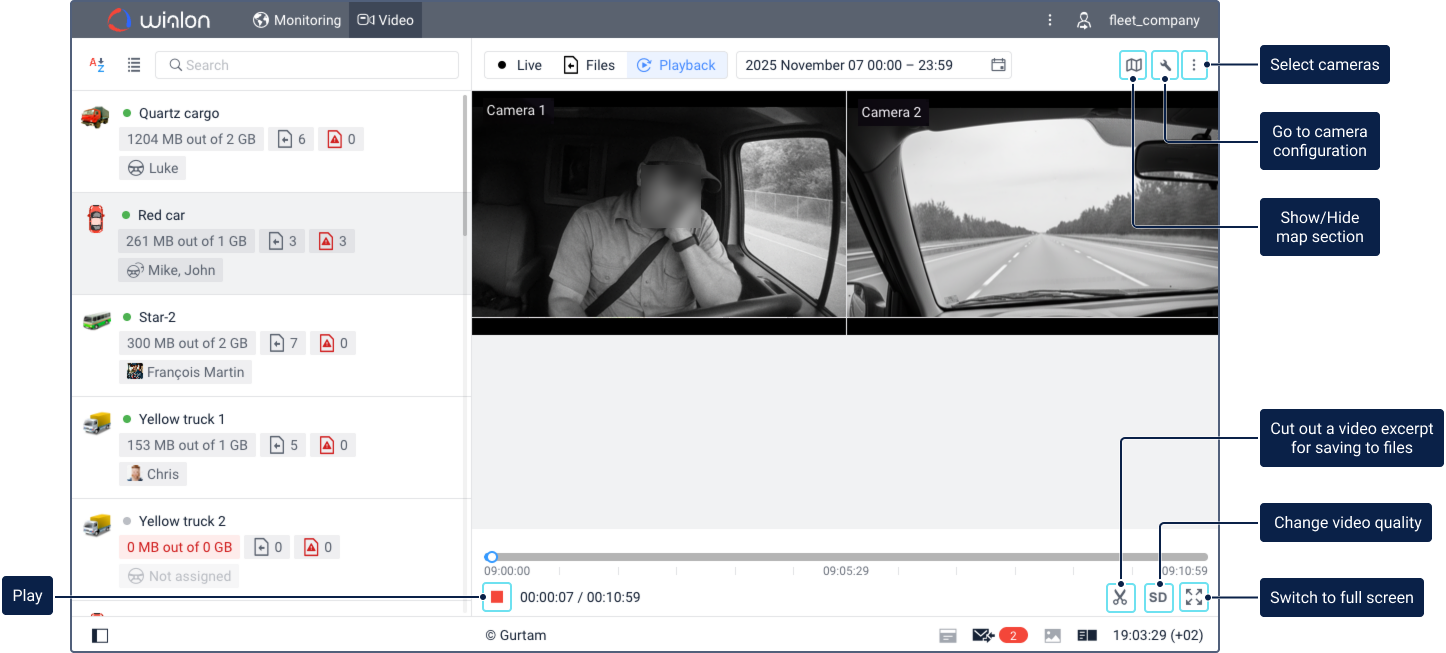
When watching playbacks, the following functions are available:
| Icon | Function |
|---|---|
 |
Play video. |
 |
Pause video. |
 / / |
Enable or disable high video quality. This feature is available only for Howen and flespi gateway devices. If the device doesn’t support quality change, this icon is not clickable (  ). ). |
 |
Switch to full screen. You can open all playbacks at once, or each one separately. To do this, click on this icon in the lower-right corner of the tab or playback section, respectively. The icon is shown in the section when you point to it. |
 |
Exit the full-screen mode. You can use the Esc key instead. |
 / / |
Switch the sound on or off. The icon is displayed when you point to a section of an individual playback. You can play the sound from only one playback at a time. If a playback is open in full screen mode, you can play the audio of only this playback. If the icon  is displayed after you start playing the playback, its sound is unavailable. is displayed after you start playing the playback, its sound is unavailable. |
 |
Show/Hide a section with a map which shows the unit moving along its track at the time the video was recorded. For more details, see the Unit track on the map when watching playback below. |
 |
Open the list of the configured unit cameras. If you want to hide the playback of a certain camera, cancel its selection. Select the camera again to make its playback appear on the screen. |
 |
Cut out a video excerpt for saving it to files. |
Unit track on the map when watching playbacks
To open the map section, click on the icon in the upper-right corner of the tab.
After you request the playback, the map shows the unit track for the period specified during the playback request. If the unit hasn’t sent any messages with location data within this period, the track is not displayed.
When you play the video, the unit moves along the track. The unit position on the track changes according to the location data from the unit messages received during the time the video was recorded. When you point to the unit icon or a track point, the tooltip shows information from the message received at that place.
For other particularities of working with the map, not related to tracks or units, see the Live stream page.
Saving a playback to files
You can save the required playback excerpt as a file. You can use the following ways to do this:
- Using the icon in the mode of watching the playback (available for devices which support playback request);
- Using the feature of saving files without requesting the playback (available for devices which don’t support playback request).
The video quality of the saved excerpt depends on the device quality settings.
Method 1
To save a playback excerpt in the first way, request a playback using the instructions above and follow these steps:
- Move the slider to the required place on the timeline or click on the marker of the necessary event to set the slider 10 seconds before this event was detected.
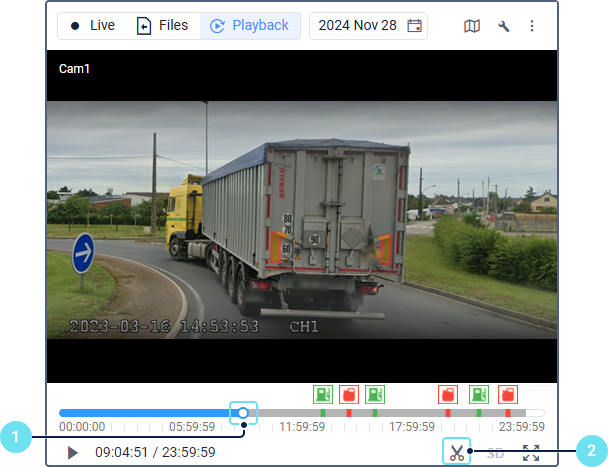
- Click on the icon .
- In the left part of the window, if necessary, clear the selection of the cameras that shouldn’t be included in the file. If a camera doesn’t have any data for the whole interval you want to save, its name becomes gray and this camera is not included in the file.
- Specify the duration before and after the event in seconds. The minimum allowed value for each field is 1. You can set different values for the periods before and after the event, as long as their total doesn’t exceed the limit. The limit is defined in the device configuration of each unit (not within the system). If no limit is configured, a default maximum of 60 s is applied. The duration of the file you want to save is equal to the sum of the specified values and is displayed above the timeline as a red segment.
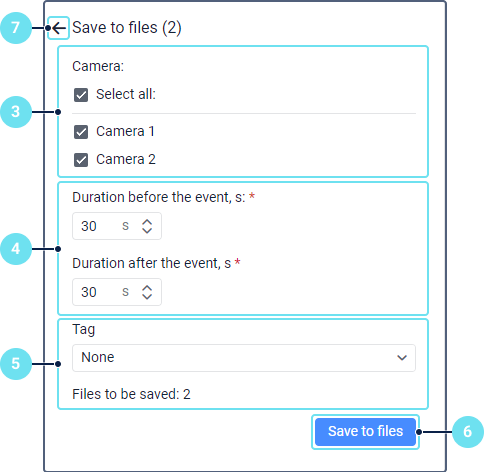
- In the drop-down list, select the tag corresponding to the event from the excerpt. The default tag is None.
- Click on the Save to files button. The button is inactive if there is no data from any camera for all the interval you want to save.
- If you want to save one or several excerpts of the same playback, move the slider and repeat steps 3 – 5. To exit the file saving mode, click on the arrow.
If you save excerpts from different cameras of the same unit and they have the same date and time of the event (slider position), duration before and after it as well as the same tag, such excerpts are grouped into one file.
You can monitor the loading progress on the Files tab. The saved file is later available on the Files tab, in messages, and in reports.
Method 2
To save a playback excerpt in the second way, select the necessary unit and follow these steps:
- Click on the Download button (it is shown on the right side of the screen when you select a unit whose device doesn’t support playback request).

- Select one or more cameras from which you want to save the video file. Use the Select all option to select or cancel the selection of all cameras at the same time.
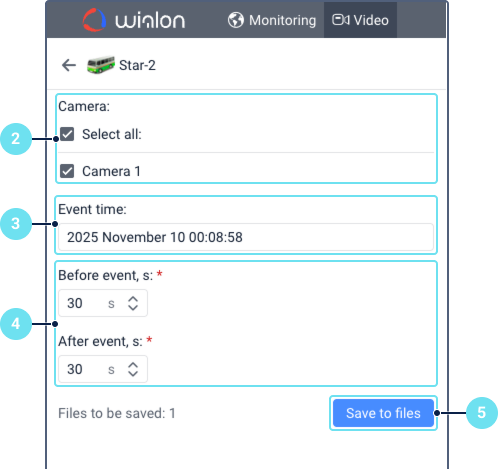
- In the Event time field, enter the date and time of the event (to the nearest second) from the excerpt you want to save. You can do this manually or using the calendar. In the calendar, the days on which fuel fillings and drains were detected are marked with an icon. The tooltip of the icon shows the first four events of the day and the time at which they were detected. If there were more than four, you can also the number of other fillings and drains.
- Specify the duration before and after the event in seconds. The minimum allowed value for each field is 1. You can set different values for the periods before and after the event, as long as their total doesn’t exceed the limit. The limit is defined in the device configuration of each unit (not within the system). If no limit is configured, a default maximum of 60 s is applied. The duration of the file you want to save is equal to the sum of the specified values.
- Click Save to files.
The requested excerpt is saved only if the playback for the specified period is available on at least one of the selected cameras.
You can monitor the loading progress on the Files tab. The saved file is later available on the Files tab, in messages, and in reports.
If you save excerpts from different cameras of the same unit and they have the same date and time of the event as well as the same duration before and after it, such excerpts are grouped into one file.
If the excerpt you are saving contains intervals with no data from all the cameras, the number and duration of the saved files is equal to the number and duration of intervals with available data.
In addition to the manual saving, you can configure the automatic saving of files in Wialon. To do this, create a notification with the Save a video as a file action.