Configuring notification actions
This page describes the redesigned notification system with updated combining logic, flexible condition building blocks, and a new full-screen interface. If your account hasn’t been upgraded to the new notification system yet, refer to the previous version of the Notifications documentation.
While configuring a notification, on the 3 step, you can select one or several actions that should be performed automatically when the notification is triggered.
All the available actions are described in detail below.
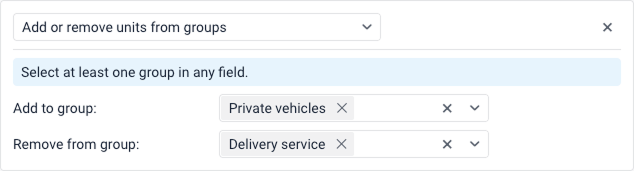
Add or remove units from groups
This action allows you to add or remove the selected unit from certain groups. To configure this action, select the required groups from the Add to group and/or Remove from group drop-down lists. You must select at least one group in any field.
Read more about the possibilities of working with this and other notification actions in the expert article.
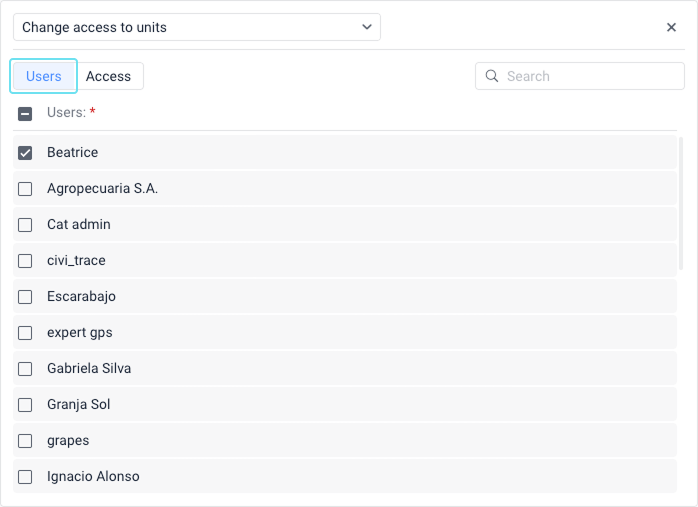
Change access to units
This action allows you to automatically change the user’s access rights to units. To do this, you should have the Manage access to this object access right to the user.
To configure this action, follow these steps:
-
On the Users tab, select the users whose access rights you want to change. You can use the search bar to find them quickly.
-
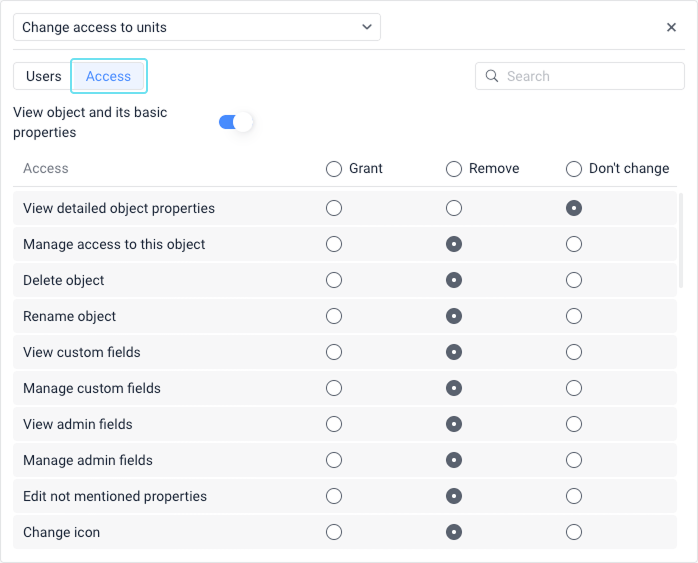
Switch to the Access tab.
-
If you want to grant any access to the units, the basic View object and its basic properties toggle must be active. Conversely, if you want to remove all access, disable this toggle.
If the View object and its basic properties toggle is disabled, the selected users will lose all access to the units.
-
If the basic access right is enabled, you can configure the remaining access rights in the list below by selecting one of the radio buttons next to each:
- Grant: Allows you to grant the users this access right.
- Remove: Allows you to remove this access right from the users.
- Don’t change: Allows you not to change the current state of this access right.
This action can be useful when granting users temporary access rights.
Example: The user should track the movement of a unit delivering cargo on a certain territory (geofence A). After the cargo is delivered to the required place (geofence B), the unit should be unavailable for this user. In this case, you should use the notification with the Geofence exit condition.
Change icon
This action allows you to select the icon that should be the unit icon when the notification is triggered. To open the list of available icons, click the Library button.
![]()
Create a ride
This action allows you to create a new ride for the unit. For example, when leaving a certain geofence or finishing a certain ride, the unit can start a new ride automatically.
To configure this action, follow these steps:
- Specify the ride name (required).
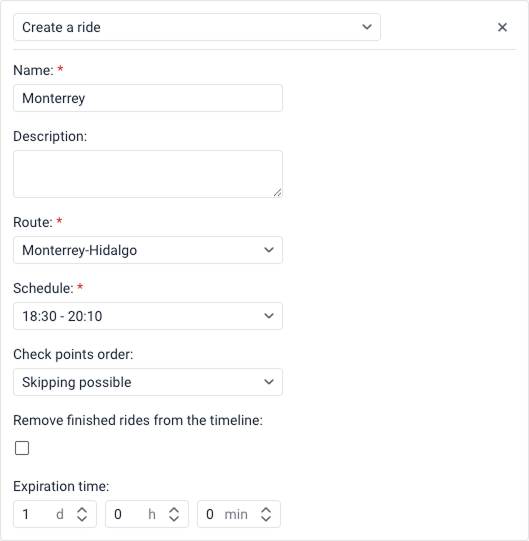
- If necessary, add a description.
- Select the route from the drop-down list (required).
- Select the schedule of the route (required).
- Select the order of check points: Strict, Skipping possible, or Arbitrary.
- If necessary, check the Remove finished rides from the timeline option so that the timeline shows only those rides which are currently executing.
- In the Expiration time fields, specify the time (in days
d, hoursh, and minutesmin) during which the ride can start.
Create task
The Create task action is available if you have the Tasks service enabled in the properties of your account or billing plan. Also, you must have the access rights to units and users listed in the Prerequisites section of the Tasks page.
When a notification with this action is triggered, a task is created for the unit and is displayed on the Tasks tab.
To configure this action, follow the steps below:
- Select the user in the Assignee field, or leave the Not assigned option if the task should not be assigned to a specific user. You can clear the selection using the icon
 .
.
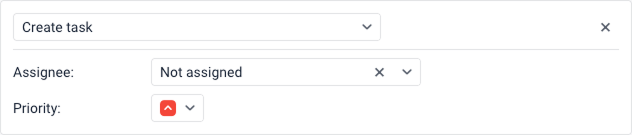
- Select the Priority that should be given to the created task from the drop-down list: Low, Medium, or High.
The created task has the New status, and its name and type match the name and type of the triggered notification. The notification text is displayed in the Description column.
Display online notification in a popup window
This notification action allows you to display notifications in a pop-up window in Wialon (see more).
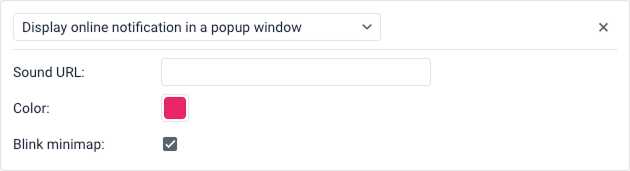
Sound URL
If the Play sound for events option is enabled in the user settings, the notifications are accompanied by an audio signal. In the Sound URL field, you can specify a direct link to the sound file, which must end with .mp3, .wav or .ogg depending on the file format. The recommended file size is up to 0.5 MB. If the field is not filled in, the default audio signal is used.
When using different browsers, take the following restrictions into account:
| Browser | Supported format |
|---|---|
| Internet Explorer 9+ | MP3, AAC |
| Google Chrome 11+ | MP3, WAV, Ogg |
| Mozilla Firefox 12+ | WAV, Ogg |
| Safari 5+ | MP3, WAV, AAC |
| Opera 10+ | WAV, Ogg |
Color
If necessary, you can select the notification indicator and background color. The default color is white.
Blink minimap
If the Blink minimap option is enabled, once the notification is triggered, a mini-window opens in which you can track the movement of the unit.
Notify by email
This action allows you to configure sending email notifications.
Some types of devices allow you to attach an image to the email sent by the unit in the message after which the notification was triggered. To do this, enable the Attach image from triggered message option.
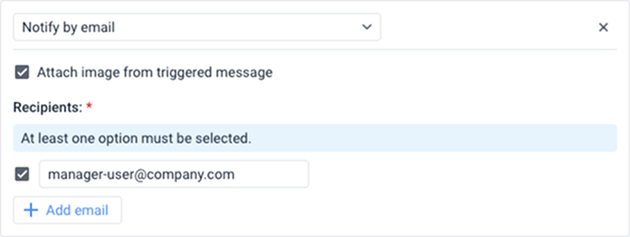
In the Emails section, you must specify the addresses to which notifications should be sent. To do this:
- Click the Add email button to add a new input field.
- Check the box to the left of the field and enter the required email address.
- To cancel sending notifications to any of the specified addresses, simply uncheck the box to the left of that address.
At least one email option must be selected to save the action.
Email structure
The notification name is specified in the header of the received email, and the unit name is shown in brackets. The main body of the email contains the notification text.
Unsubscription from email notifications
If the Unsubscribe feature is enabled in the properties of the account or resource where the notification is stored, an Unsubscribe link is shown at the bottom of the email.
If a recipient unsubscribes, the box to the left of their email is automatically unchecked in the notification settings. If all the specified recipients unsubscribe, and only this action is specified in the notification settings, the notification is automatically disabled.
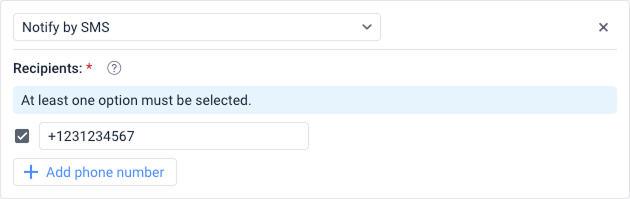
Notify by SMS
This action allows you to configure sending notifications as SMS messages. To do this, follow the next steps:
- Make sure that the Can send SMS option is enabled in the user properties.
- Make sure that SMS messages service is enabled in the account properties of the user who created the notification.
- In the Recipients section, specify the phone number in the international format (for example, +37060123456) and ensure the checkbox next to it is selected. To enter multiple numbers, click the Add phone number button.
Register event for unit
This action allows you to register events in the unit history. To do this, the creator of the resource where the notification will be stored must have the Manage events access right to the unit.
The registered events are displayed in the Events report table. In order for events to be registered as violations and to be available in the Violations table, check the Register as violation box.

Register unit status
This action allows you to register the unit status (such as Business or Personal). To do this, you must have the Manage events access right to the unit. For example, when the unit visits a certain geofence, the unit status can be changed from personal to business or vice versa.
To set the status, you can either type it directly in the text field or click the Select a saved status drop-down menu to select an existing one. This drop-down list includes statuses that were saved previously when registering events for units manually using the Register event option on the Monitoring tab.

You can view records about registered statuses in the Events table.
Save a video as a file
This action allows you to automatically save a video excerpt captured by the unit cameras at the moment when the notification is triggered. You can use such a notification for several units.
To configure this notification action, follow the steps below:
-
On the Video tab of the unit properties, enable the Automatic saving option for the cameras from which you want to save video excerpts. If you want to configure the notification for more than one unit, perform this action for all of them.
-
In the notification, choose the camera source using the radio buttons:
- All cameras: Saves video from every camera associated with the unit(s).
- Selected cameras: Allows you to specify exactly which cameras to record from. Select the desired cameras from the drop-down lists. You can use the icon
 to remove a camera from your selection. If you create the notification for several units, an indicator (e.g., “In 1 from 1 units”) next to the camera field shows how many of the selected units have a camera with that exact name.
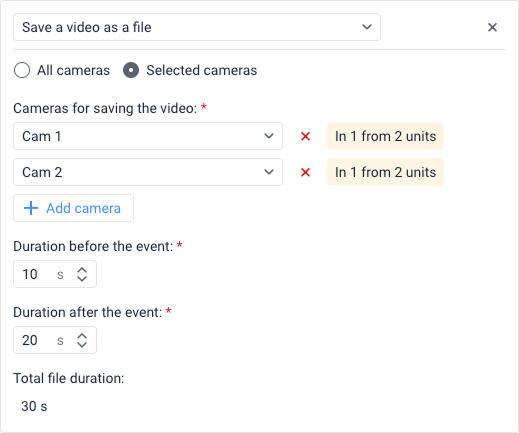
-
Specify the Duration before the event and Duration after the event (the moment when the notification is triggered) in seconds. The Total file duration is automatically calculated and displayed below these fields.
- The minimum allowed value for each duration field is 1.
- You can set different values for the periods before and after the event, as long as their total doesn’t exceed the device limit. The limit is defined in the device configuration of each unit (not within the system). If no limit is configured, a default maximum of 60 s is applied.
If a notification includes multiple units, the system uses the minimum video duration configured among all included devices. Example: If Unit 1 supports 300 s and Unit 2 supports 60 s, the system uses 60 s as the total video duration.
When the notification is triggered, it saves video excerpts from the selected cameras. If you have specified the cameras for which the Automatic saving option is not enabled in the unit properties, the video from such cameras is not saved.
You can see the saved file on the Video tab, in messages, and in reports. If automatic saving is enabled for several unit cameras, the video excerpts captured by these cameras are grouped into one file and played simultaneously.
Save counter value as a parameter
This action allows you to save the value of current mileage or engine hours as a parameter in the message. This is required in order to show the initial and final mileage values in the report on trips and convert the engine_hours parameter into the engine hours sensor for further operations.
To configure this action, check the box next to the counter you want to save: Mileage counter and/or Engine hours counter. You must select at least one option to save the action. The default parameter names are odometer and engine_hours, but you can customize these names in the provided text fields.
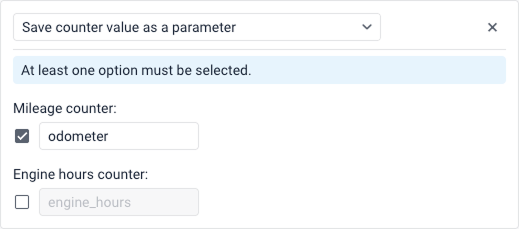
For more precise calculations, it is advisable to store counter values while the unit is parked, for example, once a day at night time.
Send a command
This action allows you to send a certain command to the unit(s). The list contains all the available commands created in the properties of all the selected units if you have the Send commands access right to them. Select the command you want to execute using the radio buttons.
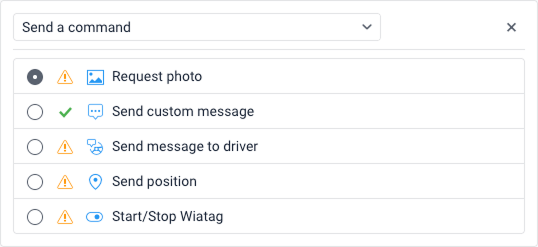
Next to the name of each command, you can see the following icons:
 : means that all the selected units support this command;
 : means that not all the selected units support this command (more information in the tooltip).
In the case of sending commands that involve entering text or a message (for example, Send custom message or Send message to driver), additional settings become available:
-
Message: Enter the required text. To save the message for future use, click the icon
 . You can use the same tags as for the notification text. When executing the command, the specified tags are converted to the values that correspond to them.
Tags in a command message are converted to values only when you use the Send a command notification action. When you send a command manually from the Monitoring tab, the tags are not converted.
-
Group: You can organize saved messages into categories. Select an existing group from the drop-down list, or click Add group to create a new one. You can also remove a selected group using the icon
 .
. -
Saved messages: Displays messages that have been saved previously. You can click a message to use it, or delete it from the list using the icon
.
Here you can find frequently asked questions about sending commands and answers to them. For more information about commands, see the Commands section.
Send a report by email
This action allows you to send a report to one or several specified email addresses. To do this, you should have the Request messages and reports access right.
To configure this action, follow these steps:
- Select the resource to which the report template belongs. To see templates from all the available resources, select the All available option.
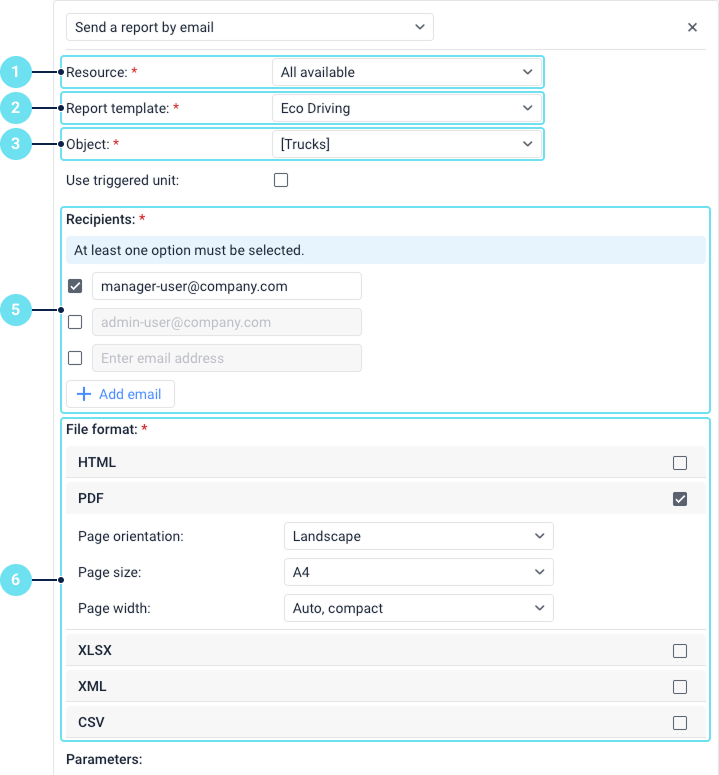
- Select the report template you want to use.
- Select the object on which you want to execute the report.
- If necessary, check the Use triggered unit box. It is only available for reports on unit or unit group. If the option is enabled, the report is executed only on the unit that triggered the notification, regardless of the object selected in the previous list.
- In the Recipients section, specify the email addresses. Click the Add email button to add new input fields, and ensure the box next to the required address is checked. At least one option must be selected to save the action.
- Select one or several options in the File format section: HTML, PDF, XLSX, XML, or CSV. When selecting the PDF format, you can specify the page orientation, size, and width. When selecting the CSV format, you can specify the coding and delimiter as well as enable or disable the displaying of headings.
- In the Parameters section, configure additional report settings:
-
Compress report files
-
Split chart by
-
Disable links to Google Maps in PDF and XLSX files
-
Attach map (for PDF and HTML only), which includes sub-options to Squeeze in all graphics
-
Hide cartographic basis
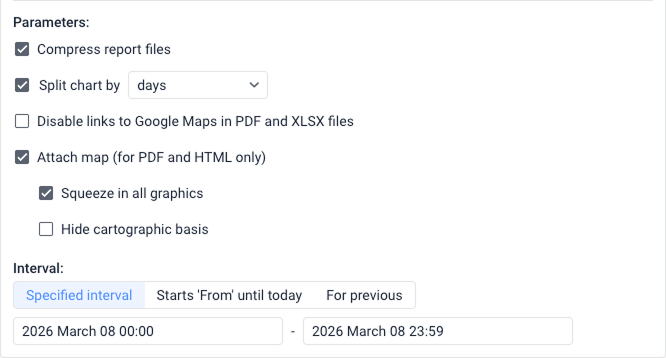
See the description of these options in the Export parameters section.
-
- Specify the time Interval for which the report should be executed by selecting one of the three tabs:
- Specified interval: Enter the exact start and end dates and times (for example, 01 March 2026 00:00 - 01 March 2026 23:59).
- Starts ‘From’ until today: This option allows you to set a specific starting date and time in the first field. The end time is automatically determined by the system (representing the moment the notification is triggered) and is shown in an inactive, grayed-out field.
- For previous: This option allows you to define a relative time period. You specify a numerical value and select a time unit (such as “days”) from a drop-down list. Additionally, there is an Including current checkbox that you can enable to include the current, ongoing time period in the report interval.
- Select one of the two options defining the report content (if applicable based on your configuration):
- Send files/archives: Allows you to send files or archives directly.
- Send links to files/archives: Allows you to send links to the FTP server (Wialon or a custom one) where the files or archives of the report are stored. If the file size exceeds 30 MB, this option is used automatically.
The information about the geodata in the notification report is shown in accordance with the settings of the user-creator of the resource in which this notification is created.
If the user-creator of the notification no longer has access rights to the object or this object has been deleted, the notification stops working.
Send a request
This action allows you to send messages about triggered notifications to third-party servers. To configure this, follow the steps below:
-
In the Server field, specify the URL, that is, the static part of the request.
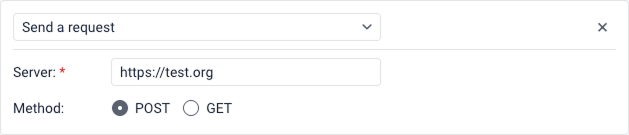
-
Select a method for the HTTP request using the radio buttons: POST or GET.
-
Click Next.
-
In the notification text field, specify the dynamic part of the request using tags. For example:
param1=value1¶m2=value2¶m3=%UNIT%¶m4=%SPEED%
When sending a GET request, its dynamic part is automatically added to the server address specified in step 1. When sending a POST request, the dynamic part is passed in the body of the request.
Send mobile notification
This action allows you to configure sending mobile notifications. The action is available if the Mobile notifications service is enabled in the properties of the user’s account.
To configure sending mobile notifications, follow these steps:
- Make sure that the users who should receive notifications are authorized in the mobile application and have the option allowing them to receive notifications enabled. In the case of the Wialon mobile app, the Push notifications option should be enabled in the settings.

- Select the mobile application to which the notification should be sent from the Applications drop-down list.
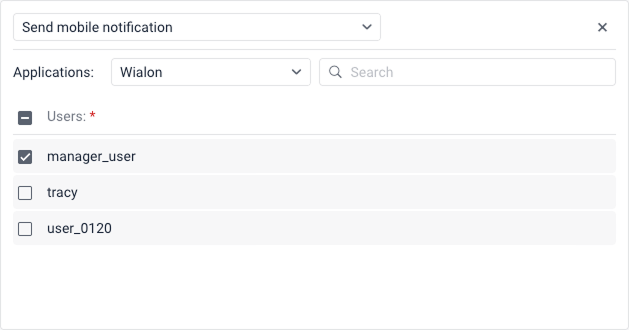
- Select the users who should receive the notification by checking the boxes next to their names. You can use the search bar above the list to find them quickly. To select all the users at once, check the box next to the Users title.
Send notification to Telegram
This action allows you to send notifications to the Telegram messenger.
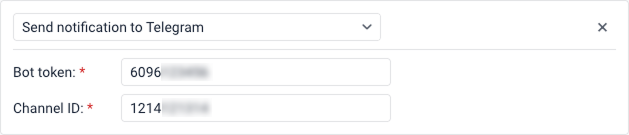
Notifications can be sent to:
Notifications to the user’s private messages
To configure sending notifications to the user’s private messages, follow these steps:
-
Using the search, find and open the bot named BotFather.
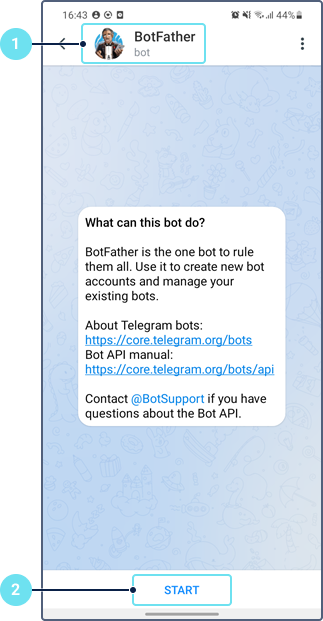
-
Tap Start.
-
Select the
/newbotcommand.
-
Specify the bot name.
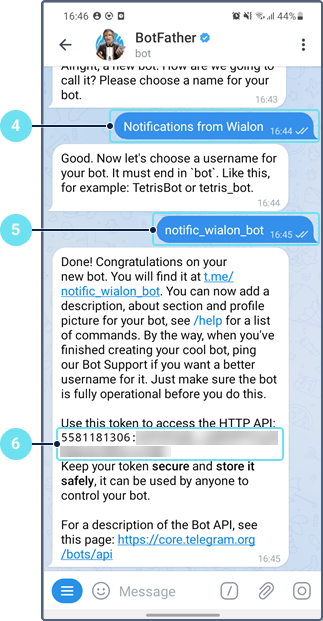
-
Specify the user name for the bot. It should end with the word
bot. -
Save the received token.
-
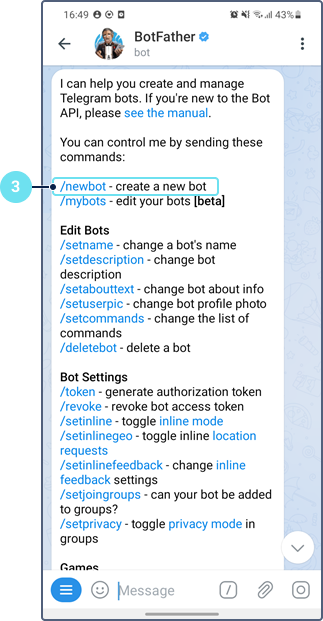
Specify the token in the Bot token field.

-
Select the
/mybotscommand.
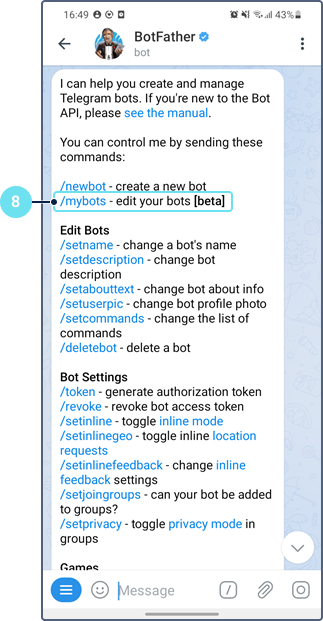
-
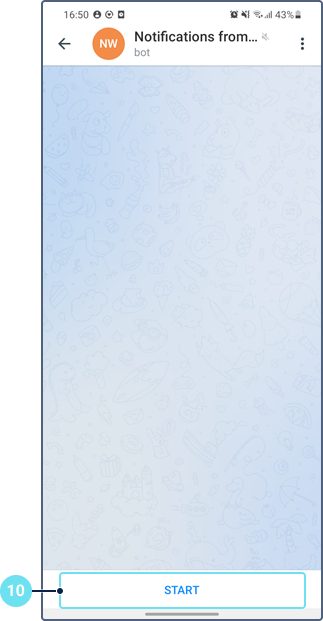
Select the created bot.
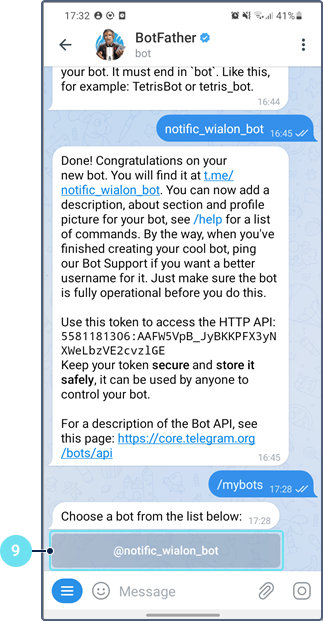
-
Tap Start.
-
Using the search, find and open the bot named userinfobot.
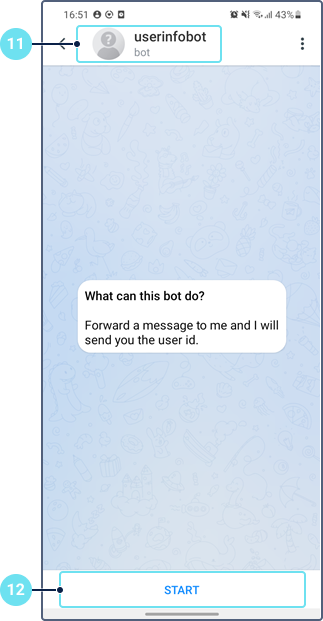
-
Tap Start. After that, the user ID is sent. To find out the ID of another user, send any message to this bot on behalf of the required user.
-
Specify the received ID in the Channel ID field.

Notifications to a public channel
To configure sending notifications to a public channel, follow these steps:
- Follow steps 1–10 from the previous guide.
- Create a public channel in Telegram.
- Add the created bot to the channel as an administrator with the right to post messages.
- In the Channel ID field in Wialon, specify the link to the channel in the
@linkformat (withoutt.me/). The link is indicated in the Info section of the channel. - In the channel settings, add subscribers, that is, the users who should receive notifications, or send them the link to the channel.
In the same way, you can configure sending notifications to a public group. In this case, add the created bot to the group as a member.
Notifications to a private channel
To configure sending notifications to a private channel, follow these steps:
- Follow steps 1–10 from the first guide.
- Create a public channel in Telegram.
- Add the created bot to the channel as an administrator with the right to post messages.
- Copy the following link to the browser address bar:
https://api.telegram.org/bot<YourBotToken>/sendMessage?chat_id=<@YourChannelName>&text=ping - Replace
<YourBotToken>with the bot token and<@YourChannelName>with the link to the created channel in the@linkformat (withoutt.me/). The link is specified in the Info section of the channel. - Press Enter.
- From the resulting code, copy a numerical value after
"chat":{"id":and paste it into the Channel ID field in the notification properties in Wialon. - Delete the automatic message in the channel.
- In the channel settings, change its type from public to private.
- In the channel settings, add subscribers, that is, the users who should receive notifications, or send them the link to the channel.
Notifications to a private group
To configure sending notifications to a private group, follow these steps:
- Follow steps 1–10 from the first guide.
- Create a private group in Telegram.
- Add the created bot to the group as a member.
- Copy the following link to the browser address bar:
https://api.telegram.org/bot<YourBotToken>/getUpdates - Replace
<YourBotToken>with the bot token. - Press Enter.
- In the resulting code, find the ID of the created group (a negative value between
"chat":{"id":and"title":"Group name"). To find this place quickly, use the key combinationCtrl+F, type the group name in the search box, and press Enter. - Insert the ID of the group in the Channel ID field of the notification properties in Wialon.
- In the group settings, add members, that is, the users who should receive notifications, or send them the link to the group.
For further information, see Telegram notifications.
Separate driver
This action allows you to automatically separate the driver from the unit. If several drivers are assigned to a unit, all of them are separated after the notification is triggered. The drivers and the notification should belong to the same resource.

See more information about the automatic separation of drivers.
Separate trailer
For this notification action, you should have the Create, edit, delete trailers access right to the resource to which the trailer belongs.
This action allows you to automatically separate the trailer from the unit. If several trailers are assigned to a unit, all of them are separated after the notification is triggered. The trailers and the notification should belong to the same resource.

See more information about the automatic separation of trailers.
Set counter value
This action allows you to change the values of the mileage, engine hours, and/or GPRS traffic counters. To do this, you should have the Edit counters access right to the unit.
To configure this action, follow these steps:
- Check the boxes next to the required counters you wish to update: Mileage counter, Engine hours counter, and/or GPRS traffic counter.

- Specify the numerical values that these counters should be set to when the notification is triggered.
At least one option must be selected to save the action.