Configuring notification conditions
This page describes the redesigned notification system with updated combining logic, flexible condition building blocks, and a new full-screen interface. If your account hasn’t been upgraded to the new notification system yet, refer to the previous version of the “Notifications” documentation.
Conditions are configured in the first step of the notification creation process.
Below are all possible notification conditions and their settings.
Address
This condition is triggered if the unit is within a certain place or outside it. For configuration, follow the steps below.
- Select when the condition should be triggered: when the unit is at the specified address (Inside) or in any other place (Outside).
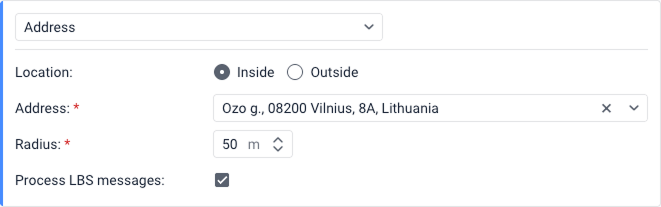
- Start typing the address in the Address field (city, street, house number, and so on) and select the suitable option from the list. You can use only addresses selected from the list.
- Specify the radius of this point in the Radius field.
- Select Process LBS messages if you want to use LBS data for triggering notification. LBS data are less accurate, but allow to determine a unit approximate location where GPS signals might be weak or absent.
In order to receive LBS data from a unit, this function must be supported for the device type and the option Allow positioning by cellular base stations must be enabled in the unit properties.
Geofence entry
- In the left list, select the geofences or groups of geofences (displayed in square brackets) for which the notification should be triggered. They are grouped by resource to which you have access. You can use the dynamic filter above the list to search. For bulk selection, use the Select all checkbox to mark all geofences, or click the checkbox next to the resource name to select all geofences within that specific resource.
- Using the icon
 , move the items from the left list to the right one.

- In case you select several geofences, select when to trigger:
- when the unit enters any of geofences
- when the unit enters all of geofences
See examples for details of triggering in each case.
- Select Process LBS messages if you want to use LBS data for triggering notification. LBS data are less accurate, but allow to determine a unit approximate location where GPS signals might be weak or absent.
In order to receive LBS data from a unit, this function must be supported for the device type and the option Allow positioning by cellular base stations must be enabled in the unit properties.
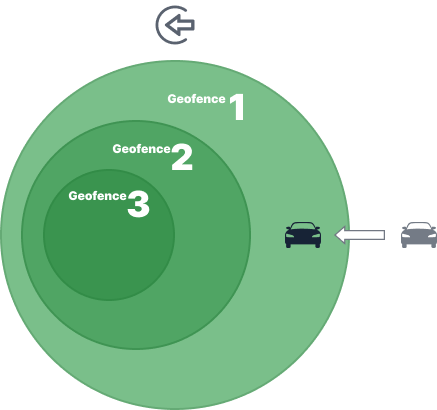
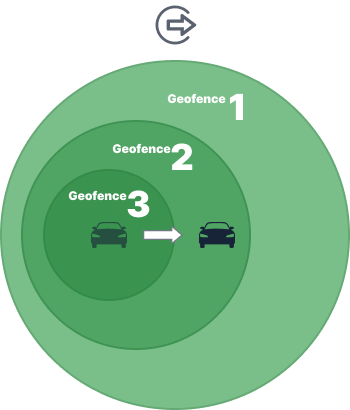
When the unit enters any of geofences
The notification is triggered when the unit enters any of the selected geofences.
Example. Geofence 1, Geofence 2 and Geofence 3 are selected in the notification settings. When the unit enters Geofence 1, the notification is triggered. It will also be triggered if the unit enters Geofence 2 or Geofence 3. In addition, the notification will be triggered if the geofences don’t overlap and the unit enters any of them.
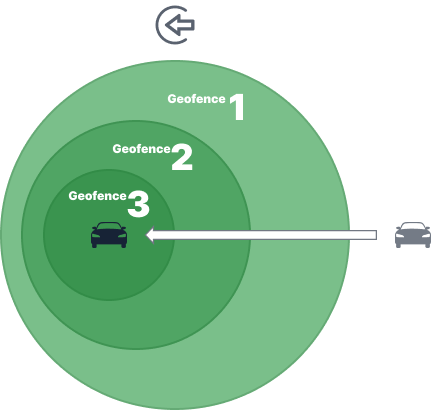
When the unit enters all of geofences
The notification is triggered when the unit is in all the selected geofences at the same time.
Example. Geofence 1, Geofence 2 and Geofence 3 are selected in the notification settings. Geofence 3 is inside Geofence 2 and Geofence 1. When the unit is in Geofence 3 and therefore in all the other geofences at the same time, the notification is triggered.
Geofence exit
- In the left list, select the geofences or groups of geofences (displayed in square brackets) for which the notification should be triggered. They are grouped by resource to which you have access. You can use the dynamic filter above the list to search. For bulk selection, you can select all geofences and all geofences from a resource.
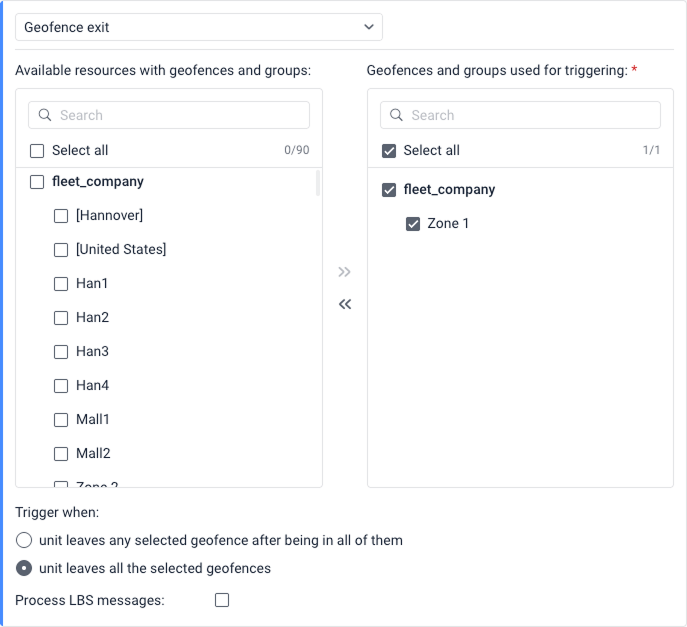
- Using the icon , move the items from the left list to the right one.
- In case you select several geofences, select when to trigger:
- when unit leaves any selected geofence after being in all of them
- when unit leaves all the selected geofences
See examples for details of triggering in each case.
- Select Process LBS messages if you want to use LBS data for triggering notification. LBS data are less accurate, but allow to determine a unit approximate location where GPS signals might be weak or absent. The GPS data still is used if available.
In order to receive LBS data from a unit, this function must be supported for the device type and the option Allow positioning by cellular base stations must be enabled in the unit properties.
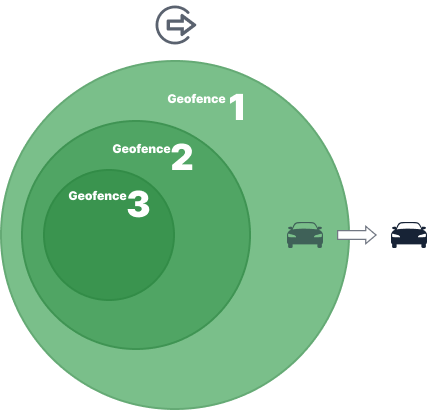
Unit leaves any selected geofence after being in all of them
The notification is triggered when the unit leaves any of the selected geofences if it previously has been in all of them at the same time.
Example. Geofence 1, Geofence 2 and Geofence 3 are selected in the notification settings. Geofence 3 is inside Geofence 2 and Geofence 1. The unit is in Geofence 3 and therefore in all the three geofences at the same time. When it leaves Geofence 3 but still remains in Geofence 2 and Geofence 1, the notification is triggered. The notification is also triggered if the unit moves from Geofence 3 to Geofence 1 or leaves all the geofences at once. If the unit was in Geofence 2 or Geofence 1 and has left them, the notification won’t be triggered.
Unit leaves all the selected geofences
The notification is triggered when the unit leaves all the selected geofences.
Example. Geofence 1, Geofence 2 and Geofence 3 are selected in the notification settings. Geofence 3 is inside Geofence 2 and Geofence 1. The unit is in Geofence 1. After the unit leaves Geofence 1, it is not in any of the three geofences, so the notification is triggered. In addition, the notification is triggered if the geofences don’t overlap and the unit leaves any of them.
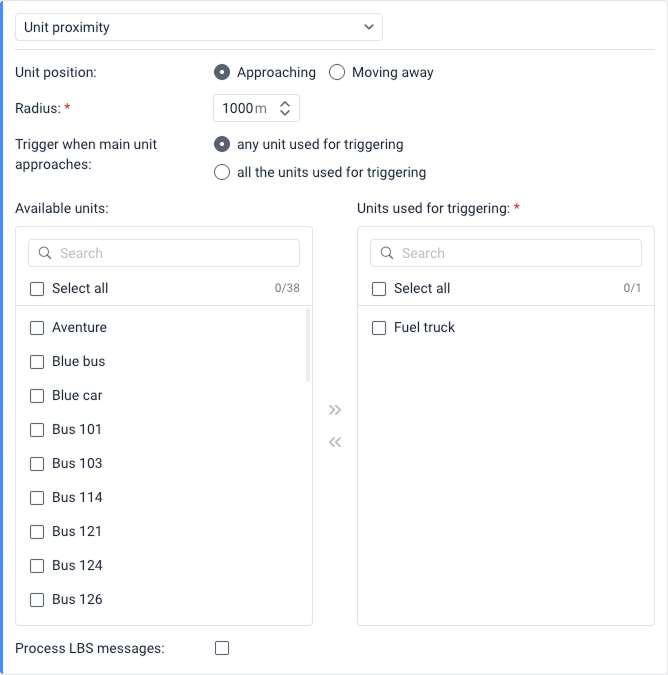
Unit proximity
Using this condition, you can monitor whether one unit is approaching or moving away from one another.
To configure this condition, follow the steps below.
-
Select when the notification is triggered: when the main unit (unit selected on the left panel) approaches another unit or when it moves away from another unit.
-
In the Radius field, specify the distance between the units, when the notification should be triggered if the distance decreases or increases.
-
In case you want to select several units, select when to trigger:
- when main unit approaches or moving away from any of the units selected for triggering
- when main unit approaches or moves away from all the units selected for triggering
-
Select units used for triggering. Using the icon
, move the items from the left list to the right one. -
Select Process LBS messages if you want to use LBS data for triggering notification. LBS data are less accurate, but allow to determine a unit approximate location where GPS signals might be weak or absent. The GPS data still is used if available.
In order to receive LBS data from a unit, this function must be supported for the device type and the option Allow positioning by cellular base stations must be enabled in the unit properties.
Approach of a unit to several other units
If the notification tracks the approach of a unit to several other units, the options work as follows.
Any unit used for triggering
The notification is triggered when the unit selected on the left panel (the main unit) approaches any of the units selected in step 4 (the other units). In order for the notification to be triggered, the distance between the main unit and one of the others must be less than the distance specified in the Radius field.
Example. The notification tracks the approach of Unit 1 to Units 2 and 3. The Radius field is set to 1000 meters. Unit 1 is approaching Unit 3. When the distance between them is 999 m, the notification is triggered.
All the units used for triggering
The notification is triggered when the unit selected on the left panel (the main unit) approaches all the units selected in step 4 (the other units) and the distance between them becomes less than the value specified in the Radius field. That is, if the main unit is approaching only some of the others at the required distance, the notification is not triggered.
In the notification text, the names of all the units approached by the main unit are shown in place of the %OTHER_UNIT% tag.
Distancing of a unit from several units
If the notification tracks the distancing of a unit from several units, the options work as follows.
Any unit used for triggering
The notification is triggered when the unit selected on the left panel (the main unit) moves away from any of the units selected in step 4 (the other units). For the notification to be triggered, the distance between the main unit and the other units must first be less than the distance specified in the Radius field, and then become greater than that value.
All the units used for triggering
The notification is triggered when the unit selected on the left panel (the main unit) moves away from all the units selected in step 4 (the other units). That is, if the main unit is moving away only from some of the others, the notification is not triggered. Also, for the notification to be triggered, the distance between the main unit and the other units must first be less than the distance specified in the Radius field, and then become greater than this value.
In the notification text, the names of all the units from which the main unit has moved away are shown in place of the %OTHER_UNIT% tag.
Custom speed range
The notification with this condition is triggered if the speed value is above or below the permitted range.
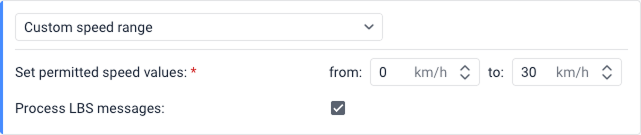
Select Process LBS messages if you want to use LBS data for triggering notification. LBS data are less accurate, but allow to determine a unit approximate location where GPS signals might be weak or absent. The GPS data still is used if available.
In order to receive LBS data from a unit, this function must be supported for the device type and the option Allow positioning by cellular base stations must be enabled in the unit properties.
Inactivity
The condition monitors the unit off time. Off time is a period during which the unit speed remains below a certain threshold.
To configure this condition, adjust the following settings:
| Setting | Description |
|---|---|
| Max allowed off time | Specify for how long a unit can remain stationary before the condition is triggered. This value can’t exceed 30 days. |
| Speed, no more than | Set the speed threshold below which the vehicle is considered stationary. It is recommended to set this value to 1–5 km/h to account for potential GPS inaccuracies. |
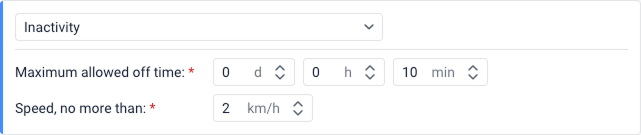
Example. The Maximum allowed off time is set to 15 minutes and Speed, no more than, is set to 3 km/h. In this case, the notification will be triggered if the vehicle speed remains below 3 km/h for 15 minutes consecutively. If the vehicle speed exceeds 3 km/h, the 15-minute timer resets to zero and begins counting again when the speed falls back below 3 km/h.
Road speed limits
The condition is triggered if the speed limits from maps are violated. Road speed limits are taken from Gurtam Maps. See Road limits section for more details.
For this control type, you can specify the number of kilometers per hour by which the limits from maps can be exceeded (the Tolerance on speeding field).
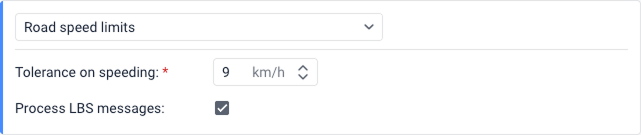
Select Process LBS messages if you want to use LBS data for triggering notification. LBS data are less accurate, but allow to determine a unit approximate location where GPS signals might be weak or absent. The GPS data still is used if available.
In order to receive LBS data from a unit, this function must be supported for the device type and the option Allow positioning by cellular base stations must be enabled in the unit properties.
Alarm
This condition is triggered when the system receives an alarm message from the unit. For this purpose, the device should support the function of sending such messages or a sensor of the Alarm type should be configured in the unit properties.
To use this condition, simply select it. No further configuration is required.

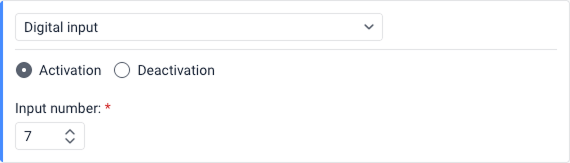
Digital input
This condition is triggered if a digital input of the device is activated or deactivated.
The system monitors two specific parameters for this condition. It first analyzes the I/O parameter. If the incoming message doesn’t contain the I/O parameter, the system analyzes the io_n parameter instead.
To configure this notification, specify the input number (from 1 to 32) for either the Activation or Deactivation option. You cannot select both options simultaneously within a single condition. If you need to monitor both the activation and deactivation of the same input, you must click Add condition to create a second condition with the opposite state.
Parameter state
Using this condition, you can control sensor parameters in messages. It allows controlling parameters sent by the device and doesn’t include the control of virtual parameters (sats, speed, lat, and so on).
To configure the condition, follow these steps:
-
Type the parameter you want to control or select in the drop-down list.
For parameters of the
inandouttypes, you can control only the availability or lack of the parameter. -
Select one of the available control types:
- Value range: Allows specifying the minimum and maximum values of the parameter and select the activation type. For this type, follow steps below.
- Text mask: Allows controlling text parameters. For this type, specify the text mask in the Mask field using special characters (
*and?). - Parameter availability: Allows controlling the availability of the selected parameter in messages.
- Parameter lack: Allows controlling the lack of the selected parameter in messages. For the notification to be activated when the parameter appears or disappears from messages, select the When non-trigger state changes to trigger state option for the Trigger notification setting in the Schedule and limitations step.
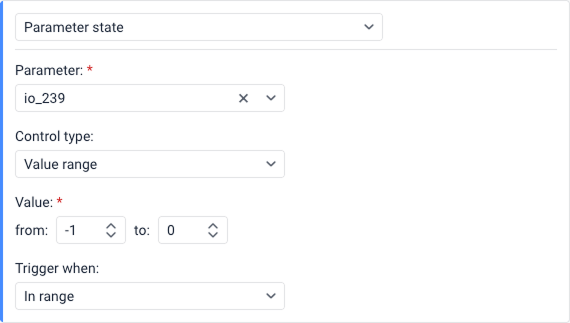
For the Value range type, continue with this steps:
-
Specify the minimum and maximum values of the parameter.
If you want the notification to be activated when the value is not equal to
0, specify0in both fields and select the Out of range activation type. -
Select the activation type:
- In range: The notification is triggered when receiving values which fall in the specified range, including the values specified as minimum and maximum ones.
- Out of range: The notification is triggered when receiving values which don’t fall in the specified range.
Sensor range
This condition allows you to specify a range of sensor values to control whether the received values fall inside or outside of it.
The Sensor range condition will not trigger in the following cases:
- The notification is used to control the values of sensors that use parameters from previous messages.
- The received sensor value doesn’t fall within the interval set in the Upper bound and Lower bound fields in the calculation table. Such values are considered invalid and are not treated as equal to 0.
To configure this condition, follow these steps:
- In the Sensor type drop-down list, select the required sensor type, and/or in the Sensor name field, specify the name mask using special characters (
*and?).
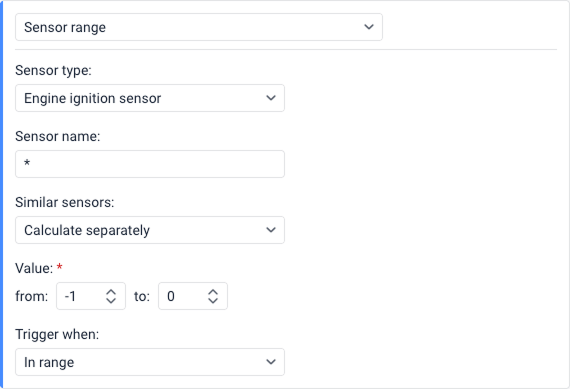
- In the Similar sensors drop-down list, select one of the available options:
- Sum up values: The values of all sensors of the selected type and/or sensors with the same name mask are summed up. Thus, the sum of all values is taken into account before the notification is activated.
- Calculate separately: The values of all sensors of the selected type and/or sensors with the same specified name mask are controlled separately.
- In the Value fields, specify the minimum (from) and maximum (to) values of the sensor. If you need to control a specific value, enter the same number in both fields (for example, from 1 to 1).
- In the Trigger when drop-down list, select the activation type:
- In range: The notification is triggered when receiving values that fall in the specified range, including the minimum and maximum values.
- Out of range: The notification is triggered when receiving values that don’t fall in the specified range.
Sensor value
This condition allows you to specify a value change (delta) to control whether the fluctuation in received values exceeds your set limit or not.
The Sensor value condition will not trigger in the following cases:
- The notification is used to control the values of sensors that use parameters from previous messages.
- The received sensor value doesn’t fall within the interval set in the Upper bound and Lower bound fields in the calculation table. Such values are considered invalid and are not treated as equal to 0.
To configure this condition, follow these steps:
- In the Sensor type drop-down list, select the required sensor type, and/or in the Sensor name field, specify the name mask using special characters (
*and?).
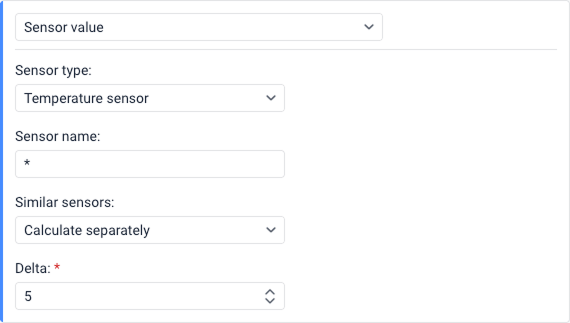
- In the Similar sensors drop-down list, select one of the available options:
- Sum up values: The values of all sensors of the selected type and/or sensors with the same name mask are summed up.
- Calculate separately: The values of all sensors of the selected type and/or sensors with the same specified name mask are controlled separately.
- In the Delta field, specify a threshold value. The notification will trigger when the absolute change between sensor values exceeds (is greater than) this threshold. The change is calculated using the absolute difference (modulo), which means the direction of change doesn’t matter: sensor values can increase or decrease. For example,
|12 − 10| = 2and|10 − 12| = 2. The notification triggers when this absolute change is greater than the Delta value, not when it equals the Delta value.
Setting the delta value correctly
Because the notification triggers when the change exceeds (is greater than) the Delta value, you need to set the Delta slightly below your desired threshold.
Example: If you want the notification to trigger when the value changes by exactly 1, you must specify 0.9 in the Delta field (because a change of 1 is greater than 0.9). If you specify 1.0, the notification will only trigger when the change exceeds 1.0 (such as 1.1, 1.5, 2.0, and so on ), but not when the change equals exactly 1.0.## Battery charging
This condition allows you to monitor battery charges.
In the Sensor masks option, you can specify one or several masks of the sensors that should be used for detecting battery charges and their volume. You can click Add mask to include several sensor masks.
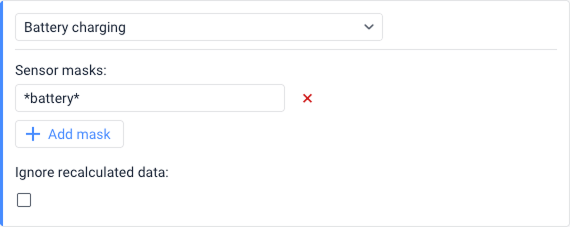
The notification is triggered for each battery level sensor individually.
If the Ignore recalculated data checkbox is enabled, the notification is received only once after a battery charge is detected.
If you want to combine the Battery charging condition with other conditions in a notification, the Battery charging condition must always be selected first.
Fuel drain
A notification of this type allows you to monitor fuel drains.
In the Sensor masks section, you can specify one or several masks of the sensors that should be used for detecting fuel drains and their volume. Click the Add mask button to add an input field for a new mask.
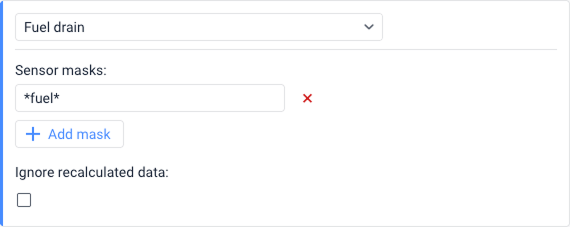
The notification is triggered for each fuel level sensor individually.
If the Ignore recalculated data checkbox is enabled, the notification is received only once after a fuel drain is detected.
If you want to combine the Fuel drain condition with other conditions in a notification, the Fuel drain condition must always be selected first.
Fuel filling
A notification of this type allows you to monitor fuel fillings.
In the Sensor masks section, you can specify one or several masks of the sensors that should be used for detecting fuel fillings and their volume. Click the Add mask button to add an input field for a new mask.
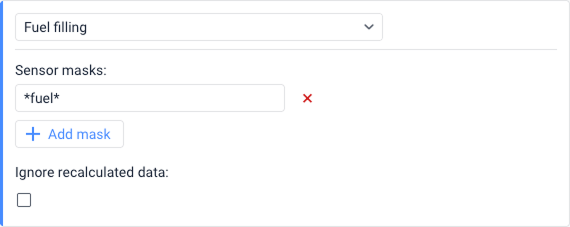
The notification is triggered for each fuel level sensor individually.
If the Ignore recalculated data checkbox is enabled, the notification is received only once after a fuel filling is detected.
If you want to combine the Fuel filling condition with other conditions in a notification, the Fuel filling condition must always be selected first.
Connection status
To configure this condition, follow the steps below:
- In the Notification field, select the event that triggers the condition: Connection loss or Connection restore. You must select at least one option, but you can select both.
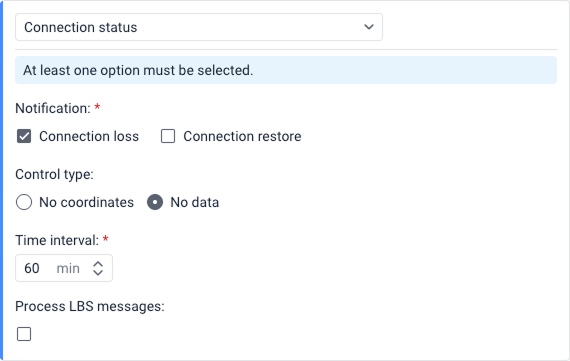
- In the Control type section, select how the connection status should be detected:
- No coordinates: If this option is selected, the connection loss refers to the absence of coordinates in the unit messages or the absence of the messages themselves. It may happen that messages with sensor data are sent but they don’t contain data on the unit location (for example, if the GPS antenna is closed).
- No data: If this option is selected, the connection loss refers to the absence of any messages from the unit.
- In the Time interval field, specify how long the connection loss should last (in minutes) for the condition to be met. The maximum allowed value is 999,999 minutes.
- Select Process LBS messages if you want to use LBS data for triggering notification. LBS data are less accurate, but allow to determine a unit approximate location where GPS signals might be weak or absent. The GPS data still is used if available.
Health status
This condition allows you to monitor the state of the unit device.
To configure this condition, select one or more of the following status checkboxes under the Trigger when the device status changes to: section. At least one option must be selected:
- Healthy: The condition is met when the unit device doesn’t meet any criteria configured on the Health check tab.
- Need attention: The condition is met when an incident that meets one or more criteria is registered for the unit device. Enable the Trigger notification for each incident option to generate a notification each time when an incident is registered within the Need attention status.
- Unhealthy: The condition is met when all the configured criteria on the Health check tab are met.
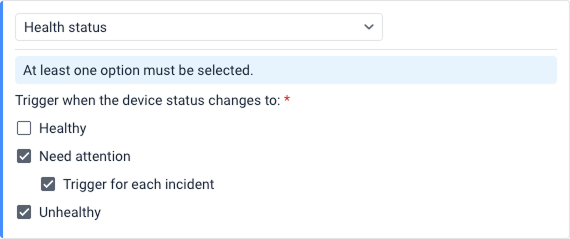
This condition can’t be combined with others.
The text of the triggered notification indicates the reason for the device status change.
To learn about the past device status changes, you can run the Health check incidents report table.
Message limit
Using this condition, you can control the number of messages received from the unit during a certain time interval. These can be regular messages with data (coordinates, sensor values, etc.) or SMS messages.
To configure this condition, follow the steps below:
- Select the type of messages to monitor: Data messages or SMS messages.
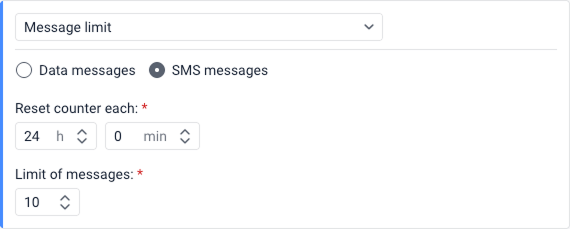
- In the Reset counter each field, specify the time interval (in hours and minutes) for which you want to set a limit on messages.
- In the Limit of messages field, specify the maximum number of messages allowed before the condition is met.
Example: In the example from the image above, the SMS messages option is selected. The Reset counter each field is set to 24 h, and the Limit of messages field is set to 10.
As a result, this condition will be triggered if the unit sends more than 10 SMS messages within a 24-hour interval, after which the message counter resets.
This condition can’t be combined with others.
SMS
This condition is triggered when an SMS message is received from the unit.
To configure this condition, use the SMS text field to define the specific message content you want to monitor.
- By default, an asterisk (
*) is specified in this field, meaning the condition will be triggered by any incoming SMS message. - You can specify a text mask so that the condition is met only if the received SMS message contains the specified text. This is particularly useful if, for example, the device sends an SMS message with specific error codes or content in case of a malfunction.
This condition can’t be combined with others.
Driver assignment
This condition allows you to monitor when drivers are assigned to units or separated from them.
This condition can’t be combined with others.
To configure this condition, select either the Assignment or Separation option. If you need to monitor both assignments and separations, you must create two separate conditions.
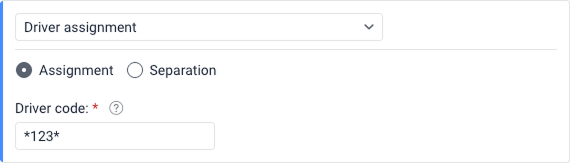
- Assignment: The condition is triggered when a driver is assigned to a unit.
- Separation: The condition is triggered when a driver is separated from a unit.
For both options, the Driver code field becomes available. Here, you can specify the driver code or its text mask to trigger the condition only when that specific driver is assigned or separated. You can enter several codes or code masks separated by commas without spaces. By default, an asterisk (*) is specified in this field, which means the condition applies to all drivers.
No driver assigned
This condition allows you to trigger a notification only if no driver is currently assigned to the unit.
The No driver assigned condition can’t be used on its own as the primary condition. It can only be selected as the second or third condition when combining multiple conditions. This is useful, for example, when you want to ensure a notification for a specific event (like speeding or movement) is triggered only if the vehicle is operating without an assigned driver.

To configure this condition, simply select No driver assigned from the condition drop-down list. There are no additional parameters or text fields required for this specific condition.
Passenger assignment
This condition allows you to monitor when passengers are assigned to the unit (check-in) or separated from it (check-out).
This condition can’t be combined with others.
To configure this condition, follow these steps:
- Select the event you want to monitor by checking the Check-in and/or Check-out boxes. You must select at least one option, but you can choose both to monitor check-ins and check-outs simultaneously.
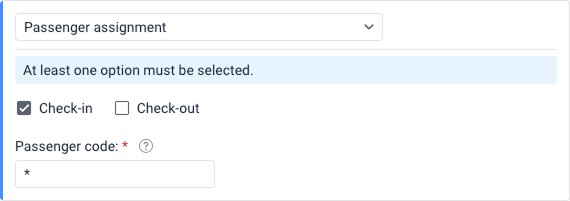
- If you want the condition to trigger for a particular passenger, specify their code or its text mask in the Passenger code field. You can enter several codes or code masks separated by commas without spaces.
By default, an asterisk (*) is specified in this field, which means the condition applies to all passengers.
Check-out notifications are not triggered if a passenger is automatically separated from the unit after the time specified in the Automatic separation field expires. Besides, the assignment interval is considered incomplete in the reports on passengers in this case.
Passenger not separated
This condition is triggered if any passenger of the selected resource hasn’t got off the vehicle (that is, hasn’t been separated from the unit) within the specified timeout. The timeout is counted from the exact moment the passenger is assigned to the unit.
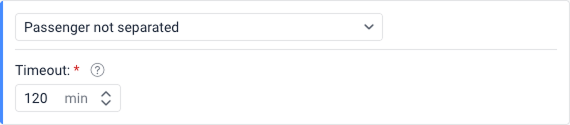
This condition can’t be combined with others.
Trailer assignment
This condition allows you to monitor when trailers are assigned to the unit or separated from it.
This condition can’t be combined with others.
You can configure this condition in the same way as the Driver assignment condition.
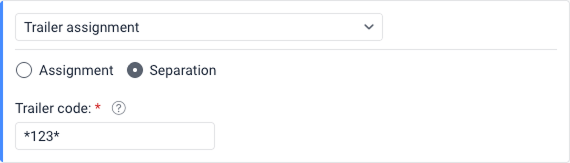
To configure this condition, select either the Assignment or Separation option. If you need to monitor both assignments and separations, you must create two separate conditions.
- Assignment: The condition is triggered when a trailer is assigned to a unit.
- Separation: The condition is triggered when a trailer is separated from a unit.
For both options, the Trailer code field becomes available. Here, you can specify the trailer code or its text mask to trigger the condition only when that specific trailer is assigned or separated. You can enter several codes or code masks separated by commas without spaces. By default, an asterisk (*) is specified in this field, which means the condition applies to all trailers.
Maintenance
This condition is used to monitor the services created on the Service intervals tab of the unit properties.
To configure this condition, follow these steps:
- In the Type section, select when you want the condition to be met: Service term approach (before the service term) or Service term expiry (after the service term).
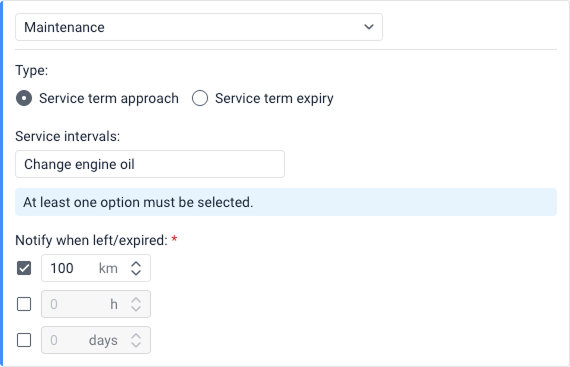
- In the Service intervals field, specify the name of the service for which you want to configure the condition. To specify several names, use a text mask. By default, an asterisk (
*) is specified, meaning the condition is applied to all created intervals. - Under the Notify when left/expired section, check the corresponding boxes to specify how many kilometers (
km), hours (h), and/ordaysshould be left (or should pass) for the condition to be triggered. At least one option must be selected.
Example: Vehicle maintenance must be performed every 15,000 km, so a service interval by mileage with a value of 15,000 km has been created for the unit. Also, a condition for the approaching deadline with a value of 1,000 km has been configured. Assuming that the mileage is counted from 0, the condition will be triggered when the mileage reaches 14,001 km.
Condition particularities
- This condition can’t be combined with others.
- The maintenance condition is triggered only once when at least one of the conditions specified in step 3 is fulfilled.
- After performing maintenance work, register it using the event registrar or in the unit properties so that the term is counted again.
- If the condition is created for several or all service intervals, it will no longer be triggered if at least one of those services becomes overdue.
Conditions of this type are not triggered if:
- You specify the name of at least one overdue service when creating the notification.
- The unit for which the notification is created doesn’t have any messages with location data.
Route activity
This condition is used to monitor the unit movement along the route.
To configure this condition, follow these steps:
- In the text fields provided, you can specify the name mask for the Route name, Schedule name, and/or Ride name. By default, an asterisk (
*) is specified in each field, which means the condition applies to all routes, schedules, and rides.
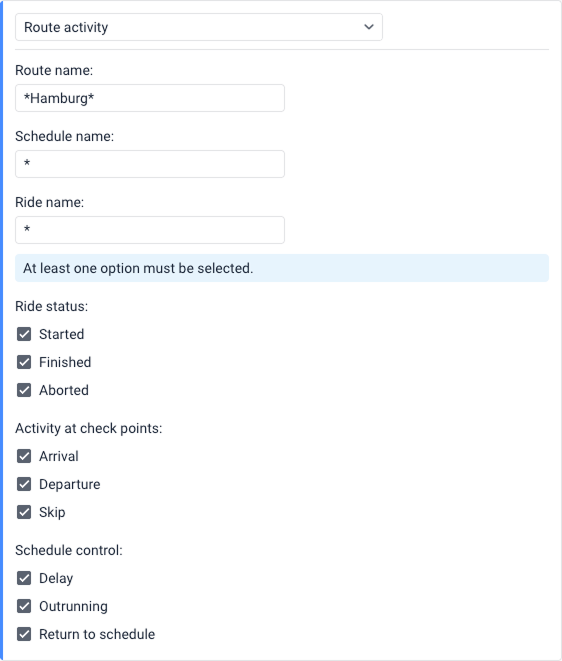
- Select the specific route changes you want to monitor by checking the relevant boxes. At least one option must be selected across the following categories:
- Ride status: Monitor when a ride is Started, Finished, or Aborted.
- Activity at check points: Monitor an Arrival, Departure, or Skip at check points.
- Schedule control: Monitor a Delay, Outrunning, or Return to schedule.
This condition can’t be combined with others.