Configuring checklist-related widgets for customers in FleetSpace
Who can do it: Service provider
Where: Wialon Platform FleetSpace
Wialon Platform FleetSpace allows you to customize the information displayed in the device list, device details, driver list, and driver details pages by adding and configuring various widgets. These widgets provide quick access to key data, analytics, and actions relevant to your fleet operations.
To configure widgets in a customer workspace, log in as this customer from Studio and follow instructions from the sections below.
Checklist-related widgets on the “Devices” page
You can add checklist-related widgets to both the device list and the device details page.
In the device list
In the device list, you can add the following widgets:
- The Assign checklist action to manually assign checklists to the device.
- The Checklist status (chip) widget to display information about the last updated checklist or all assigned checklists.
To add widgets to the device list, go to the Devices page and enable the editor mode. To quickly find the widget in the list, start typing its name in the Search bar.
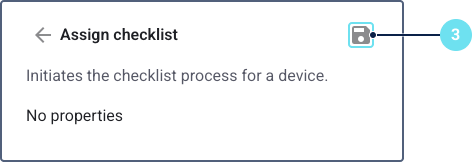
“Assign checklist” widget
To add the Assign checklist widget:
- Click on any of the icons
 in the device list, or the icon
  if your action widgets are lined up in the device row.
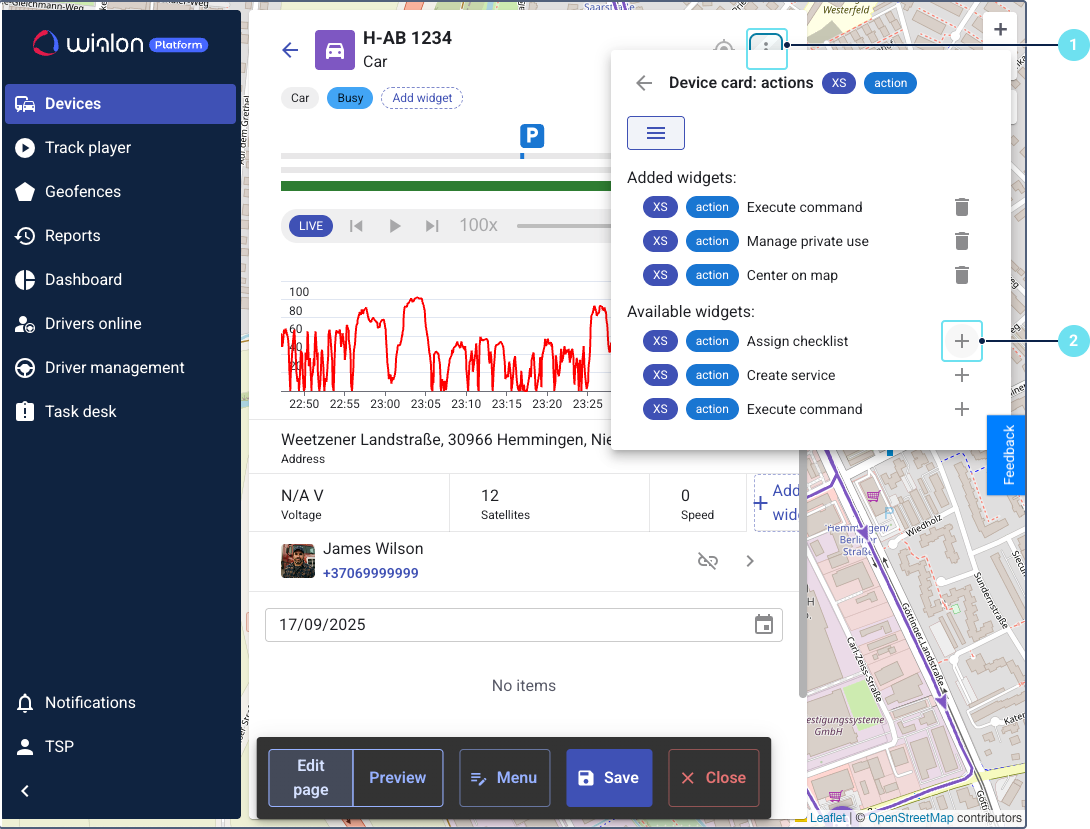
- Select Assign checklist.
- Click on the icon
 .
.
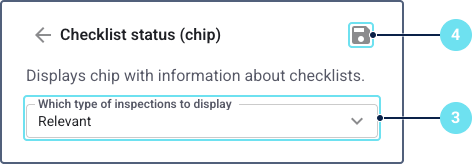
“Checklist status (chip)” widget
To add the Checklist status (chip) widget:
- Click Add widget in any device section in the device list.

- Select Checklist status (chip).
- Select whether you want to display all assigned checklists or only the last updated one.
These settings apply to all devices in the device list.
In the device details
In the device details, you can add the following widgets:
- The Assign checklist action to manually assign checklists to the device.
- The Checklist status (chip) widget to display information about the last updated checklist or all assigned checklists.
- The Assigned checklists list to see all assigned checklists for the device.
- The Submitted checklists list to view past inspection submissions for the device.

To add these widgets, go to the Devices page, click on any device, and enable the editor mode. To quickly find the widget in the list, start typing its name in the Search bar.
“Assign checklist” widget
To add the Assign checklist widget:
- On the device details page, click on the icon .
- Select Assign checklist.
- Click on the icon to save the changes.

“Checklist status (chip)” widget
To add the Checklist status (chip) widget:
- On the device details page, click Add widget under the device name.
- Select Checklist status (chip).
- Select whether you want to display all assigned checklists or information about the last updated checklist.
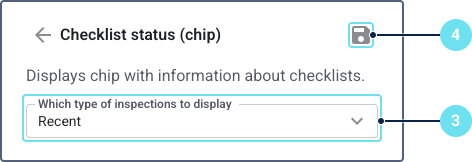
- Save the changes.
“Assigned checklists” widget
To add the Assigned checklists widget:
- On the device details page, click Add widget.
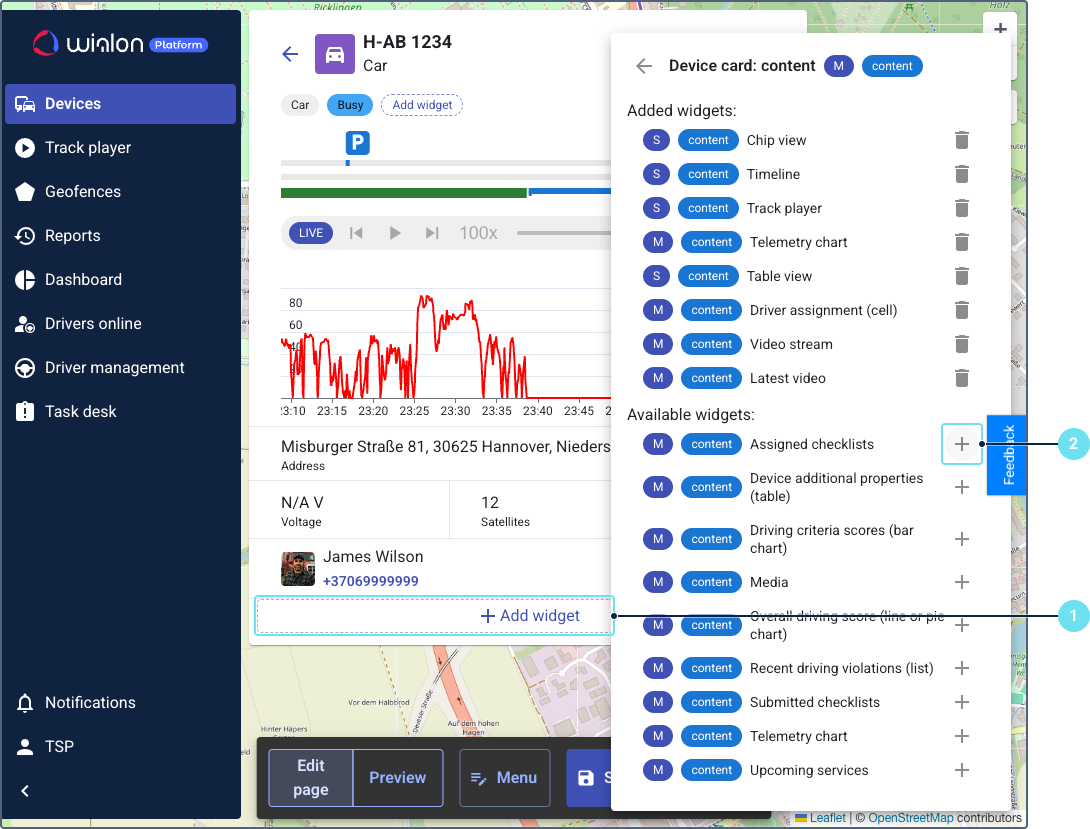
- Select Assigned checklists.
- Click on the icon to save the changes.
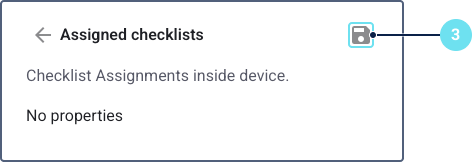
If there are more than five assigned checklists, the widget displays only the first five. To go to the Reports page and view the complete list, click the See all assigned checklists on Reports link at the bottom of the widget.
“Submitted checklists” widget
To add the Submitted checklists widget:
- In the bottom of the device details page, click Add widget.
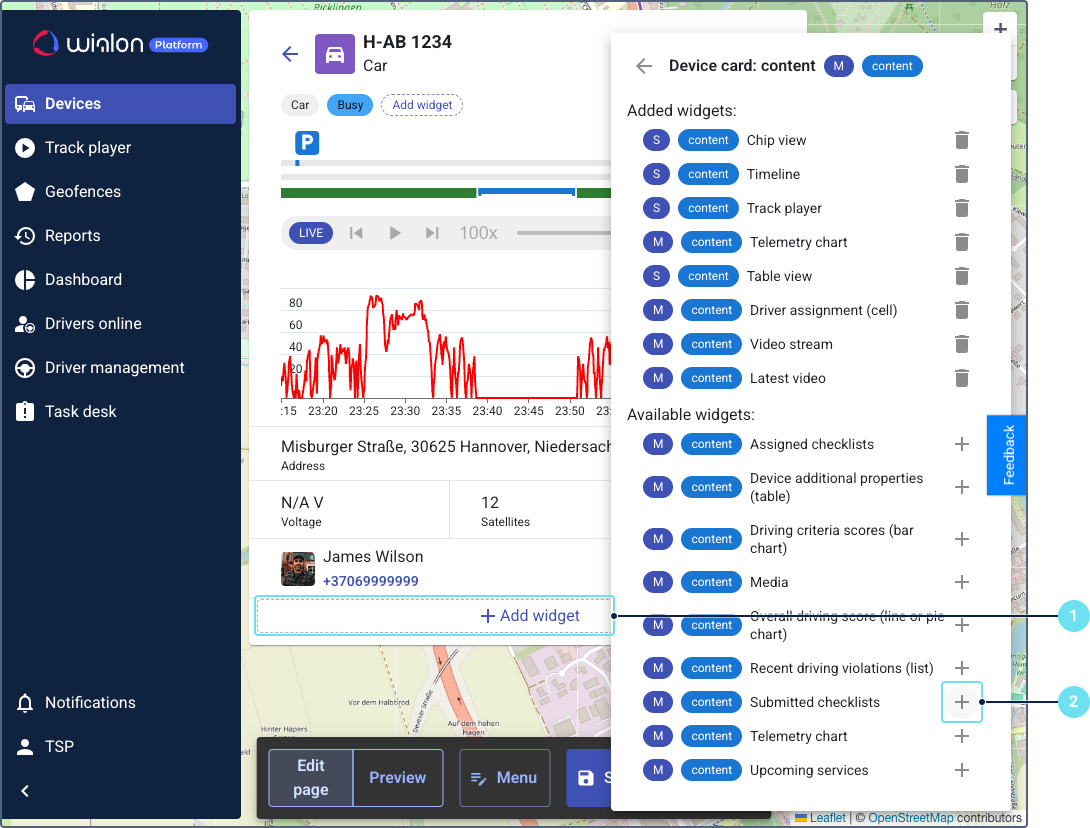
- Select Submitted checklists.
- Click on the icon to save the changes.

If there are more than five submitted checklists, the widget displays only the first five. To go to the Reports page and view the complete list, click the See all submitted checklists on Reports link at the bottom of the widget.
Checklist-related widgets on the “Drivers online” page
You can add checklist-related widgets to both the driver list and the driver details page.
In the driver list
In the driver list, you can add the following widgets:
- The Assign checklist action to manually assign checklists to the driver.
- The Checklist status (chip) label to display information about the last updated checklist or all assigned checklists.
To add these widgets, go to the Drivers online page and enable the editor mode. Then, follow the instructions from Checklist-related widgets in the device list.
In the driver details
In the driver details, you can add the following widgets:
- The Assign checklist action to manually assign checklists to the driver.
- The Checklist status (chip) label to display information about the last updated checklist or all assigned checklists.
- The Assigned checklists list to see all new checklists assigned to the driver.
- The Submitted checklists list to view the checklists submitted by the driver.
To add these widgets, go to the Drivers online page, click on any driver section and enable the editor mode. Then, follow the instructions from Checklist-related widgets in the device details.
Checklist-related widgets on the Dashboard
The Dashboard page provides an overview of your fleet performance and key metrics. You can add the following charts related to checklists to monitor inspection trends and results:
- Checklist overview (pie chart): Displays the total number of submitted checklists and categorizes them by their status: all items passed, with failed items, or rejected.
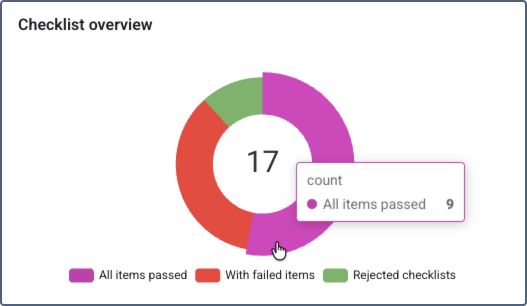
Click a chart segment to view the list of vehicles that have submitted checklists with the selected status and the submitted checklist total number. Also, you can go to the Checklist reports from the details. - Failed checklists by type (pie chart): Displays the distribution of failed checklist items by the type of checklist (template).
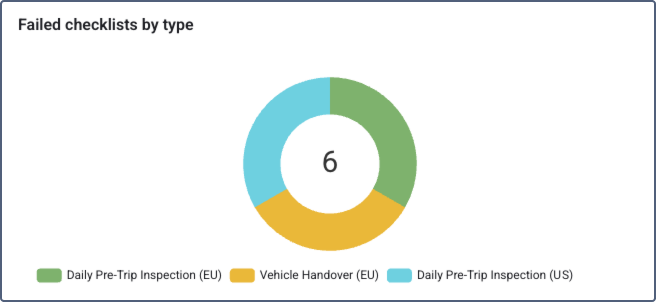
Click a chart segment to see the vehicles that failed the selected checklist type and total number of submitted checklists for this type. Also, you can go to the Checklist reports from the details. - Failed checklists by vehicle type (pie chart): Shows the distribution of submitted checklists with failed items, categorized by vehicle type labels. Devices without an assigned vehicle type appear in Without types.
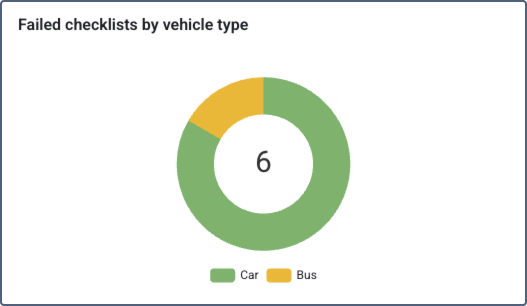
Click a chart segment to see the devices of the selected type with failed checklists and total number of submitted checklists. Also, you can go to the Checklist reports from the details. - Failed checklists over time (line chart): Displays the trend of failed checklists over a selected period, helping to identify recurring issues.
 Click a data point to see the vehicles with failed checklists and total number of submitted checklists. Also, you can go to the Checklist reports from the details.
 - Vehicle checklist results (pie chart): Provides a summary of vehicle conditions based on submitted checklists. It categorizes vehicles into two groups: those in good condition (all checklist items passed) and those with problems (at least one failed item).
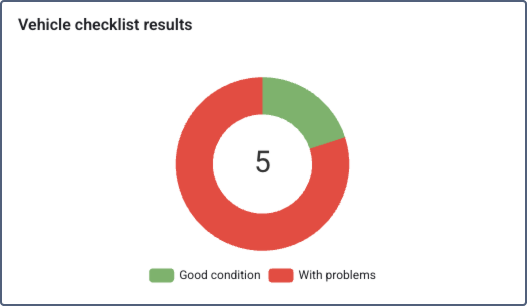
Click a chart segment to view the vehicles in the selected group, number of failed, rejected and total submitted checklists for each vehicle. Also, you can go to the Checklist reports from the details.
In all widget details views, you can sort the data by clicking a column header and download it in CSV format.
To add checklist-related charts to the Dashboard:
- Go to the Dashboard page and enable the editor mode.
- Click Add widget.
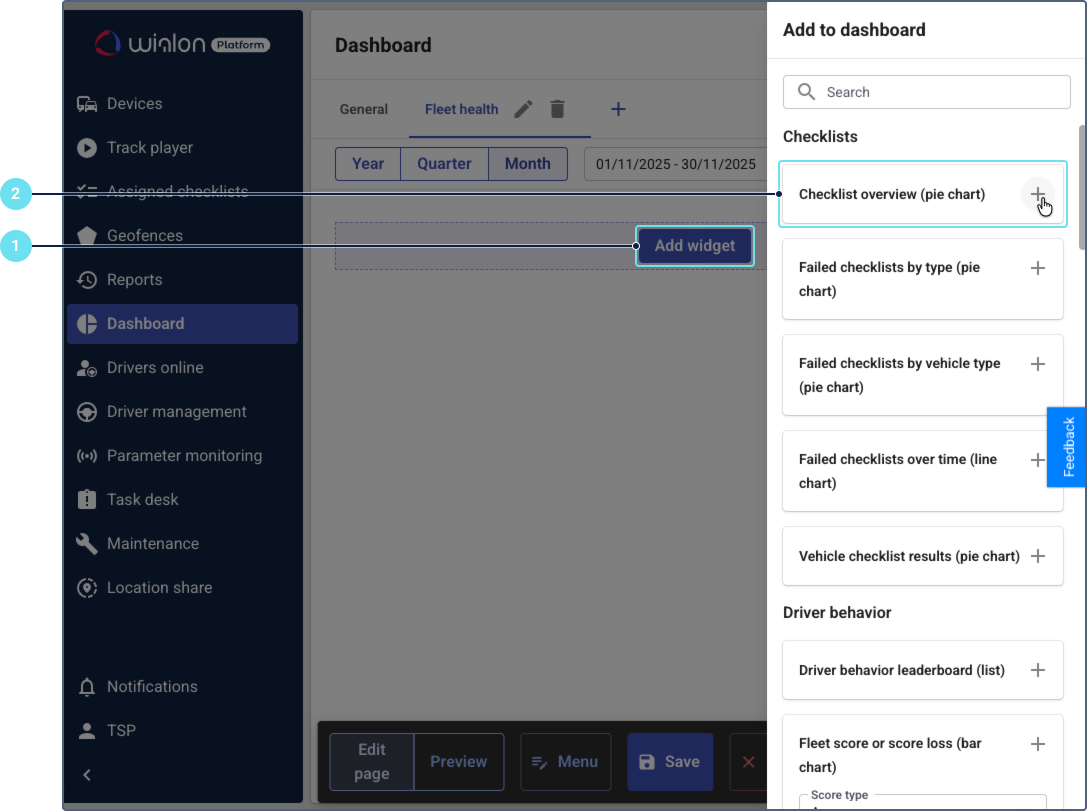
- Select the required checklist chart from the list (for example, Checklist overview (pie chart), Failed checklists over time (line chart), and so on). No specific configurations are required for the checklist widgets.
- Save the changes.