Configuring device telemetry
This guide will walk you through the process of configuring device telemetry to translate raw data into meaningful, visually structured information.
Telemetry data is all the information collected from your devices, such as speed, temperature, voltage and others. This information is collected in Sensors. To make setup easier, you can create sensor templates to apply the same data configuration across multiple devices.
Configuring and visualizing sensors includes the following tasks:
Setting up device telemetry
A telemetry preset saves a predefined configuration of telemetry parameters and formatting rules for a specific device model.
First, define how the platform should interpret data from your devices:
-
In Wialon Platform Studio, navigate to the Customers page.
-
Select the customer whose device you want to configure.
-
Go to the Devices tab.
-
Select a device.
-
Go to the Sensors tab.
-
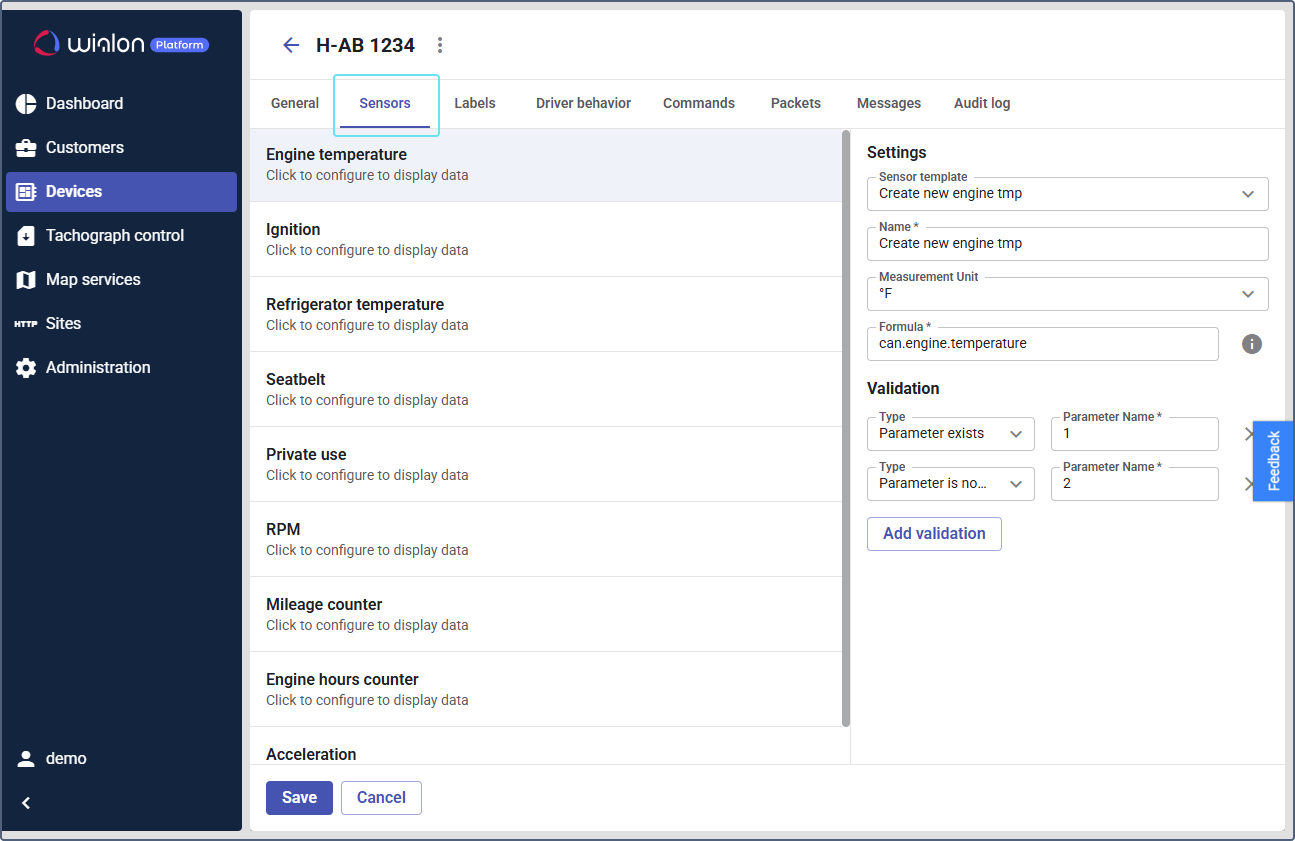
Select a sensor type on the left, for example,
Ignition. -
In the Settings field on the right, select a Sensor template. To create a new one, select Create new in the bottom of the list.
-
Configure the following parameters:
- Name:
- Measurement unit: Set the unit, if necessary.
- Formula: Specify the parameter or define the formula to calculate the value. See the detailed instructions on the Creating a new sensor template page.
- Validation: Add validation condition to confirm accuracy. In the Type field, select if the parameter exists or not. In the Name field, indicate the name of the parameter.
-
Click Save to save your template.
Advantages of templates:
- Consistency: Apply a single template to all devices of the same model, ensuring uniform data processing and display.
- Simplified configuration: When customizing the device display, you can add preconfigured data types (for example,
Ignition) instead of raw parameters.
Setting up device profiles
After configuring sensors in Wialon Platform Studio, you can customize how it is displayed in Wialon Platform FleetSpace.
A device has two configurable views:
- Device list: Overview of all devices.
- Device details: Details of a single device.
You can use chips and widgets to customize both views.
- Chips: Small, color-coded indicators for at-a-glance status.
- Widgets: Larger blocks that display detailed data, often with charts.
Customizing the device list
The device list is customized with chips for quick, real-time summaries. Sensor chips provide quick summaries of each device’s key stats, helping you spot issues at a glance.
To add a telemetry chip:
-
Log in as a customer and navigate to the Devices page.
-
Click the icon
 in the sidebar to enable the editor mode. For more information on the editor mode, see the page Using editor mode.
 -
In any device row click the Add widget slot.
-
Locate the Sensor chip and click the icon
 in its row.
 -
In the Sensor type field, select the sensor type you’ve just set, for example,
Ignition.
-
Enable the option Use sensor name as title to use the default sensor name, or disable it to give a custom name to the chip.
-
Under Thresholds, define the icon and color for two states: on and off.
-
Click the icon
 in the top-right corner of the window to add the telemetry chip to the device’s row.
Now you can monitor the vehicle ignition in the devices list. You can add multiple sensor chips to monitor other data.
Learn how to add other widgets to the device list on the Setting up widgets in the device list page.
Customizing the device details
The device details shows a device dashboard with chips (summary data) and widgets (detailed data such as speed, temperature, ignition, and voltage).
To add a chip:
- From the device list, open the device details.
- Click the icon in the sidebar to enable the editor mode.
- In any top row click the Add widget slot.
- Add the Sensor chip as described above.
Now you can monitor the vehicle ignition in the devices list. You can add multiple sensor chips to monitor other data.
To add a widget:
-
Click Add widget in the device details body.
-
Select a widget (for example,
Telemetry cell).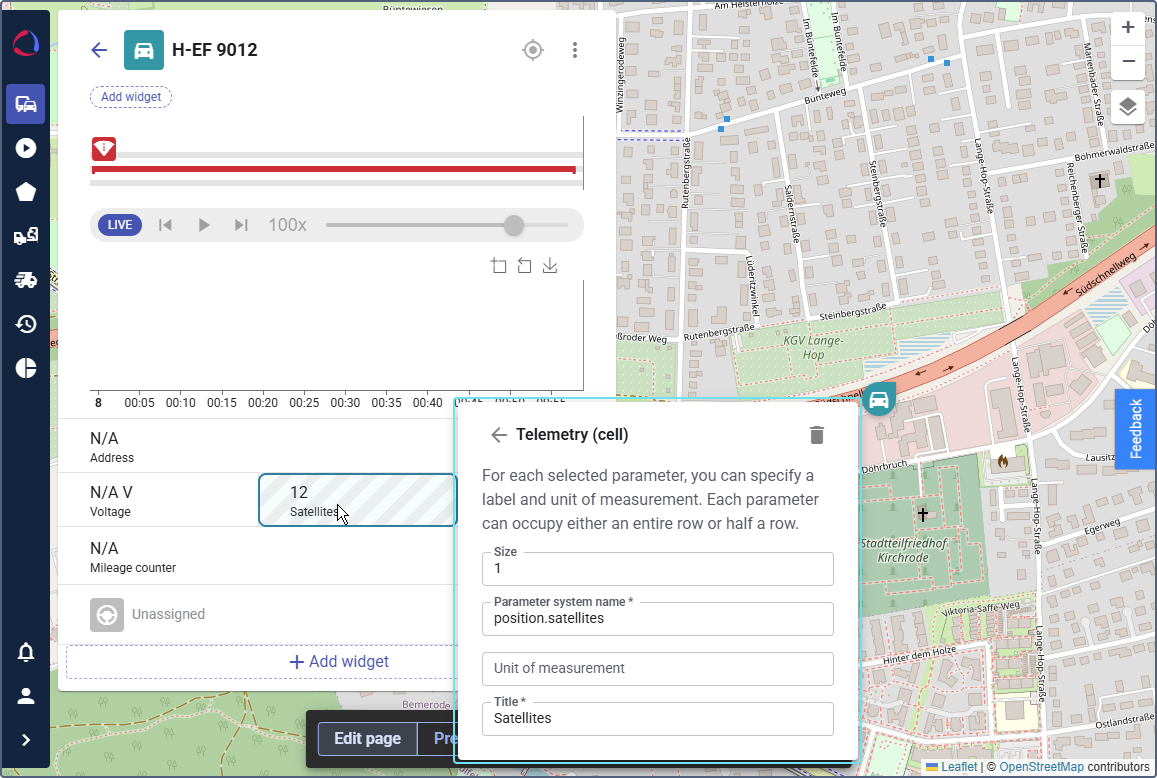
-
In the new window, select a Size for the cell, which determines how much space it occupies.
-
Select a Parameter system name from the dropdown menu. This is the data point you want to display (for example,
position.satellites). -
You can optionally enter a Unit of measurement for the parameter.
-
Provide a Title for the telemetry cell (for example,
Satellites). -
Click the icon
 in the top-right corner to add the telemetry cell to the device’s row.
Now you can view satellite data in a cell within the device details main body.
Learn how to add other widgets to the device details on the Setting up widgets in the device details page.
Using telemetry data on the Track player page
The Track Player page visualizes historical trips with event icons generated directly from telemetry data. These icons mark critical occurrences such as speeding or harsh driving.
You can customize the data displayed on the Track player page using the editor mode.