Connecting hardware
To start receiving data from your trackers, you must create devices in Wialon Platform Studio. A device is the digital representation of a physical tracker, and a channel is the entry point that receives data for a specific protocol.
You create devices in a wizard that also prepares the channels for you, so you don’t need to configure them separately. Select one of the two methods:
- Creating devices automatically: set up a connection for the selected brands or gateways. Use this method to onboard many trackers at once.
- Adding one device manually: enter the tracker model, IMEI, and vehicle details before the tracker connects. Use this method for a single tracker with specific settings. Adding a single device allows you to assgn a customer at the same time.
If you already have a Wialon Hosting account with configured units, you can mirror the devices instead.
You can connect up to 100 devices. To increase the limit, send a request to support@wialon.com. For other restrictions, see Limitations.
To start, open the All devices page in Wialon Platform Studio and click New device. If you have no devices yet, select the creation method on the empty page.
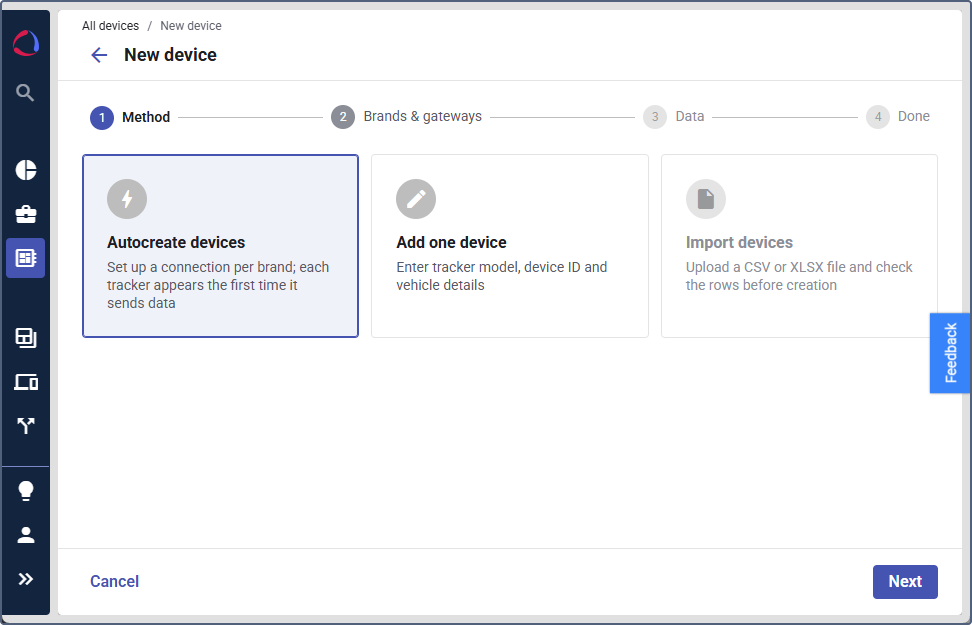
Creating devices automatically
With this method, you don’t create channels yourself: the wizard creates the channels for the selected brands with automatic device creation turned on, or reuses the ones you already have.
Devices created by this method are created without an assigned customer, even if you start the wizard from the Customers page. Assign them after they connect (see Assigning the devices to customers).
Selecting the brands and gateways
-
Select Autocreate devices and click Next.
-
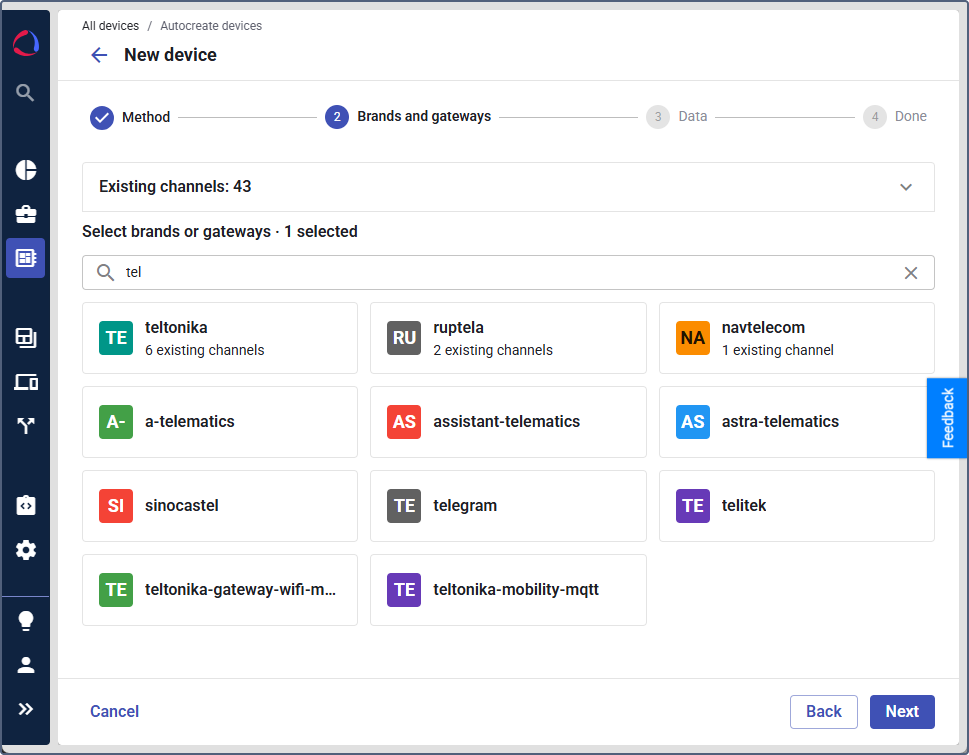
Select the brands or gateways of your trackers in the grid. Each brand shows the number of the existing channels for this protocol. To find a brand that isn’t in the grid, use the search field or click Show all brands and gateways.
-
If a channel for the selected brand already exists, confirm what to do with it:
- Create for all: Create a new channel in addition to the existing one. A second channel is necessary only for distinct TTL, TLS, or IP filters. Additional unused channels may expose open ports.
- Create only new: Reuse the existing channel and create channels only for the brands that don’t have one.
-
Click Next.
Setting up the telemetry
On the Data step, check the channels to be created and select how the sensors are configured for the devices after they connect:
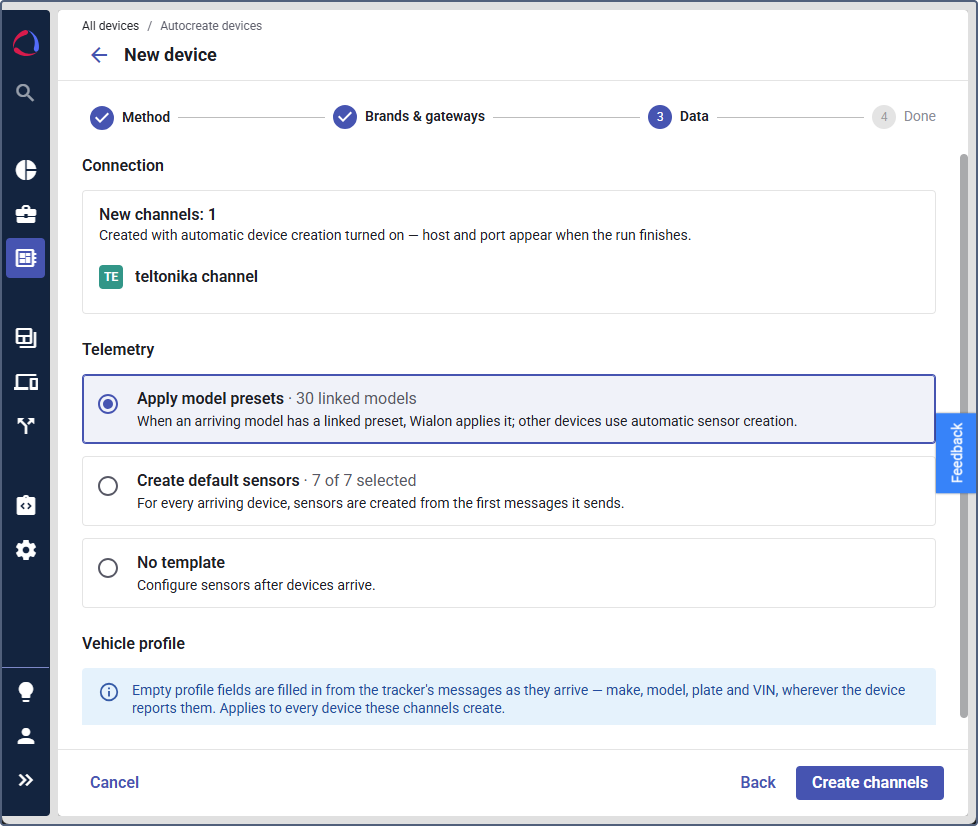
- Apply model presets: If an added model has a linked telemetry preset, the platform applies it. The other devices get the default sensors selected by Wialon Platform.
- Create default sensors: Default sensors are created together with the devices. Click Choose sensors to select which of them you need: Ignition, Engine temperature, Voltage, Battery level, Acceleration, Mileage, and Engine hours.
- No template: No sensors are created. You configure sensors after the devices are added.
Click Create channels.
Pointing the trackers to the platform
On the Done step, find the Point the trackers here section and copy the host and port of each channel. You can also copy the address later on the Channels page using the icon  .
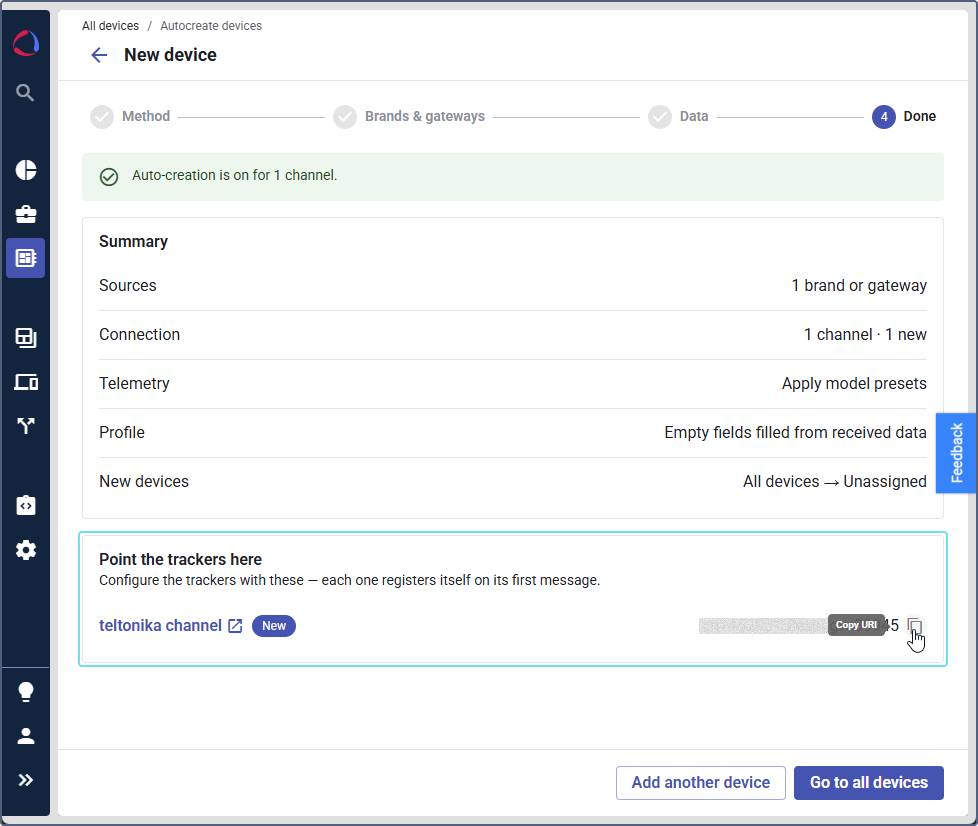
Use these values to configure your trackers. The process varies by manufacturer and may involve sending an SMS command or using configuration software.
Example (for WiaTag):
- Open the WiaTag application.
- Select Wialon Local at the top of the screen.

- In the Unique ID field, enter a name for your new device.
- Set a password.
- Enter the URI details into the Host and Port fields.
- Click Sign in.

When a tracker sends its first message, the device appears on the All devices page.
For an example with Teltonika Configurator and for channels with specific settings (message TTL, IP filters, TLS certificates, or post-processing), see Connecting devices to a channel.
Assigning the devices to customers
Automatically created devices have no customer, so assign them after they connect. Until then, they aren’t billed.
- Open the All devices page.
- In the devices list, click the selection icon
 .
- Select the devices you want to assign.
Automatically created devices are named by their identifier and are marked by the tag autocreated. Optionally, you can rename them to something descriptive (for example,
Service Van 102). Click the device row, edit the device name in the Monitored object section and click Save.
- Click the Bulk action button.

- Select Move to customer.
- Select the customer name from the dropdown list.
Customers see the assigned devices in Wialon Platform FleetSpace. For details, see Managing devices in bulk.
Adding one device manually
Use this method when you have the tracker data and want to fill it in before the device connects. You can select the customer during the creation, so no separate customer assignment is needed.
Filling in the details
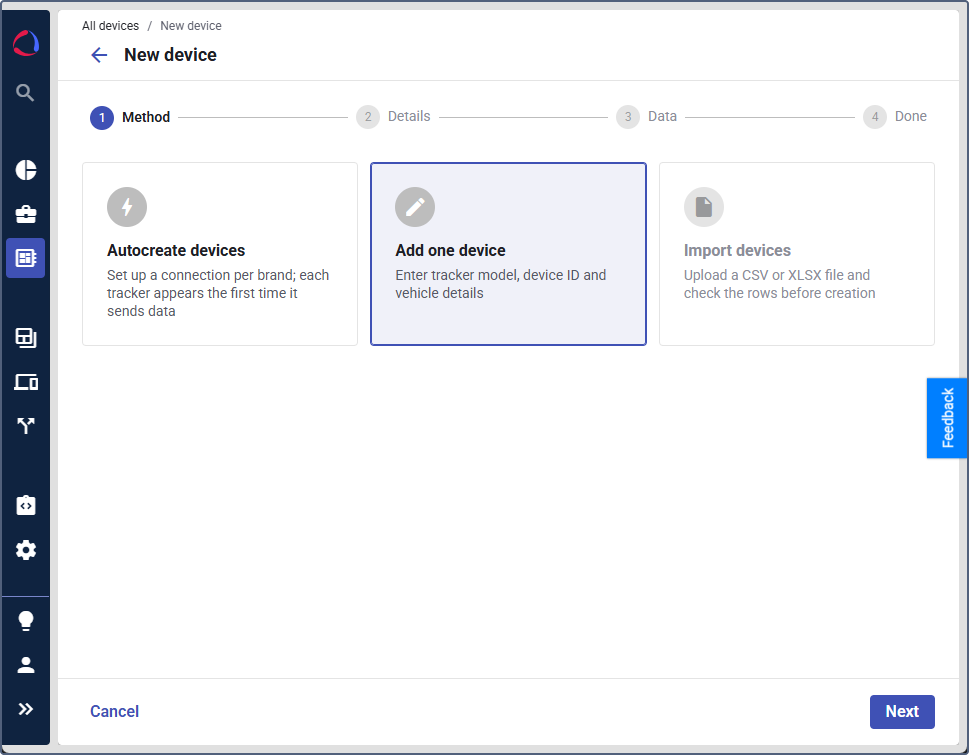
- Select Add one device and click Next.
- In the Model field, search for the tracker by model or vendor (for example,
FMC640, Teltonika) and select it from the list. Under the field, the platform shows whether a channel for this model already exists or a new one is created. - In the IMEI field, enter the 15-digit identifier of the tracker. It must be unique within your account.
- (Optional): Enter the vehicle name and select the icon and color of the device. If you leave the name blank, the IMEI is used instead.
- In the Customer field, select the account to which the device belongs. You can select the customer later: until then, the device isn’t billed.
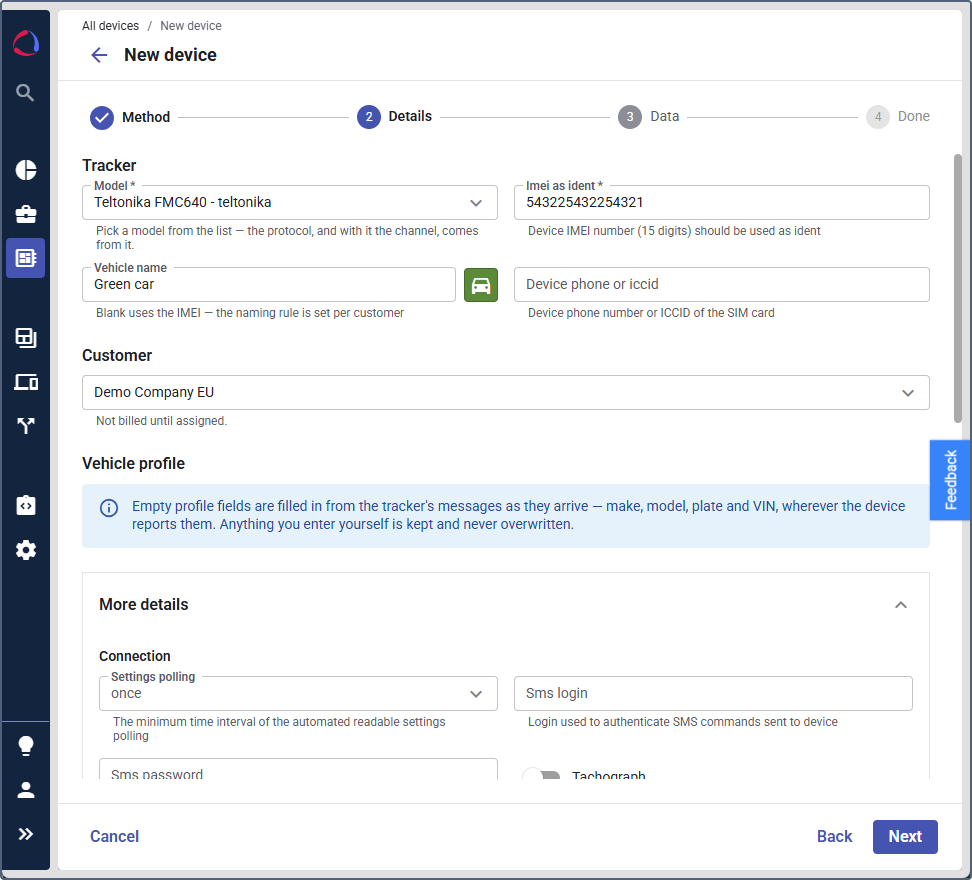
- (Optional): Expand More details and fill in the vehicle profile: vehicle type, VIN and plate, make and model, fuel type and emissions, dimensions and weight. See Managing the device profile.
- (Optional): If the model supports tachograph functionality, turn on the Tachograph switch and set the automatic file request parameters. See Configuring tachograph functionality for a device.
- Click Next.
Setting up the telemetry
- On the Data step, select how the sensors are configured for the device:
- Apply model presets: If the model has a linked telemetry preset, the platform applies it. Otherwise, the device gets the default sensors selected by Wialon Platform.
- Create default sensors: Default sensors are created together with the devices. Click Choose sensors to select which of them you need: Ignition, Engine temperature, Voltage, Battery level, Acceleration, Mileage, and Engine hours.
- No template: No sensors are created. You configure sensors after the device are added.
- Click Create device.
Pointing the tracker to the platform
On the Done step, find the Point the tracker here section and copy the host and port of the channel. Use these values to configure the tracker with the manufacturer software or by SMS command. Make sure that the physical tracker and the device you created have the same IMEI.
When the device sends its first message, it starts displaying the received messages and the Online indicator turns on.
For the full guide on both methods, see Creating devices.
Mirroring devices from Wialon Hosting
If your hardware is already configured in a Wialon Hosting account, you can copy the raw device data and redirect it to a Wialon Platform channel. To use this option, you need a Wialon Hosting top account.
-
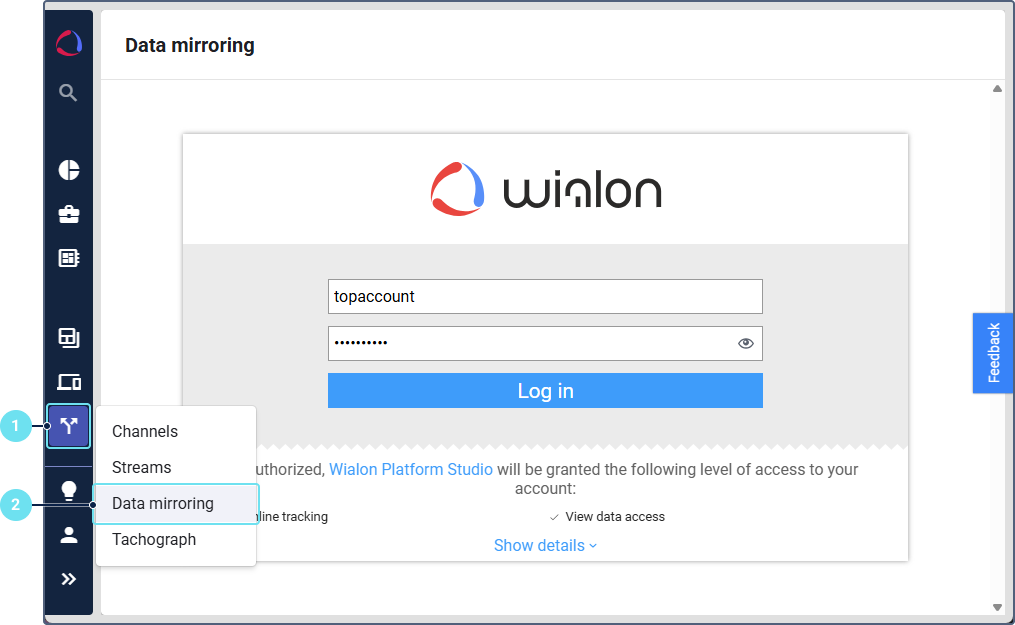
In Wialon Platform Studio, click the Connectivity section.
-
Open the Data mirroring page.
-
Log in with the username and password of your Wialon Hosting top account.
-
Find the account you want to mirror. The platform checks which units can be transmitted. If some of them can’t, hover over the icon in the Transmittable units column to see the details. A unit is incompatible if its device model isn’t supported in Wialon Platform or if it has no unique ID (IMEI).
-
Click Mirror.
You can’t send commands to mirrored devices.
The channels and a customer named after the Wialon Hosting account are created automatically, with all compatible devices assigned to this customer. For details, see Mirroring devices from Wialon Hosting.
What’s next
After the devices send their first messages, continue with Configuring device telemetry.