Customizing task details
Who can do it: Service provider
Where: Wialon Platform FleetSpace
To enhance the task details page for your customers, you can add various widgets that provide real-time data, historical context, and quick access to device information.
Customization steps
To customize the task details page for a customer, follow these steps:
- Log in to Wialon Platform FleetSpace as the customer for configuration purposes.
- Navigate to the Task desk page.
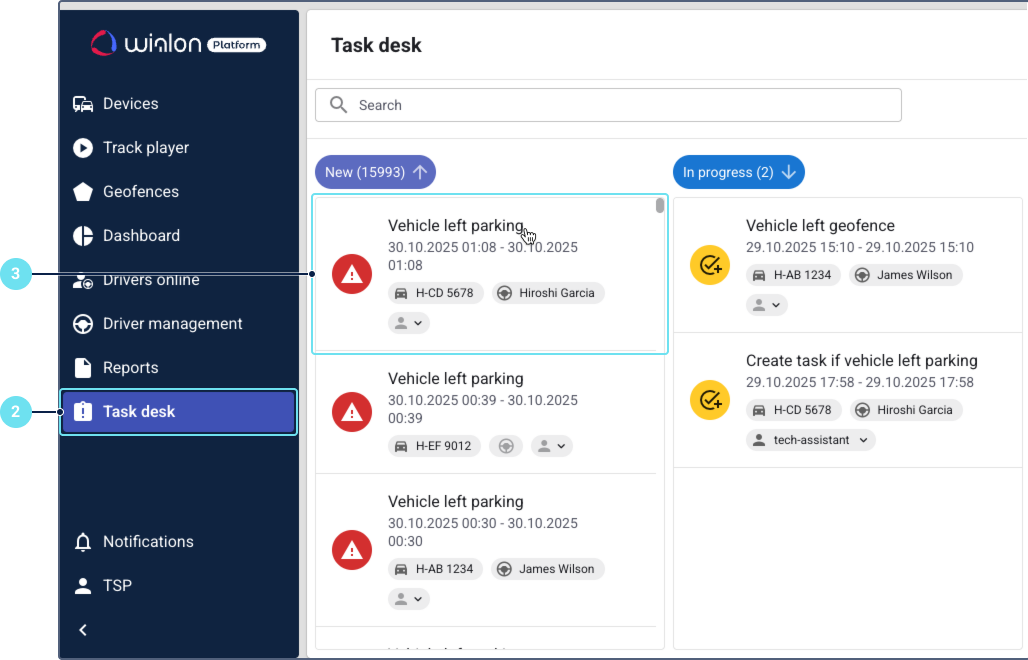
- Click on any task to open its details.
- (Optional): Click on the service provider name in the left bottom corner to ensure the required workspace is selected. If you need to create a new workspace, see the guide on creating a new workspace.
- Click the icon
 in the sidebar to enable the editor mode. The page is now ready for customization.

- Click Add widget.
- Select and configure the required widdgets. See the Available widgets section below for details on each widget type.
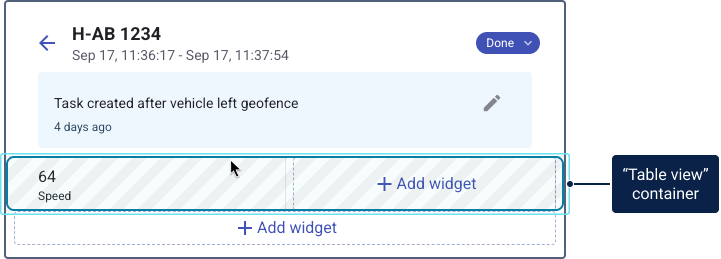
To add table widgets (like Counter (cell), Sensor (cell) and Telemetry (cell)), you first need to add a Table view container. You can add as many cell widgets as required. Use search by widget name to quickly find the required widget.
- After adding and configuring all widgets, click the button
 in the editor mode toolbar at the bottom of the page.
Available widgets
You can add the following widgets to the task details page:
- Media: Displays a list of media files (videos and photos) with a calendar for navigation.
- Timeline: Provides a chronological view of events.
- Track player: Plays back the historical track of a device.
- Telemetry chart: Visualizes telemetry data over time in a chart format. See how to configure this widget in the Adding the “Telemetry chart” widget section.
- Table view (container): A container required to hold table widgets.
- Assigned driver (cell): Displays the name of the driver assigned to the device. Requires the Table view container.
- Checklist status (cell): Displays information about the last updated checklist or all assigned checklists associated with the device. Requires the Table view container.
- Connection status (cell): Displays the current connection status of the device. Requires the Table view container.
- Counter (cell): Displays data from a pre-configured sensor of the Engine hours counter or Mileage counter type. Requires the Table view container. See how to configure this widget in the Configuring the “Counter (cell)” widget section.
- Driving score by device (cell): Displays the driving score calculated for the device based on the driving behavior criteria. Requires the Table view container. See how to configure this widget in the Configuring driver behavior widgets page.
- Geofence count (cell): Displays the number of geofences that a device is currently located in. Requires the Table view container.
- Labels (cell): Displays the labels assigned to the device. Requires the Table view container.
- Last updated time (cell): Displays the last time the device sent data to the server. Requires the Table view container.
- Motion state (cell): Displays the current motion state of the device (for example, moving, parked). Requires the Table view container.
- Private use (cell): Displays the current private use status of the device. Requires the Table view container.
See how to use task detail widgets in the Widgets for analyzing task events section.