Customizing a driver profile view
Who can do it: Service provider
Where: Wialon Platform FleetSpace
In Wialon Platform FleetSpace, you can customize the driver profile across different sections using the editor mode.
When the Tachograph control module is enabled for the customer account, the driver details on the Drivers online page are split into two tabs: General and Tachograph. The widgets you configure in the editor mode appear on the General tab. The Tachograph tab displays real-time driving and rest data and isn’t customizable through the editor mode. For details, see Viewing driver tachograph details.
Widgets available with the “Drivers” module
| Location | Widgets |
|---|---|
| Dashboard | Driver mileage (bar chart), Current driver assignments (pie chart), Mileage by driver (bar chart), Moving vehicles by driver assignment (pie chart) |
| Driver details | Driver additional properties (table); Assigned vehicle (chip); Assigned driver (chip), Driver timeline (widget), Track player (widget) |
| Drivers list, map item | Uninterrupted driving time; Driver list entry; Driver profile links; Driver assign links; Driver assignment (cell) |
Configuring the widgets for the driver profile
The driver profile on the Drivers online page in Wialon Platform FleetSpace has two views: drivers list and the driver details. You can add and customize various widgets to fill out the driver’s profile in both views.
To enter the editor mode for the drivers profile:
- Log in as a customer to Wialon Platform FleetSpace from your service provider account in Wialon Platform Studio.
- Open the Drivers online page.
- (Optional): Ensure you are in the necessary workspace. Click on your username or the icon
 in the sidebar and select the workspace, if necessary.
 - Click the icon
 to enable the editor mode.
Now you are ready to customize the driver profile.
Adding content and actions to the driver list
The Driver list entry widget is used to display a driver in the list. It has two main slots: actions and content.
To add content and actions to the list view:
-
Click on a driver name in the list.
-
Click on the
actionsorcontentslots to see a list of available widgets you can add. -
Select the desired widgets to add them to the driver’s profile in the list. For example, the
Driver assign linksorDriver profile linkswidgets can be added to theactionsslot. To find the necessary widget by name, use the Search bar in the list of widgets.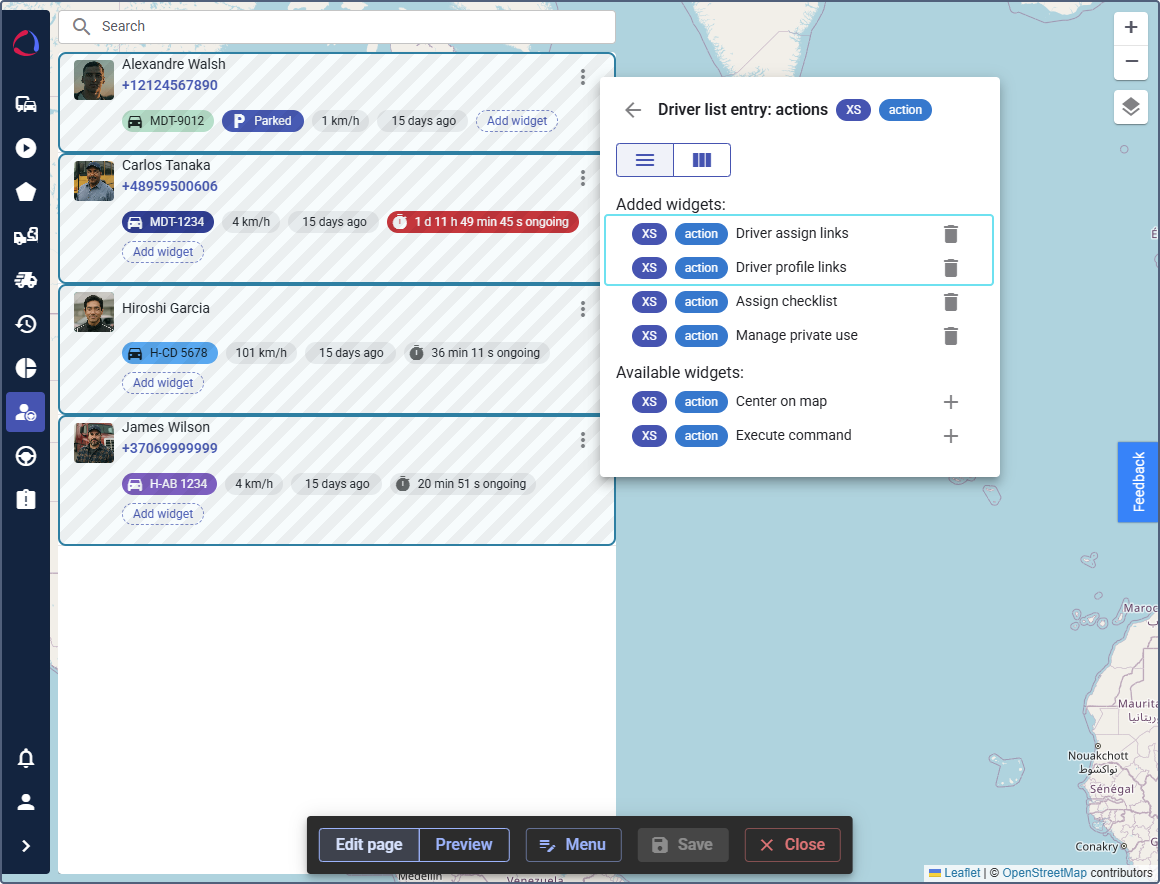
Adding widgets to the driver details
In the driver details view, you can add more detailed information and functionality. To do this:
-
Click the button
 in the editor mode toolbar to enter the driver details view.
 -
Click the Edit page button to continue editing.
-
To add widgets to the main body of the driver details, click the Add widget button.
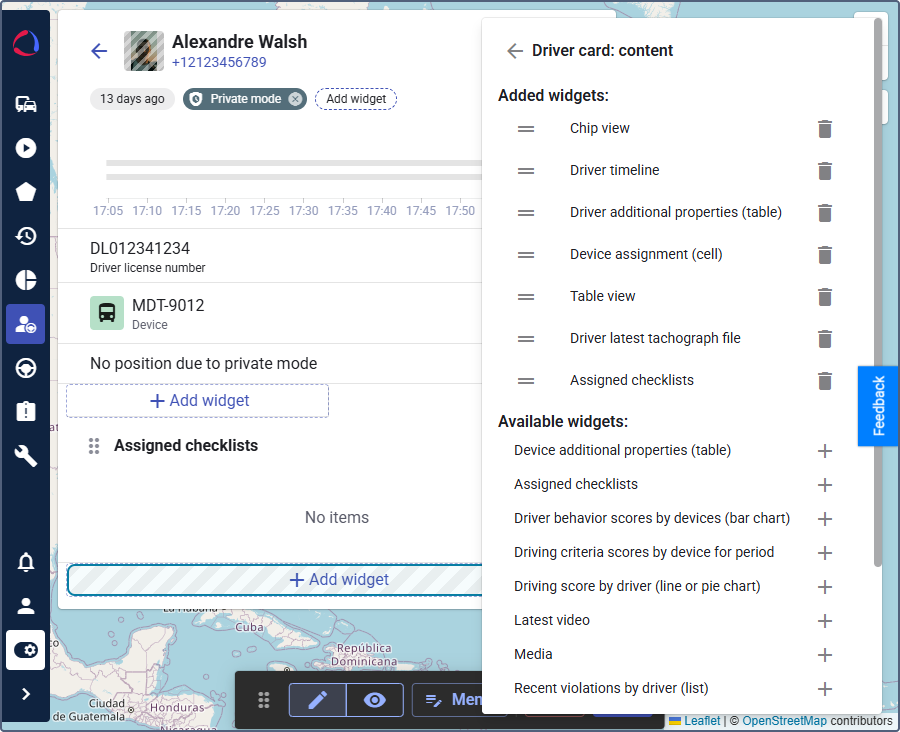
-
A new panel will open, allowing you to select and configure different widgets. To find the necessary widget by name, use the Search bar in the list of widgets. For example, you can add:
- Driver timeline: This widget displays events on a timeline in real time. It contains such configuration options as Show assignments, Show connection loss, Show parkings, Show private mode, and Show trips.
- Device assignment (cell): This widget displays the currently assigned vehicle to the driver.
- Driver additional properties (table): This widget displays the additional properties of the selected driver. You can specify the fields to be displayed in the widget settings.
- Driver latest tachograph file: This widget displays the latest tachograph file and allows downloading it.
- Track player: This widget allows playing tracks in real time or for the last trip period.
- Recent trips (card or list view): Provides information about recent trips and parking intervals. Many other widgets are similar to those available for devices. See Customizing devices in Wialon Platform FleetSpace.
-
To configure an added widget, click on it in the driver details view. A sidebar will open on the right, providing the widget’s properties and slots for customization.
-
Click the button
 in the editor mode toolbar to save the changes.
Adding driver widgets to the Dashboard
To configure the widgets for the Dashboard page:
- Enable the editor mode on the Dashboard page.
- Click Add widget at the bottom of the page and add the driver-related widgets.
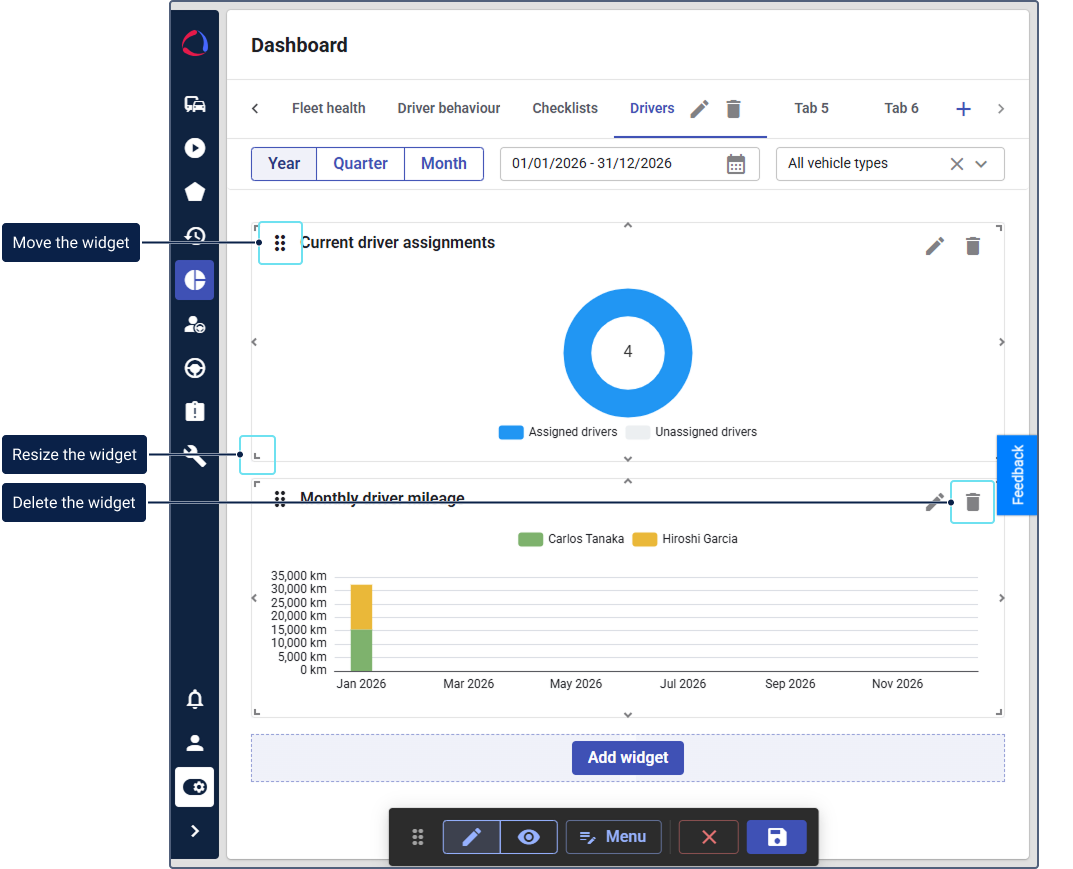
- Use the editor mode tools to move, resize or delete widgets.
- Click the button
 in the editor mode toolbar to save the changes.
You can now manage the driver list and details view, as well as driver information on the Dashboard page.
The following driver-related widgets are available for the Dashboard:
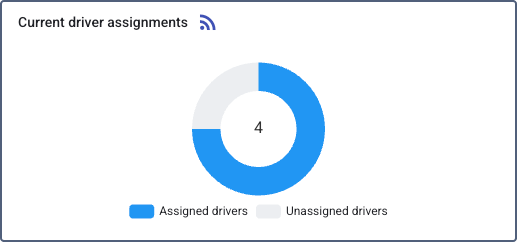
Current driver assignments (pie chart)
Displays a pie chart with the number of drivers split into two segments: Assigned drivers and Unassigned drivers. Click a chart segment to view the real-time list of drivers for the selected category, including driver name, assigned device, and assignment period. For unassigned drivers, the details show their last known assignment if available. You can also go to the Driver management page from the details.
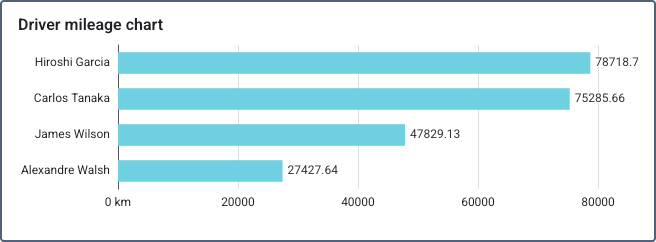
Driver mileage (bar chart)
Displays a bar chart of mileage accumulated by each driver over the selected period. Add {{Period}} to the widget title to automatically insert the current period name.
Click a chart bar to view a table with each driver’s total distance, trip count, and number of assignments for that period. You can also go to the Trip report and the Assignments page from the details.
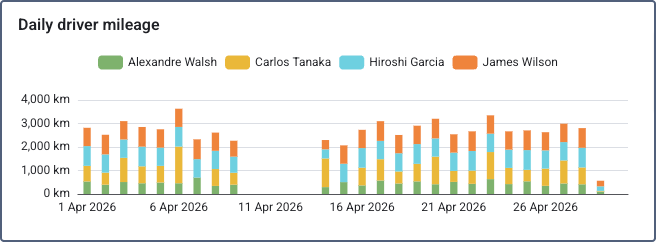
Mileage by driver (bar chart)
Displays the total mileage accumulated by each driver. Click a chart bar to view detailed mileage information for the selected driver, including devices, distance and trip count. You can also go to the Trip report from the details.
Moving vehicles by driver assignment (pie chart)
Displays a pie chart with the number of currently moving vehicles split into two segments: Drivers assigned and Drivers not assigned. Click a chart segment to view the vehicles in the selected category, including the device name, the assigned driver, and the trip start time. For vehicles without an assigned driver, the Driver column displays –.

In all widget details views, you can sort the data by clicking a column header and download it in CSV format.