Managing the device profile
Who can do it: Service provider
Where: Wialon Platform Studio
After a device is created, you can manage its profile in the device details. To open the device profile, go to the Devices page and click the required device in the list.
The device details open on the Profile tab and contain the following tabs:
| Tab | Description |
|---|---|
| Profile | Device, vehicle, assignment, and billing information grouped into cards. This guide covers this tab. |
| Sensors | Sensor configuration for the device. |
| Data | Messages and raw packets received from the device. |
| Tachograph | Tachograph files and file requests. |
| Log | The audit log of the device. See Recent activity. |
The available tabs and cards depend on the device assignment and on the modules included in the customer’s billing plan.
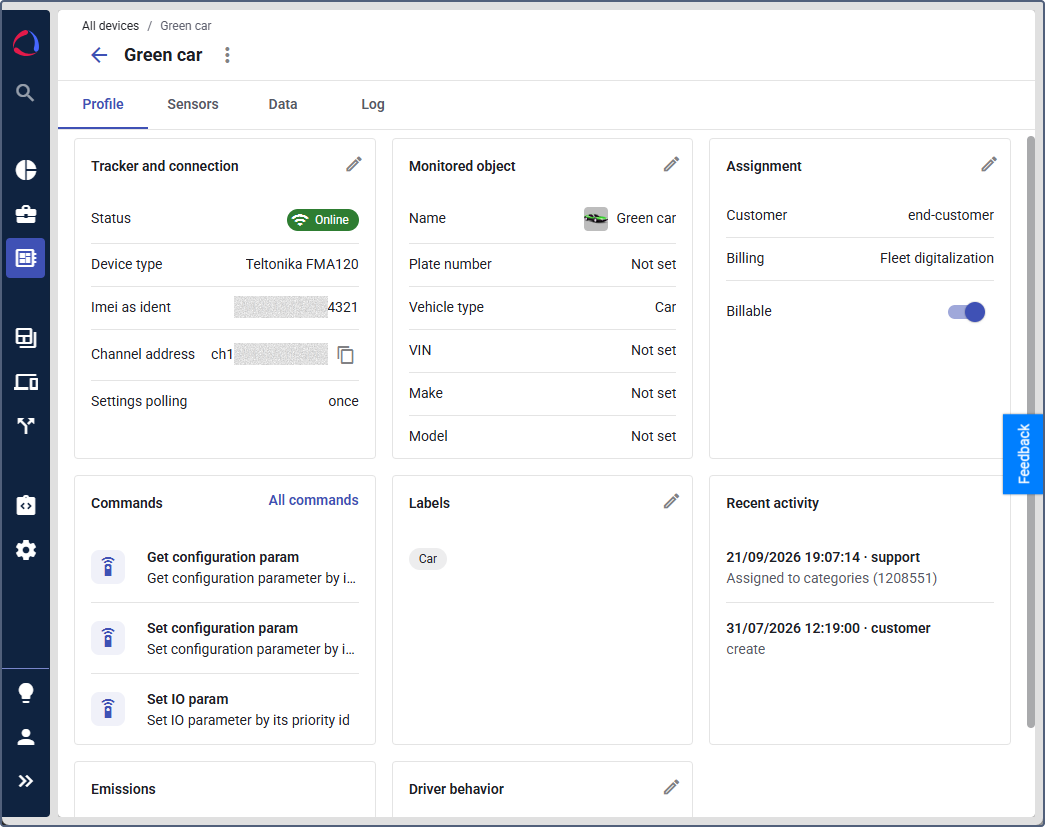
Profile
The Profile tab gives an overview of the device and the vehicle it’s installed in. If there are problems with the device (for example, the channel is disabled or the device hasn’t sent any message yet), the notifications appear at the top of the tab together with the action you need to take.
If the device has configured sensors, their latest values are shown above the cards. If a sensor doesn’t report a value, it’s shown as N/A.
To change the information in a card, click the icon  in its header. If you don’t have permission to update the device, the edit icons are replaced with view icons
  , and the values open in view-only mode.
Tracker and connection
The card shows the connection status of the device, the device type, the ident, the channel address, and the settings polling period. To copy the channel address, click the copy icon next to it.
Monitored object
The card shows the details of the vehicle the tracker is installed in. Enter the general vehicle properties when you create a device. After you save the device, you can add more properties in the editing window.
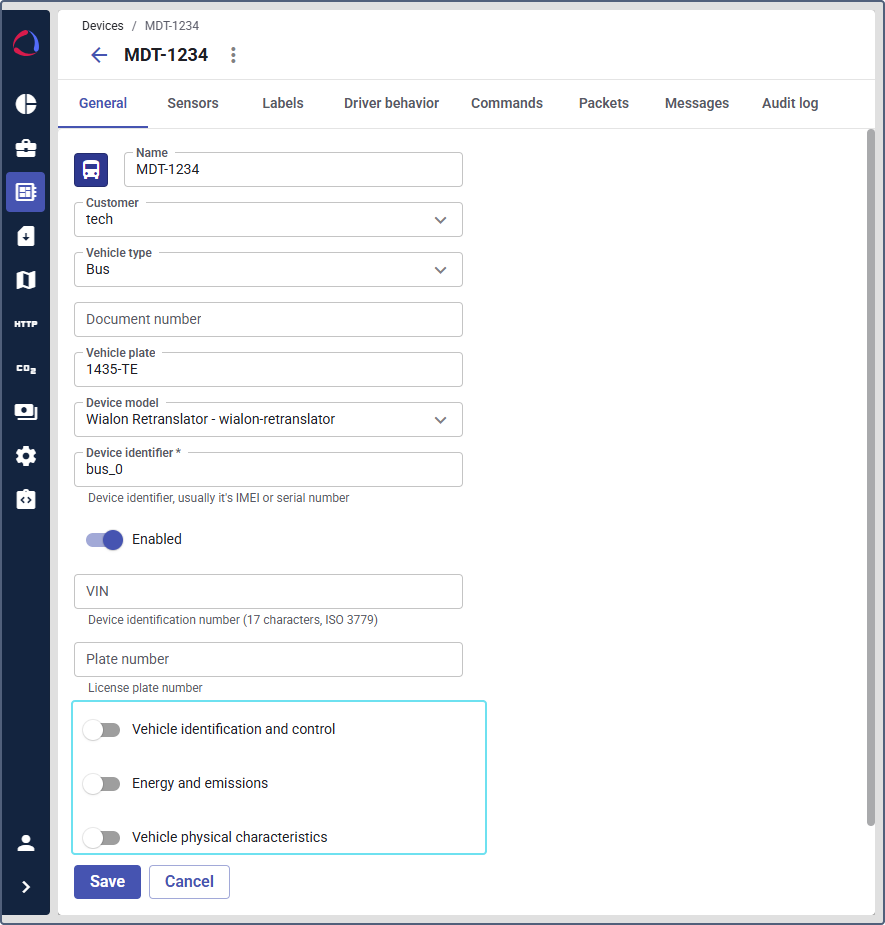
The following fields are available:
- Vehicle type: Select a vehicle type: car, truck, pickup, bus, van, or tractor.
- Plate number: License plate number of the vehicle.
- VIN: Vehicle Identification Number (17 characters, ISO 3779 format, numbers and uppercase letters excluding I, O, Q). The VIN can be entered manually or filled in automatically from incoming telemetry data. If the VIN received from telemetry doesn’t match the value entered manually, the platform displays a mismatch indicator next to the field.
Detailed identifiers and physical characteristics are grouped into the following sections: vehicle identification and control, energy and emissions, and vehicle physical characteristics.
Vehicle identification and control
To show extended vehicle fields, enable the Vehicle identification and control toggle and provide the following information:
- Make: The vehicle manufacturer. For example, Mercedes-Benz.
- Model: The vehicle model. For example, Citaro G (O530).
- Manufacture year: The year the vehicle was produced. For example, 2022.
- Operational control status: Ownership or lease arrangement used for emissions reporting. Click to select from the list: Owned, Finance lease or Operating lease (Controlled).
Energy and emissions
This section is available only if the Emissions module is enabled for the customer.
To show the fields in this section, enable the Energy and emissions toggle and provide the following information:
- Fuel type (required): The fuel or energy source for the vehicle. Available options are: Gasoline, Diesel, Biodiesel, Hybrid, Electric, Petrol, LNG, or LPG. This field is required to calculate emissions.
- Normative fuel consumption (required): The fuel or energy consumption rate for the device. Enter the value in whole or decimal numbers (for example, 32.5). The unit of measurement is selected in the Consumption unit field below. Use the value from your operational experience or the vehicle manufacturer’s technical specifications. This value is used to estimate emissions when the fuel volume sensor isn’t configured or doesn’t provide enough data.
- Consumption unit (required): The unit used to track the consumption rate across distance or operating hours. Available options are: l/100km (liters per 100 kilometers) or l/1eh (liters per 1 engine hour).
- Emission standard (optional): The regulatory emission class for environmental compliance. The following emission standard options are available:
- Europe (EU): Euro 1, Euro 2, Euro 3, Euro 4, Euro 5a, Euro 5b, Euro 6b, Euro 6c, Euro 6d-Temp, Euro 6d, Euro 6e, Euro 7.
- USA Federal (EPA Tier): Tier 0, Tier 1, Tier 2, Tier 3, Tier 4.
- USA California (CARB LEV/ZEV): LEV I, LEV II, LEV III, LEV IV, ZEV.
The platform uses two data sources to calculate emissions: actual fuel consumption from the fuel volume sensor and estimated consumption based on mileage or engine hours. If the fuel volume sensor data is available, the platform uses it. Otherwise, it falls back to the normative fuel consumption specified here. For details on how emissions are calculated, see Emissions.
Vehicle physical characteristics
To show the vehicle dimensions and weight, enable the Vehicle physical characteristics toggle and provide the following information:
- Gross weight: Total weight of the vehicle in kilograms (kg).
- Length: Vehicle length in millimeters (mm).
- Width: Vehicle width in millimeters (mm).
- Height: Vehicle height in millimeters (mm).
Customizing the device color and icon
You can set a custom icon and color for each device. The selected icon and color are displayed for this device in the device list, device profile, and on the map in both Wialon Platform FleetSpace and the Wialon Platform mobile app.
To customize the device icon:
- Navigate to the Devices page and select the device.
- In the Monitored object card, click the edit icon and then click the device icon next to the Name field.
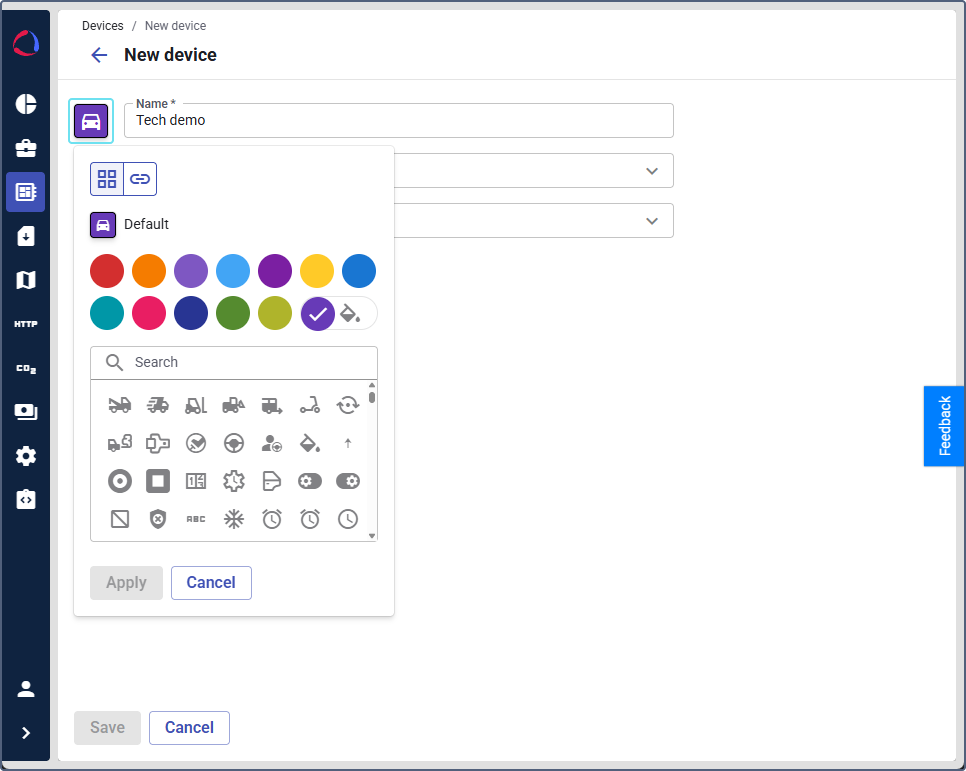
- In the icon settings, select a color for the device icon. Select one of the available colors from the palette (red, orange, blue, light blue, purple, yellow, teal, pink, olive, green, or dark blue) or set a custom one.
- (Optional): To set a custom color, click the color picker icon at the end of the color palette. In the color picker, you can:
- Enter a HEX color code (for example,
#673ab7) in the input field at the top. - Drag the pointer across the gradient area to adjust the saturation and brightness.
- Use the hue slider at the bottom to select the base color. Click Apply to confirm the custom color, or Cancel to discard it. To return to the preset color palette, click the back arrow.
- Enter a HEX color code (for example,
- Select an icon from the gallery below. Use the Search bar to filter the available icons by name. The gallery includes icons for various vehicle types (cars, trucks, buses, vans, tractors, motorcycles) and other vehicle categories.
- Click Apply to save the changes, or Cancel to discard them.
The Default section at the top of the window cancels all the custom settings and sets the default configuration.
The icon and color you set here define the base appearance of the device. On the map, the icon shape can change dynamically based on the device movement state.
Assignment
The card shows the customer the device is assigned to, the customer’s billing plan, and whether the device is billable. To change the billable status, use the toggle in the card. To move the device to another customer, click the edit icon and select the customer.
If the device isn’t assigned to a customer yet, the card explains that billing starts only after the assignment.
Commands
The card shows the most frequently used commands for the device. To see the full list of commands grouped by section, click All commands. After you send a command, a message confirms whether the request succeeded or failed.
The list of available commands depends on the protocol the device uses. To learn more about the device commands, see the Commands section for your protocol in flespi documentation.
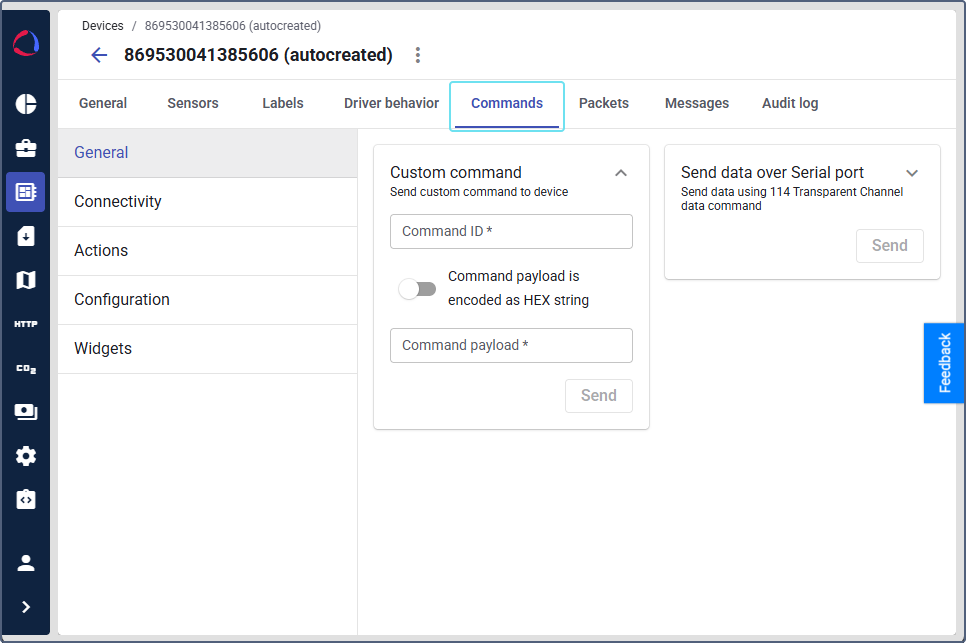
Commands are organized into sections. Depending on the device type, the menu can consist of different sections, for example, General, Actions, Configuration, Connectivity, and Widgets. Related commands (for example, get and send variants of the same command) are grouped together under a single entry.
Labels
The card shows the labels assigned to the device (for example, Truck, Van, or Car). To assign or remove labels, click the edit icon .
If the labels don’t fit in the card, a chip with the number of hidden labels appears. Point to it to see their names. Labels are available only for devices assigned to a customer.
Recent activity
The card shows the three latest audit log entries for the device, newest first. Click an entry to open the separate Log tab with this entry highlighted.
On the Log tab, you can track all changes made to the device properties. The tab provides a complete history of who did what and when, filtered to the opened device.
To see the operations performed on all items in your account and your customers’ accounts, use the audit log in the Access and logs section.
Emissions
The card shows the CO₂ value calculated for the device since the beginning of the current calendar year. If the required vehicle data is missing, the card shows Not calculated and lists the parameters you still need to set, such as fuel type, normative fuel consumption, and consumption unit.
The card is available only if the Emissions module is enabled for the customer.
Driver behavior
The card shows the driver behavior score of the device for the current month and the number of criteria bound to the device. To link the device to driver behavior criteria presets and monitor driving quality, click the edit icon .
Tachograph
The card shows the date of the last successful tachograph download and the number of days left until the next download. If there are no successful downloads, the card shows No files. To request files, go to the Tachograph tab.