Placing anchors and gateways on the floor plan
Who can do it: Service provider, Customer user
Where: Wialon Platform FleetSpace
Anchors are added to the account automatically once they start sending data through the gateway, but their real location in the building remains unknown to the system. To get correct positions, place each anchor on the floor plan at the point where it’s installed.
How the tag position is defined
The platform defines the position of a tag by the anchors that detect its signal and by the strength of this signal. The result depends on the number of such anchors.
| Anchors that detect the tag | Result |
|---|---|
| 1 | The tag gets the position of this anchor. |
| 2 | The tag is placed on the line between the two anchors, closer to the one with the stronger signal. |
| 3 or more | The tag is placed inside the area formed by the lines between the anchors. The exact point depends on the signal strength from each of them. |
That’s why the density of the anchors defines the accuracy: the more anchors detect a tag, the closer its position on the plan is to the real one. If only one anchor detects a tag, the asset is shown exactly at the anchor point, which can be a different zone or even a different room.
As a rule, the anchors are installed along the outline of the area with the assets, in the corners of the rooms, and every 10 to 15 meters. For the final installation guidelines (the number of anchors for each floor, the coverage area, and the gateway placement), follow the documentation of the hardware manufacturer.
Placing anchors on the floor plan
Only the anchors placed on the floor plan take part in the calculation. If none of the anchors that detected the tag are placed on a plan, the asset keeps its previous position, and its status changes to Stale and then to Lost.
- Open the Floor plans view of the building.
- Select the floor where the anchors are installed.
- Go to the Anchors tab on the left panel. The list shows all anchors that send data through the gateway connected to this floor.
The anchors already placed on this floor are shown in the main list. The anchors that haven’t been placed on any floor yet are shown in a separate group.
Placing an automatically added anchor
-
Select the anchor in the list.
-
Click the point on the plan where the anchor is installed.
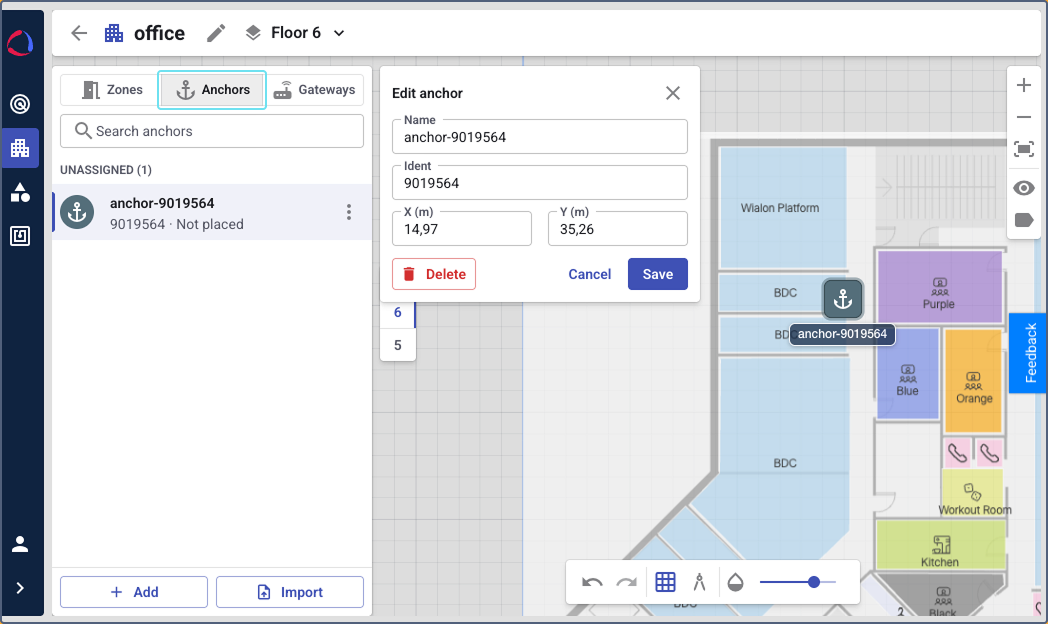
-
(Optional): Drag the marker to adjust the position.
-
Click Save.
Adding an anchor manually
- Click Add at the bottom of the panel.
- Enter the anchor ident and name.
- Click the point on the plan where the anchor is installed.
- (Optional): Drag the marker to adjust the position.
- Click Save.
Repeat these steps for all anchors installed on the floor.
Removing an anchor from the floor
To remove an anchor from the floor without deleting it, hover over its row in the list, click the icon  , and select Unassign. The anchor is moved back to the group of anchors that aren’t placed on any floor.
Placing gateways
Gateways are placed on the floor plan in the same way as anchors:
- In the floor plan editor, select the Gateways tab on the panel on the left.
- Select the gateway in the list or click Add to add a new one.
- Click the point on the plan where the gateway is installed.
- (Optional): Drag the marker to adjust the position.
- Click Save.
For details on adding and connecting gateways, see Connecting a gateway.
Importing anchors and gateways from a file
If you have a list of the installed hardware, you can add all the items at once instead of creating them one by one.
- In the floor plan editor, select the Anchors or Gateways tab on the panel on the left.
- Click Import.
- Select a CSV file. Its size mustn’t exceed 10 MB.
- Select the column that contains the idents of the anchors or gateways.
- Check the preview and click Import N rows, where N is the number of rows in the file.
The other columns in the file are ignored. The rows with empty, invalid, or duplicate idents are skipped automatically.
The import runs in the background. The items appear in the list as they’re created.
The imported anchors and gateways aren’t placed on a floor plan. They appear in the Unassigned group on the panel. Place each of them on the plan afterwards, as described in Placing anchors and Placing gateways.